引言
EventBus是square发布的一个用于事件订阅和发布的框架,其最大的贡献在于将事件的订阅和发布很好地解耦,使代码更优雅,逻辑更清晰。
EventBus的主要特点如下:
- 组件解耦
- 解耦事件订阅和发布者
- 在Activitives,Fragments和后台线程的使用中表现良好
- 避免了复杂且易导致错误的依赖和生命周期问题
- 简化代码
- 足够快
- 轻量(大约50K)
- 已经在100,000,000+个应用上得到了证明
- 具有一些高级特色,如负责传递的线程,订阅优先级,粘性事件等.
1.EventBusAnnotationProcessor:EventBus的正确打开方式
网上有很多介绍EventBus的文章,但是几乎没有提到EventBusAnnotationProcessor的。实际上,从EventBus 3开始引入了注解,它的主要作用在于使用注解而非反射来解析订阅信息,并且这个过程是在编译时而非运行时完成的,因而可使EventBus中的事件订阅节约很多时间。
要使用EventBus 3的这个新特性,需要以下几步:
- 添加依赖
|
|
- 由于注解依赖android-apt-plugin,故需要在项目的gradle的dependencies中引入apt,如下:
|
|
- 在app module的build.gradle中应用apt插件,并设置apt生成的索引的包名和类名,如果不设置的话在编译时会报错。
|
|
- 最后,需要在app module的dependencies中引入EventBusAnnotationProcessor:
|
|
完成以上几步后,重新编译一次,即可在app/build/generated/source/apt/debug/下看到生成的MyEventBusIndex类,如下是我的示例中生成的代码:
|
|
需要注意的是,项目中至少要有一个订阅信息,否则EventBusProcessor获取到的订阅信息为空,自然不生成相应的类了。
重新编译之后,在第一次使用EventBus之前(如Application或SplashActivity中),添加如下代码,以使Index生效:
|
|
至于EventBus中常规事件和sticky事件的发布和订阅,都是非常简单的事情,也不是本文的重点,故不再赘述,就有一点需要注意,EventBus 3中sticky events的订阅是在注解中添加类似@Subscriber(sticky=true,threadMode=ThreadMode.MAIN)的属性.
读者可以fork我在github中的这个示例进行了解: EventBusProcessor使用示例
需要注意的是,如果不利用EventBusAnnotationProcessor,则EventBus 3的解析速度反而会比之前版本更慢。如下是square发布的EventBus3与之前版本在Nexus One,Nexus 5,Nexus 9上的表现对比:
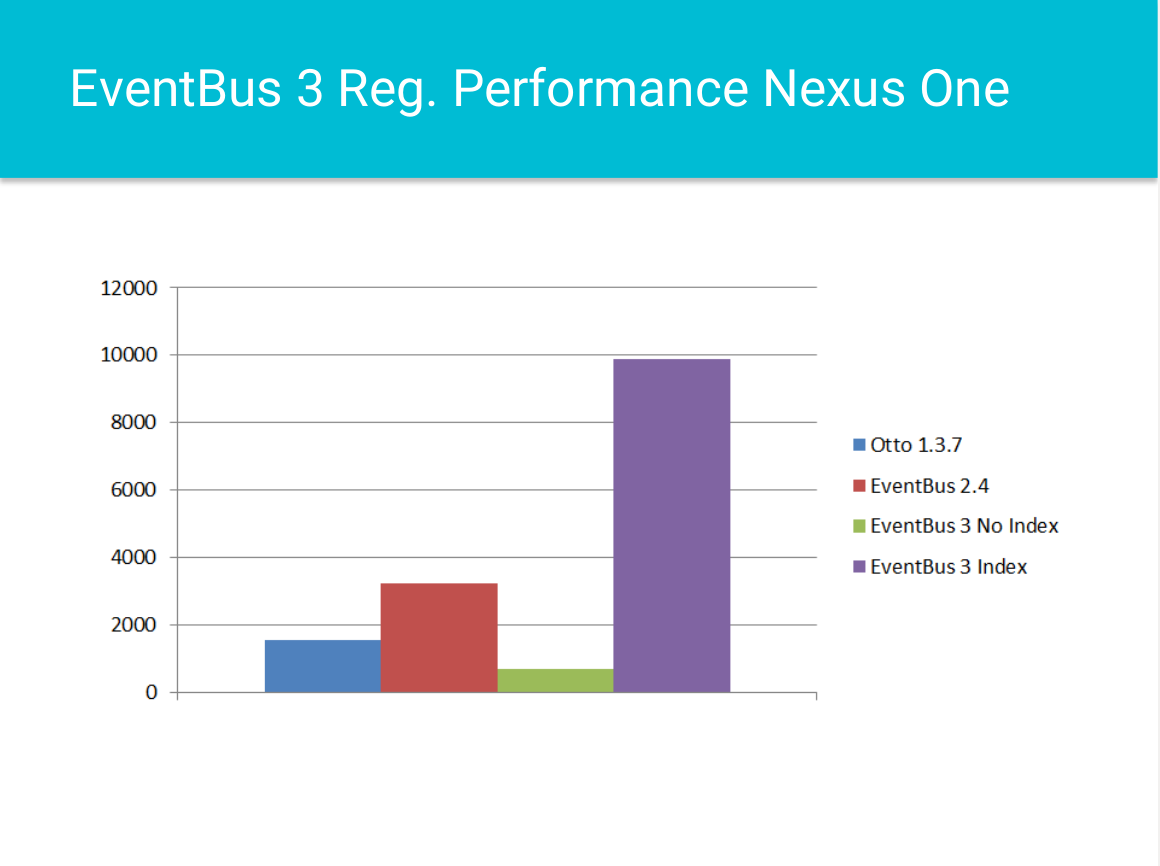
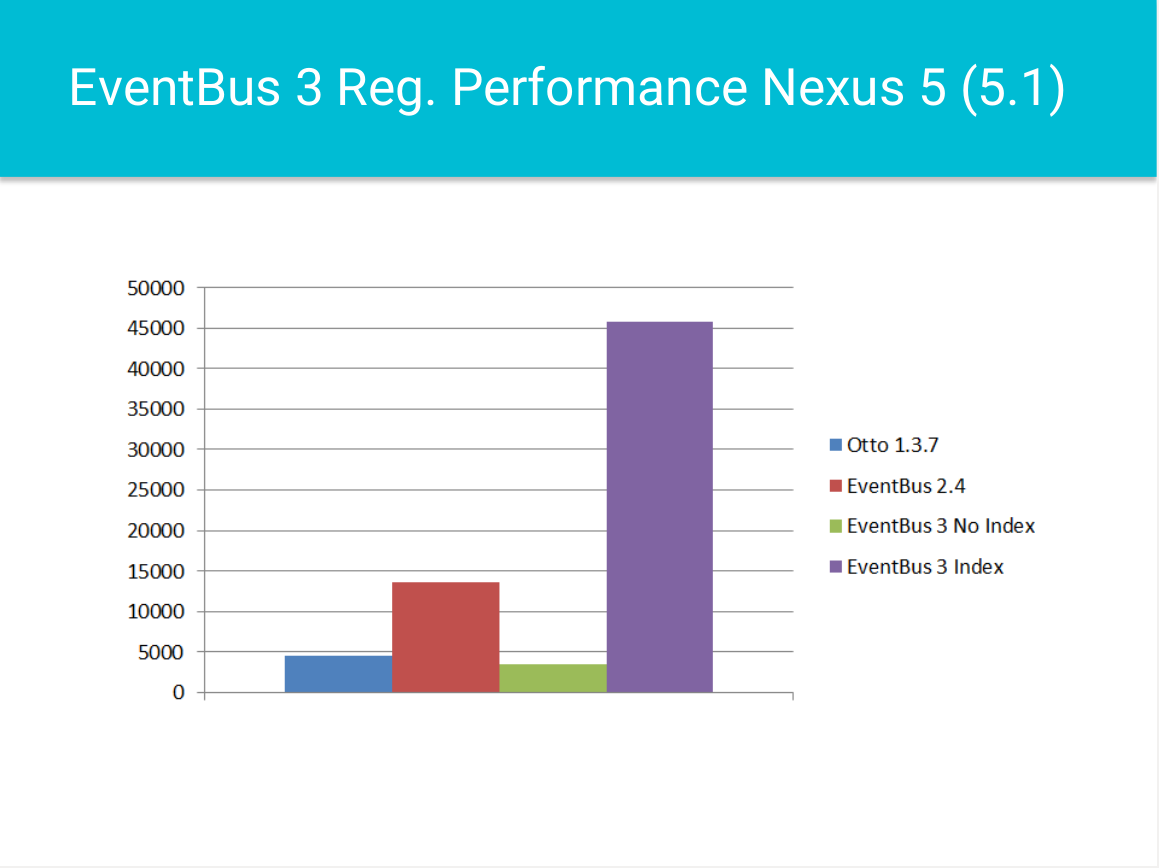
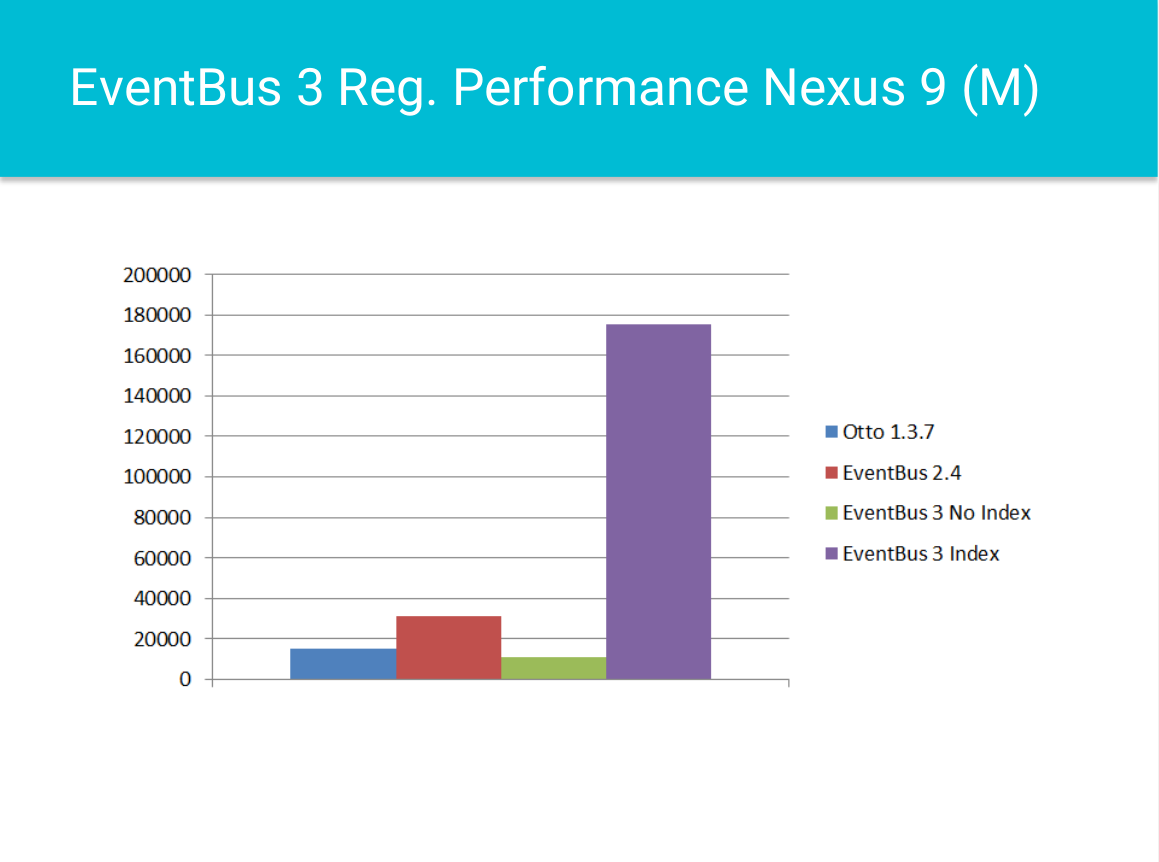
显然,在不同版本的设备上,EventBus 3的速度都要快很多,是EventBus 2.4的3倍以上.
至于MyEventBusIndex是如何使订阅加速的,后面在分析源码时会提到。
2.EventBus 3.0.0架构
EventBus 3.0.0的发布和订阅事件的架构如下:
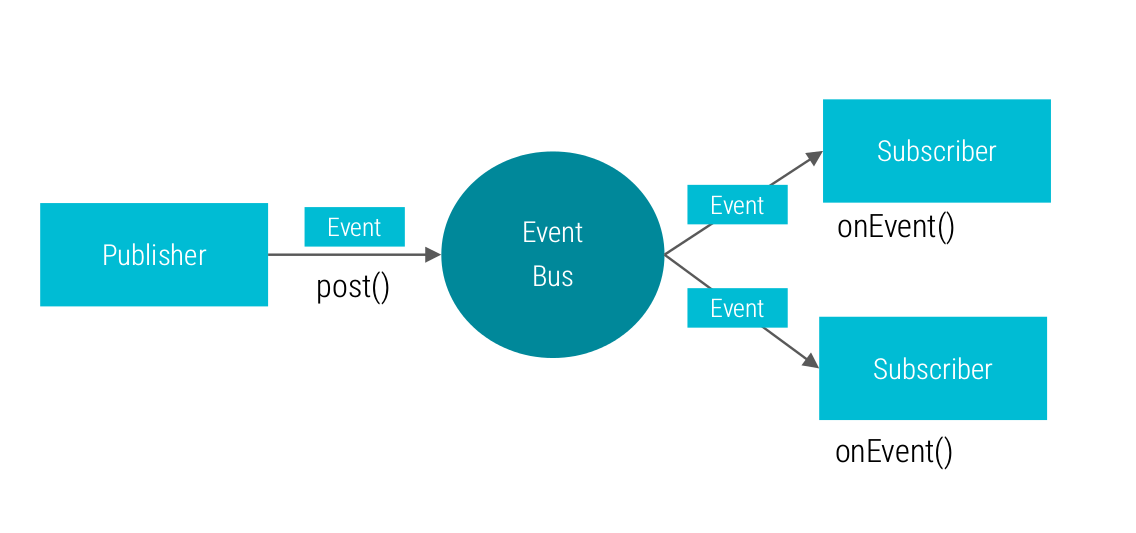
仍然是在某个线程发布后,通过EventBus分发到不同线程中的Subscriber,这一点与之前版本的并无不同。
EventBus 3.0.0的UML图如下:
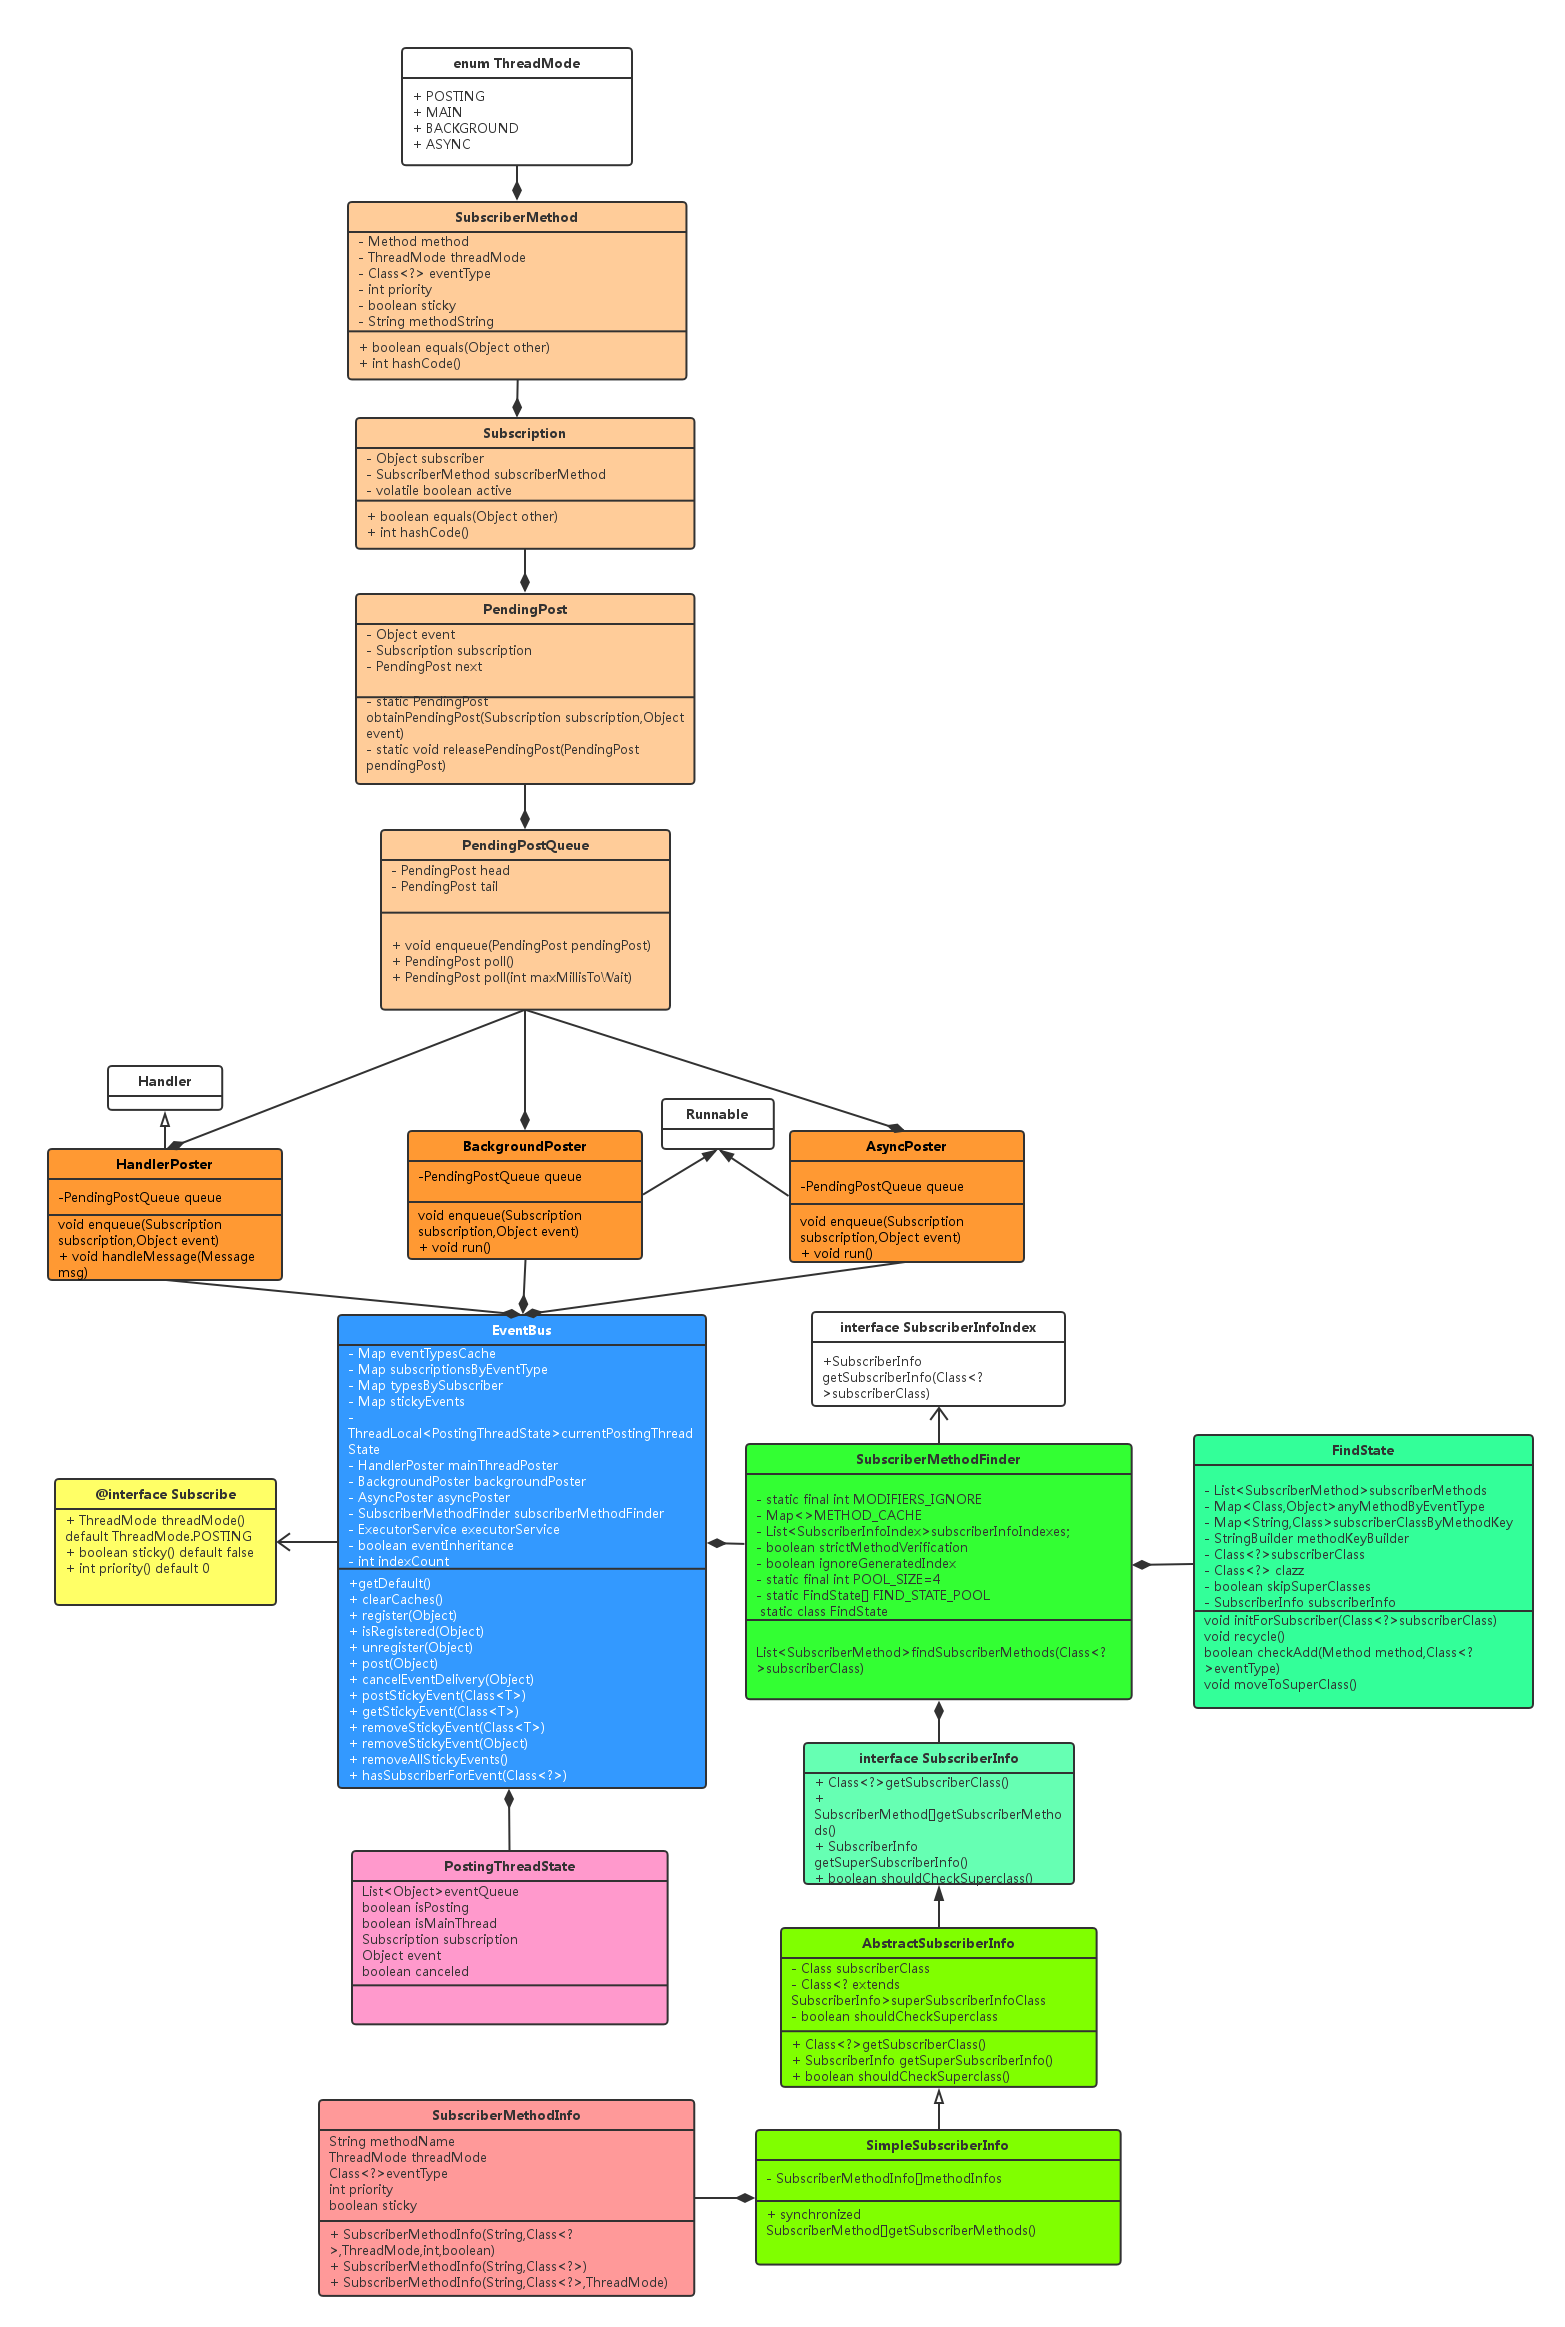
需要重点关注的类有EventBus,SubscriberMethodFinder,FindState,SubscriberInfo,PostingThreadState,HandlerPoster,BackgroundPoster,
AsyncPoster,PendingPost,Subscription,SubscriberMethod,后面的分析也主要与这些类有关.
3.事件订阅/解除订阅
下面的代码讲解将结合 EventBusProcessor使用示例 进行。
事件订阅的代码如下:
|
|
subscriberClass就是订阅者所属的Class,如MainActivity.class,之后利用subscriberMethodFinder查找subscriberClass中的订阅方法,其中findSubscriberMethods()方法如下:
|
|
由于反射成本高,而且EventBus 3引入了EventBusAnnotationProcessor,故默认ignoreGeneratedIndex为false,需要注意的是,如果设置ignoreGeneratedIndex为true,则前面使用的MyEventBusIndex无效,还是会走反射解析的分支。
要证实这一点很简单,进入findUsingReflection()方法看一下即可:
3.1 使用反射获取订阅信息
|
|
调用的是findUsingReflectionInSingleClass(),其代码如下:
|
|
代码逻辑很简单,就是先获取这个类的declared方法,然后选择其中是public和非static,非abstract,非bridge,非synthetic的方法,如果该方法的注解为Subscribe,则说明它是订阅事件的方法,解析注解参数,最后将解析结果到findState.subscriberMethods中.
里面有个小细节就是Class<?>eventType=parameterTypes[0],这意味着即使订阅方法中有多个参数,也只取第一个,如果确认该订阅对象中还未添加该eventtype的方法,则添加到findState.subscriberMethods中,其中checkAdd()方法的代码很简单,不展开分析了。
从这里引出一个细节:在一个订阅对象中,同一个事件类型只能有一个回调。
3.2 使用EventBusAnnotationProcessor解析结果获取订阅信息
回到findSubscriberMethods()这个方法,ignoreGeneratedIndex为false时,通过findUsingInfo()方法来获取订阅信息:
|
|
进入getSubscriberInfo()查看:
|
|
这里由于subscriberInfo为null,故执行的是第二个分支,即在subscriberInfoIndexes中寻找,那这个subscriberInfoIndexes来自哪里呢?
可以看到,它是在constructor中被赋值的,而subscriberMethodFinder就在EventBus的constructor中创建的,这个subscriberInfoIndexes来自builder.subscriberInfoIndexes,而EventBusBuilder中的subscriberInfoIndexes就是来自于第一节中我们提到的如下代码:
|
|
所以,MyEventBusIndex起作用的地方是在SubscriberMethodFinder中,结合MyEventBusIndex的代码可知,EventBusAnnotationProcessor解析出订阅信息,之后以订阅对象的Class为key放入到HashMap中(有的例外的是sticky events,这个在后面会分析),然后在SubscriberMethodFinder的getSubscriberInfo()中,根据findState.clazz来解析已有的结果,如果查找到了则直接返回。
回到findUsingInfo()中,仍然是要检查是否已添加同类型事件的回调,如果没有添加才会添加到findState.subscriberMethods中.
需要注意的是else中findUsingReflectionInSingleClass(findState),我个人认为是冗余代码,除非EventBusAnnotationProcessor解析出错或不完整,某种程度上是对EventBusAnnotationProcessor不自信的表现,期待作者在后面去掉吧。
注意return语句之前的findState.moveToSuperclass()这句,它其实是将findState中的clazz对象换成基类的,也就是说,事件订阅是可以继承的,之后循环之前的过程。
3.3 绑定订阅对象和方法
回到EventBus#register()中,在获取subscriberMethods之后,就是遍历各订阅方法,逐个绑定。subscribe()的代码如下:
|
|
这个方法略长,分为以下几步分析:
- 首先根据subscriber和subscriberMethod生成一个Subscription对象
- 之后从subscriptionsByEventType这个Map中获取对应eventType的所有Subscription对象,如果为空则新建,否则判断是否已经包含newSubscription,如包含则抛出已订阅的异常
- 遍历subscriptions,如果发现subscriberMethod的优先级比某个Subscription对象中的优先级高,则用当前的Subscription对象取代它,之后跳出循环
- typesBySubscriber是以订阅对象为key,事件类型列表为value的Map,将当前的事件类型添加到对应的List中即可
- 最后一部分比较特殊,如果订阅的是粘性事件,则要分两种情况:
- 如果要考虑事件继承(EventBusBuilder中默认为true),则需要遍历stickyEvents这个以事件的Class为key,事件本身为value的Map,如果发现某个事件类型是eventType的子类(就是eventType.isAssignableFrom(candidateEventType)的含义),则要发布这个事件类型对应的事件(也就是该事件类型最近一次事件)给这个订阅方法。至于事件发布的代码,在第4节会分析。
- 如果不考虑事件继承,则只需要将eventType最近一次的事件(如果有的话)发送给这个订阅方法即可
3.4 解除订阅
解除订阅的代码如下:
|
|
代码很简单,就是解除与该订阅对象关联的所有事件类型.unsubscribeByEventType()的代码如下:
|
|
该方法就是根据事件类型获取所有的订阅信息,如果该订阅信息的订阅对象为当前订阅对象,则将其移除.
解除订阅的逻辑很简单,就不画流程图了.
3.5 事件订阅总结
至此,事件订阅就基本分析完了,我们可以从中梳理出如下流程:
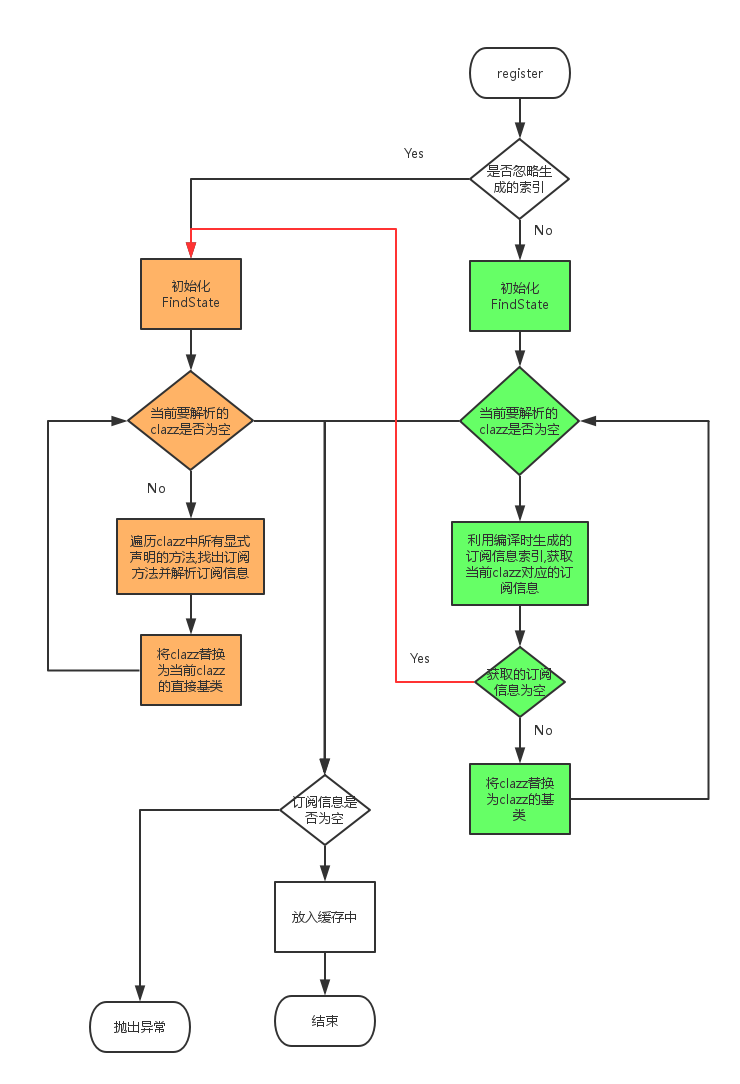
其中红线标出的是我认为不合理的地方。
4.事件发布
4.1 发布普通事件
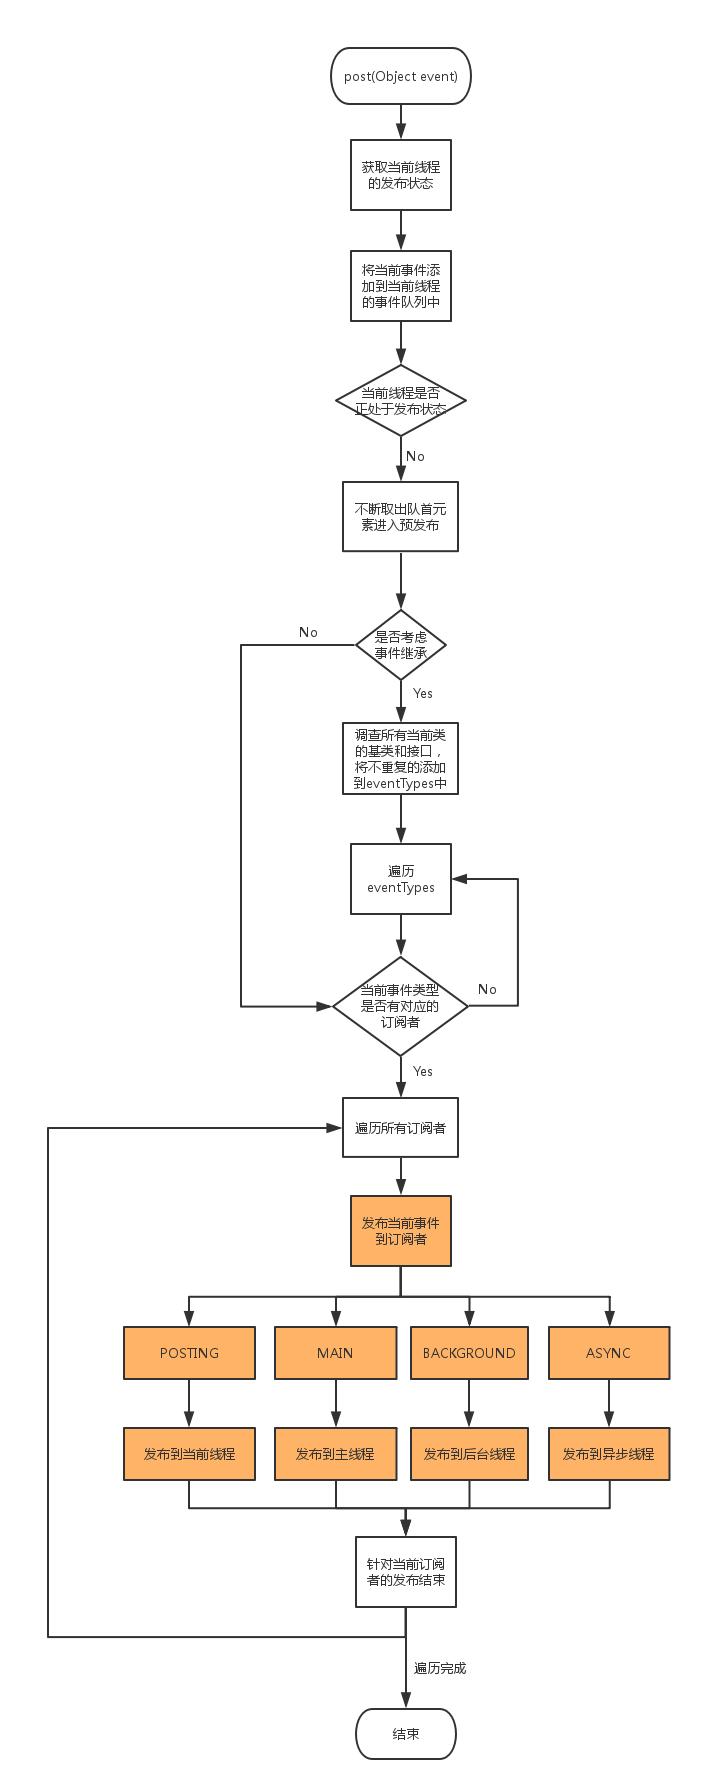
post()的代码如下:
|
|
- 首先获取当前线程的PostingThreadState对象,实现方式是ThreadLocal
- 然后将当前event添加到postingState的事件队列中
- 如果当前线程没有正在发布事件,则遍历当前线程的事件队列,将事件逐个发布出去,其中postSingleEvent()的代码如下
|
|
这里涉及到事件继承的问题(默认情况下eventInheritance为true,即要考虑事件继承),如果考虑事件继承,则要获取这个事件类型的所有基类和实现的接口,并且还要将基类的基类,以及接口的基类也包含进去。如下是lookupAllEventTypes()的代码:
|
|
代码很简单,就是循环获取基类以及基类的接口,并且将符合条件的事件类型添加到eventTypes中,最后将(eventClass,eventTypes)放入eventTypesCache中。
再回到postSingEvent()中,下面就是遍历eventTypes了,进入postSingleEventForEventType()中,代码如下:
|
|
如果eventClass对应的订阅信息不为空,则将当前事件逐个发布到各订阅对象中,真正的发布处理在postToSubscription()中,代码如下:
|
|
显然,需要分线程模式为POSTING,MAIN,BACKGROUND,ASYNC这四种情况处理。
- 如果是POSTING模式,则直接回调事件订阅方法,说明POSTING模式代表发布和订阅回是在同一个线程;
- 如果要在主线程回调,而发布线程就是主线程的话,则直接回调;否则需要利用主线程发布代理(mainThreadPoster)来进行发布;
- 如果要在后台线程中回调,而发布线程是主线程的话,则需要利用后台线程发布代理(backgroundPoster)来进行发布,否则直接发布;
- 如果是异步发布,则不管当前是在什么线程,都是利用异步发布代理(asyncPoster)来进行发布
- 如果threadMode不是其中之一的话,则抛出异常.
到这里为止,普通事件的发布就基本梳理完了。
4.2 发布sticky event
粘性事件的发布代码如下:
|
|
非常简单,相比普通事件的发布,就只是多了一步:将当前事件put到当前事件类型对应的实体中。这样做的目的是为了在绑定粘性事件回调时可以将最近一次该事件类型的事件发布给它。
至此,我们可以梳理出发布事件的流程: