Java集合总结

引言

Java中的集合在日常开发中使用非常广泛,因为它提供了一些通用的接口来管理对象。为此,整个集合框架围绕一组标准接口而设计,你可以直接使用这些接口的标准实现,诸如: LinkedList, HashSet, 和 TreeSet等,除此之外你也可以通过这些接口实现自己的集合。目前,所有的集合框架都包含以下内容:

  • 接口:是代表集合的抽象数据类型,接口允许集合独立操纵其代表的细节,在面向对象的语言,接口通常形成一个层次;
  • 实现类:是集合接口的具体实现,从本质上讲,它们是可重复使用的数据结构;
  • 算法:是实现集合接口的对象里的方法执行的一些有用的计算,例如:搜索和排序。这些算法被称为多态,那是因为相同的方法可以在相似的接口上有着不同的实现

1.集合架构

Java中的集合架构如下:

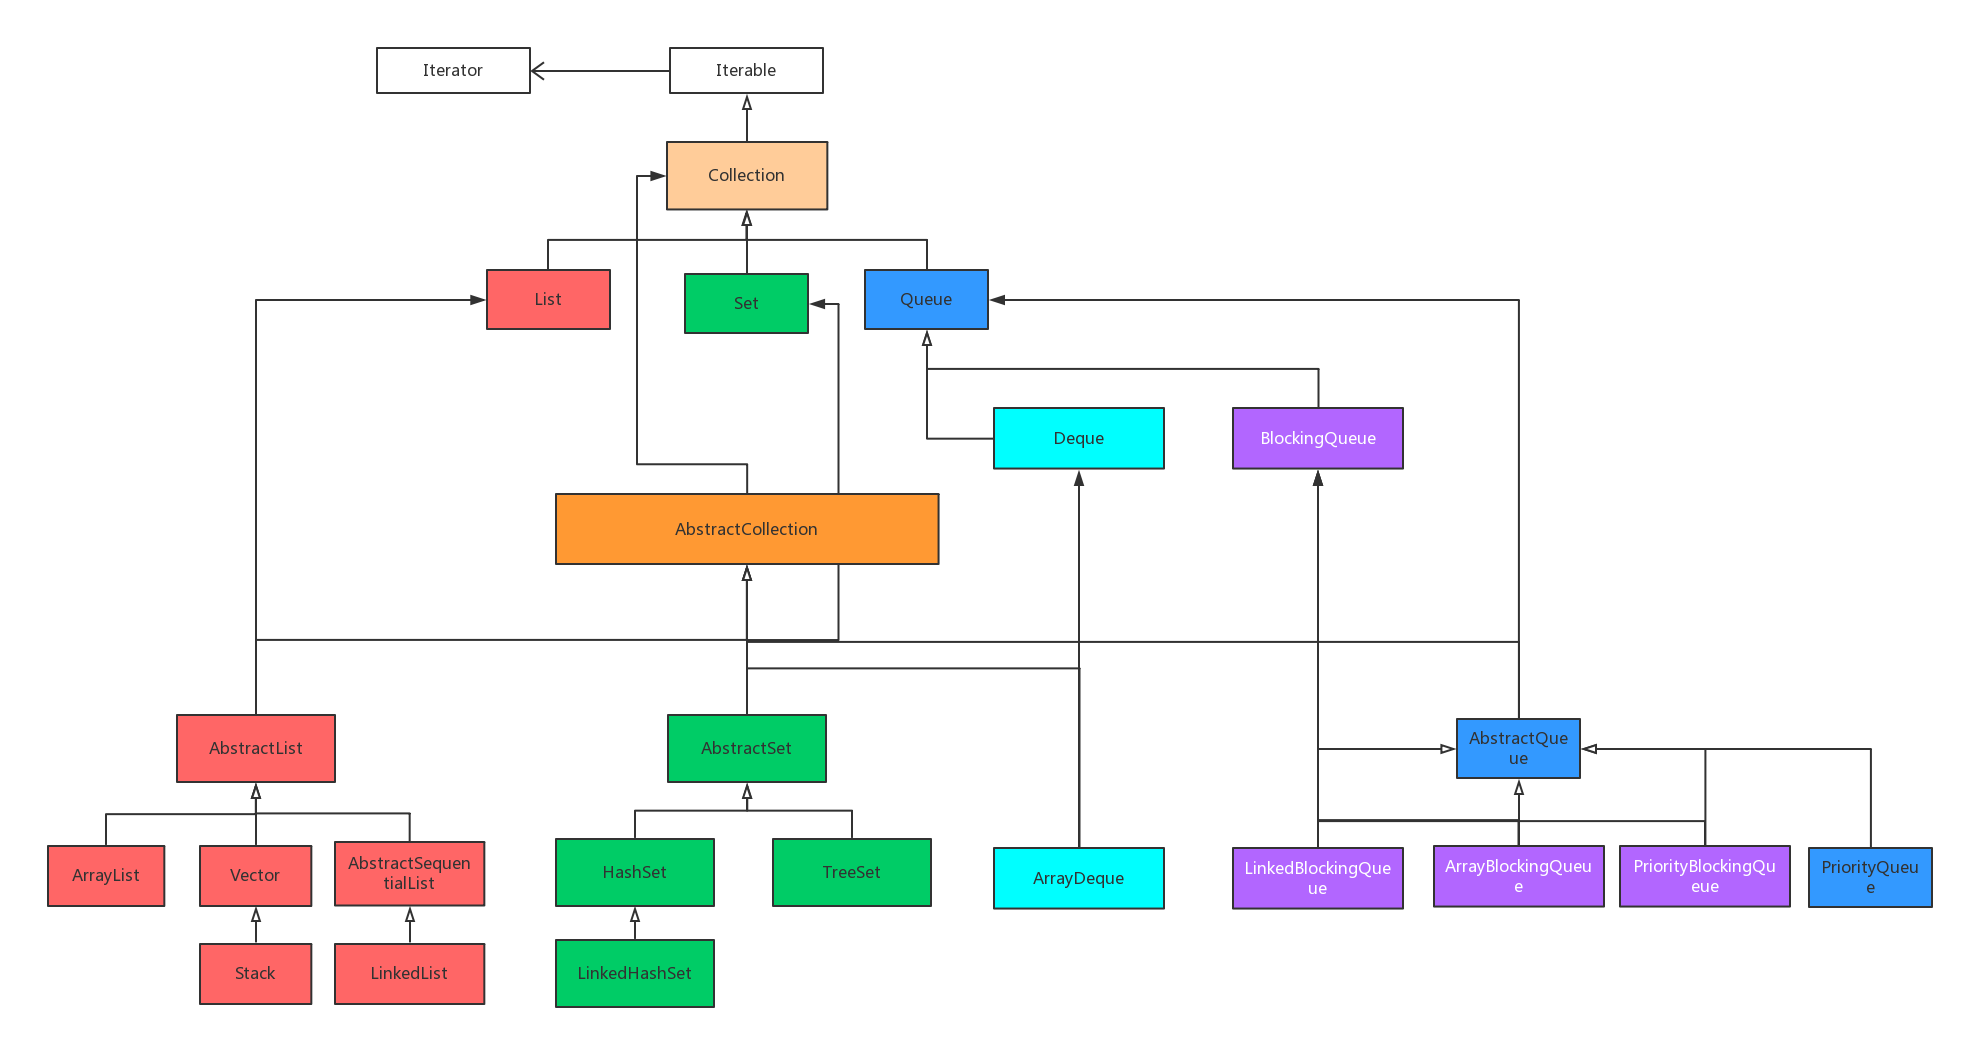
上面那个是预览图,下面是带有接口中方法的详细架构图:

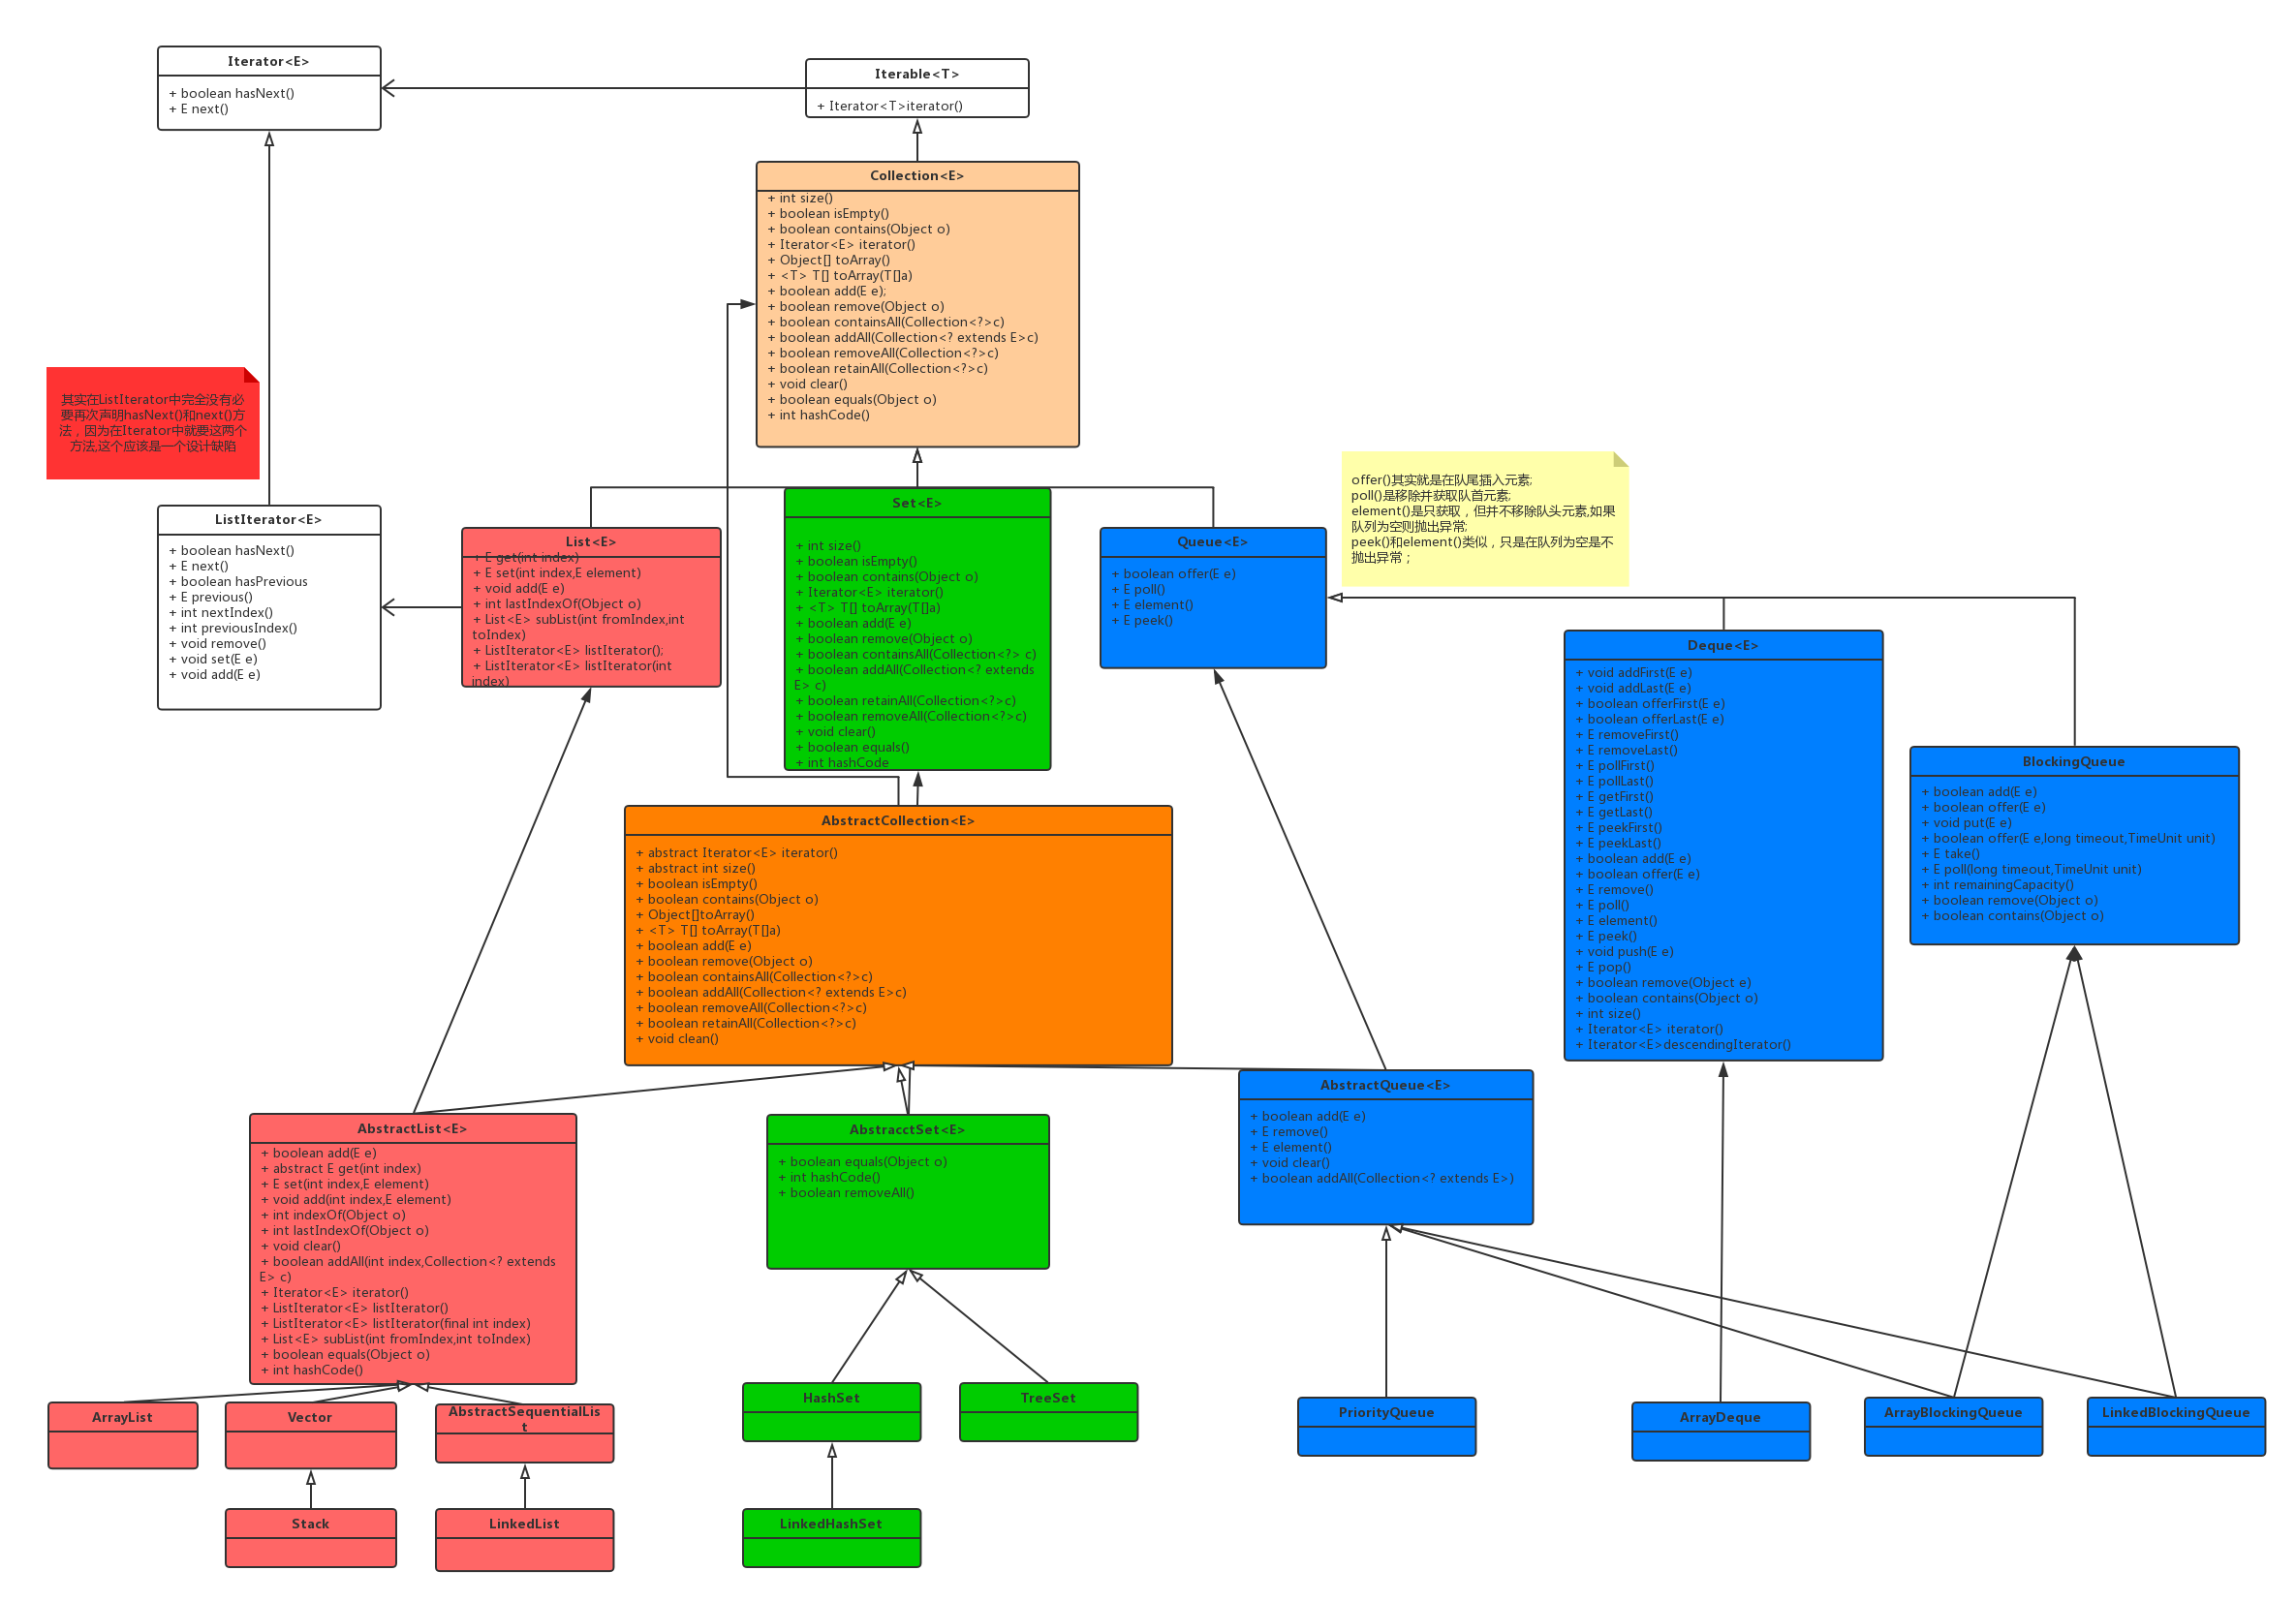
需要注意的是,这里只是列出了常用的实现类,不过已经可以看到Java集合类的5层架构了。

  • 第一层是Collection,定义了所有集合类需要实现的方法:size(),isEmpty(),contains(Object),iterator(),toArray(),add(E),remove(Object),containsAll(Collection<?>),removeAll(Collection<?>),retainAll(Collection<?>),clear(),equals(),hashCode();
  • 第二层是3类顶层接口:List,Set,Queue.分别代表不同行为的3类集合;
  • 第三层是实现了Collection部分功能的抽象类:AbstractCollection,这个类非常重要,因为它的存在,使下一层的3个抽象类减少了很多冗余代码;
  • 第四层是3个抽象类,分别是AbstractList,AbstractSet,AbstractQueue;
  • 第五层是三大类具体的集合实现类,它们都继承各自集合中的抽象类;

2.深入了解ArrayList

2.1 ArrayList架构

在Android开发中,经常使用ArrayList,所以有必要对它的实现进行深入了解。
ArrayList的架构如下图:

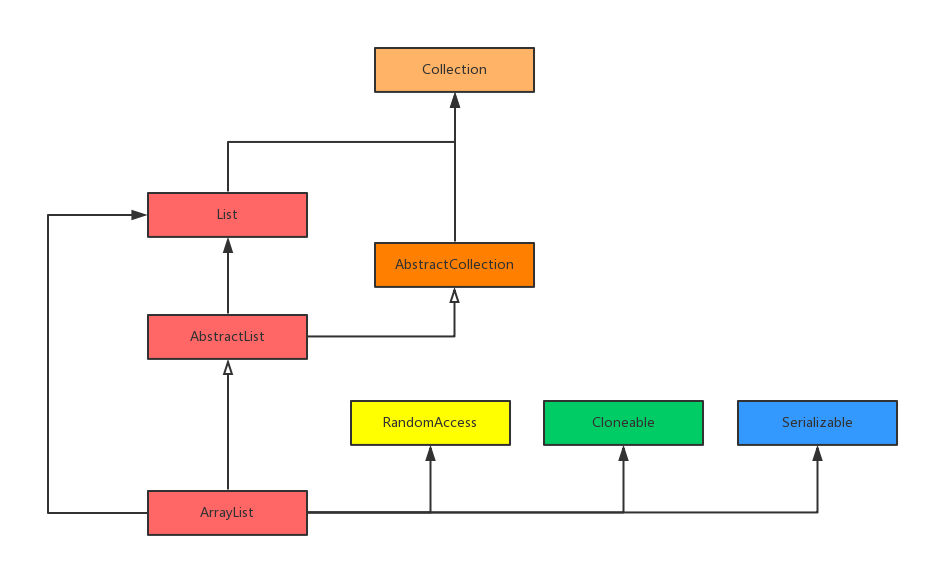
可以看到,ArrayList继承于AbstractList,但是由于AbstractList是一个抽象类,并没有实现List接口中的所有方法,所以ArrayList还需要自己区实现那些在AbstractList中未实现的方法。

另外,ArrayList还实现了RandomAccess,Cloneable,Serializable这3个接口,它们的定义如下:

1
2
3
4
5
6
7
8
9
10
11
public interface RandomAccess{
}
public interface Cloneable{
}
public interface Serializable{
}
  • ArrayList实现了RandomAccess接口,即提供了随机访问功能。在ArrayList中,我们可以通过元素的序号快速获取元素对象,这就是快速随机访问;
  • ArrayList实现了Cloneable接口,即覆盖了函数clone(),可以调用该方法进行克隆;该方法如下:
1
2
3
4
5
6
7
8
9
10
11
public Object clone() {
try {
ArrayList<?> v = (ArrayList<?>) super.clone();
v.elementData = Arrays.copyOf(elementData, size);
v.modCount = 0;
return v;
} catch (CloneNotSupportedException e) {
// this shouldn't happen, since we are Cloneable
throw new InternalError(e);
}
}

显然,克隆操作就是复制elementData数据;

  • ArrayList实现了Serializable接口,这意味着ArrayList支持序列化,能通过序列化传输;

2.2 ArrayList实现

ArrayList中的属性成员如下:

1
2
3
4
5
6
7
8
9
10
11
private static final long serialVersionUID = 8683452581122892189L;
private static final int DEFAULT_CAPACITY=10;
private static final Object[]EMPTY_ELEMENTDATA={};
private static final Object[]DEFAULTCAPACITY_EMPTY_ELEMENTDATA={};
transient Object[]elementData;
private int size;
  • DEFAULt_CAPACItY用于默认情况下初始化的数组大小
  • EMPTY_ELEMENTDATA表示类共享的空数组,在开发者指定初始大小为0时(即调用ArrayList(int)这个构造方法时),初始elementData即为EMPTY_ELEMENTDATA;
  • DEFAULTCAPACITY_EMPTY_ELEMENTDATA表示默认大小的空实现,在调用ArrayList()这个构造方法时,初始elementData即为DEFAULTCAPACITY_EMPTY_ELEMENTDATA,之所以提供两个空实现,是为了区分初始时开发者是否指定了容量;
  • elementData是真正保存对象的数组;注意它的修饰符transient,表示在序列化的时候,不会将elementData直接序列化,在后面会详述;
  • size表示ArrayList中实际的对象数量

ArrayList的构造方法如下:

1
2
3
4
5
6
7
8
9
10
11
12
13
14
15
16
17
18
19
20
21
22
23
24
25
26
27
28
29
30
31
32
33
34
35
36
37
38
39
40
41
42
43
44
/**
* Constructs an empty list with the specified initial capacity.
*
* @param initialCapacity the initial capacity of the list
* @throws IllegalArgumentException if the specified initial capacity
* is negative
*/
public ArrayList(int initialCapacity) {
if (initialCapacity > 0) {
this.elementData = new Object[initialCapacity];
} else if (initialCapacity == 0) {
this.elementData = EMPTY_ELEMENTDATA;
} else {
throw new IllegalArgumentException("Illegal Capacity: "+
initialCapacity);
}
}
/**
* Constructs an empty list with an initial capacity of ten.
*/
public ArrayList() {
this.elementData = DEFAULTCAPACITY_EMPTY_ELEMENTDATA;
}
/**
* Constructs a list containing the elements of the specified
* collection, in the order they are returned by the collection's
* iterator.
*
* @param c the collection whose elements are to be placed into this list
* @throws NullPointerException if the specified collection is null
*/
public ArrayList(Collection<? extends E> c) {
elementData = c.toArray();
if ((size = elementData.length) != 0) {
// c.toArray might (incorrectly) not return Object[] (see 6260652)
if (elementData.getClass() != Object[].class)
elementData = Arrays.copyOf(elementData, size, Object[].class);
} else {
// replace with empty array.
this.elementData = EMPTY_ELEMENTDATA;
}
}

前面两个方法在讲解EMPTY_ELEMENTDATA和DEFAULTCAPACITY_EMPTY_ELEMENTDATA时就讲了,这里不再赘述;
注意看第三个构造方法,如果集合c不为空,则直接对数组进行复制,否则elementData为EMPTY_ELEMENTDATA;

下面分析一下ArrayList中对于List接口的实现:

1)添加

首先是add(E)这个方法:

1
2
3
4
5
public boolean add(E e) {
ensureCapacityInternal(size + 1); // Increments modCount!!
elementData[size++] = e;
return true;
}

ensureCapacityInternal(int)方法如下:

1
2
3
4
5
6
7
private void ensureCapacityInternal(int minCapacity) {
if (elementData == DEFAULTCAPACITY_EMPTY_ELEMENTDATA) {
minCapacity = Math.max(DEFAULT_CAPACITY, minCapacity);
}
ensureExplicitCapacity(minCapacity);
}

显然,minCapacity是最小容量保证,其中DEFAULT_CAPACITY为10,所以minCapacity等于DEFAULT_CAPACITY和minCapacity中的较大者;

其中ensureExplicitCapacity(int)方法如下:

1
2
3
4
5
6
7
private void ensureExplicitCapacity(int minCapacity) {
modCount++;
// overflow-conscious code
if (minCapacity - elementData.length > 0)
grow(minCapacity);
}

即如果minCapacity比当前的elementData要大,就需要进行增长:

1
2
3
4
5
6
7
8
9
10
11
12
13
14
15
16
17
/**
* Increases the capacity to ensure that it can hold at least the
* number of elements specified by the minimum capacity argument.
*
* @param minCapacity the desired minimum capacity
*/
private void grow(int minCapacity) {
// overflow-conscious code
int oldCapacity = elementData.length;
int newCapacity = oldCapacity + (oldCapacity >> 1);
if (newCapacity - minCapacity < 0)
newCapacity = minCapacity;
if (newCapacity - MAX_ARRAY_SIZE > 0)
newCapacity = hugeCapacity(minCapacity);
// minCapacity is usually close to size, so this is a win:
elementData = Arrays.copyOf(elementData, newCapacity);
}

显然,oldCapacity为当前数组长度,newCapacity为oldCapacity的1.5倍,之后有两种特殊情况需要处理:

  • 如果newCapacity比minCapacity(最小容量保证)还要小,则使newCapacity等于minCapacity;
  • 如果newCapacity比MAX_ARRAY_SIZE还大(MAX_ARRAY_SIZE=Integer.MAX_VALUE-8),则调用hugeCapacity来获取,该方法如下:
1
2
3
4
5
6
7
private static int hugeCapacity(int minCapacity) {
if (minCapacity < 0) // overflow
throw new OutOfMemoryError();
return (minCapacity > MAX_ARRAY_SIZE) ?
Integer.MAX_VALUE :
MAX_ARRAY_SIZE;
}

显然,如果minCapacity小于0,则抛出OutOfMemoryError,否则如果minCapacity大于MAX_ARRAY_SIZE,则minCapacity为Integer.MAX_VALUE,否则为MAX_ARRAY_SIZE;

当然,这两种都是比较特殊的情况,实际中经常碰到的是在原来的基础上增长50%的长度.

到这里,add(E)方法就很明显了:每次将元素添加到elementData中实际数据的末尾之前,为保证容量充足,都需要进行扩容检查,如果发现elementData已满,就会增长50%的容量,这一点跟C++中的vector采用动态增长类似;

下面是add(int,E)方法:

1
2
3
4
5
6
7
8
9
10
11
12
13
14
15
16
17
18
/**
* Inserts the specified element at the specified position in this
* list. Shifts the element currently at that position (if any) and
* any subsequent elements to the right (adds one to their indices).
*
* @param index index at which the specified element is to be inserted
* @param element element to be inserted
* @throws IndexOutOfBoundsException {@inheritDoc}
*/
public void add(int index, E element) {
rangeCheckForAdd(index);
ensureCapacityInternal(size + 1); // Increments modCount!!
System.arraycopy(elementData, index, elementData, index + 1,
size - index);
elementData[index] = element;
size++;
}

首先看rangeCheckForAdd(index)方法:

1
2
3
4
5
6
7
/**
* A version of rangeCheck used by add and addAll.
*/
private void rangeCheckForAdd(int index) {
if (index > size || index < 0)
throw new IndexOutOfBoundsException(outOfBoundsMsg(index));
}

显然,就是检查下标是否越界。

而ensureCapacityInternal(size+1);在前面分析过,就是为了做最小容量检查的。

Sytem.arraycopy(elementData,index,elementData,index+1,size-index);**就是将elementData中index之后的元素都后移一位,之后调用elementData[index]=element;将element赋给index处的元素;可见ArrayList这种方式是不适合插入的,为了在指定位置插入一个元素,需要将index之后的所有元素后移一位,但是如果是LinkedList,插入的代价就非常小;

下面看一下addAll(Collection<? extends E>)方法:

1
2
3
4
5
6
7
8
9
10
11
12
13
14
15
16
17
18
19
20
21
/**
* Appends all of the elements in the specified collection to the end of
* this list, in the order that they are returned by the
* specified collection's Iterator. The behavior of this operation is
* undefined if the specified collection is modified while the operation
* is in progress. (This implies that the behavior of this call is
* undefined if the specified collection is this list, and this
* list is nonempty.)
*
* @param c collection containing elements to be added to this list
* @return <tt>true</tt> if this list changed as a result of the call
* @throws NullPointerException if the specified collection is null
*/
public boolean addAll(Collection<? extends E> c) {
Object[] a = c.toArray();
int numNew = a.length;
ensureCapacityInternal(size + numNew); // Increments modCount
System.arraycopy(a, 0, elementData, size, numNew);
size += numNew;
return numNew != 0;
}

理解了前面的分析的话,这里就非常简单了:

  • 先将集合c转化为数组
  • 然后调用ensureCapacityInternal(size+numNew);检查elementData的容量是否足够装下size+numNew个元素,如果不够,则会重新分配的1.5倍空间给elementData;
  • 之后就是元素复制,以及实际元素个数size的增长

从这里可以发现,调用addAll()批量添加比多次调用add()单个添加的效率要更高,所以能用addAll()的地方就不要使用多次add();
类似的,批量移除比多次单个移除的效率更高,所以能使用removeAll()的地方就不要使用多次remove();

还有一个方法addAll(int,Collection<? extends E>)的实现就是前面两种的结合,不再赘述;

2)移除

首先看一下remove(in)方法:

1
2
3
4
5
6
7
8
9
10
11
12
13
14
15
16
17
18
19
20
21
22
23
/**
* Removes the element at the specified position in this list.
* Shifts any subsequent elements to the left (subtracts one from their
* indices).
*
* @param index the index of the element to be removed
* @return the element that was removed from the list
* @throws IndexOutOfBoundsException {@inheritDoc}
*/
public E remove(int index) {
rangeCheck(index);
modCount++;
E oldValue = elementData(index);
int numMoved = size - index - 1;
if (numMoved > 0)
System.arraycopy(elementData, index+1, elementData, index,
numMoved);
elementData[--size] = null; // clear to let GC do its work
return oldValue;
}
  • rangeCheck(index)是检查下标是否越界
  • modCount这个成员主要是用于在使用迭代器遍历的时候,用来检查列表中的元素是否发生结构性变化(列表元素数量发生改变)了,主要在多线程环境下需要使用,防止一个线程正在迭代遍历,另一个线程修改了这个列表的结构,此时会抛出ConcurrentModificationException.
  • 为了移除该元素,需要将index之后的所有元素向前移动一位,同时之前的最后一位元素是多余的,故使elementData[–size]=null;

下面看一下remove(Object)这个方法:

1
2
3
4
5
6
7
8
9
10
11
12
13
14
15
16
17
18
19
20
21
22
23
24
25
26
27
28
29
/**
* Removes the first occurrence of the specified element from this list,
* if it is present. If the list does not contain the element, it is
* unchanged. More formally, removes the element with the lowest index
* <tt>i</tt> such that
* <tt>(o==null&nbsp;?&nbsp;get(i)==null&nbsp;:&nbsp;o.equals(get(i)))</tt>
* (if such an element exists). Returns <tt>true</tt> if this list
* contained the specified element (or equivalently, if this list
* changed as a result of the call).
*
* @param o element to be removed from this list, if present
* @return <tt>true</tt> if this list contained the specified element
*/
public boolean remove(Object o) {
if (o == null) {
for (int index = 0; index < size; index++)
if (elementData[index] == null) {
fastRemove(index);
return true;
}
} else {
for (int index = 0; index < size; index++)
if (o.equals(elementData[index])) {
fastRemove(index);
return true;
}
}
return false;
}

显然,不管o是否为空,都调用了fastRemove(index)这个方法:

1
2
3
4
5
6
7
8
9
10
11
12
/*
* Private remove method that skips bounds checking and does not
* return the value removed.
*/
private void fastRemove(int index) {
modCount++;
int numMoved = size - index - 1;
if (numMoved > 0)
System.arraycopy(elementData, index+1, elementData, index,
numMoved);
elementData[--size] = null; // clear to let GC do its work
}

这个其实除了没有调用rangeCheck(index)之外,其他都跟remove(int)的代码完全一样,所以这里其实完全可以直接调用remove(int)的,没必要再写一个fastRemove()方法,这也算是ArrayList中的一个败笔吧!

下面看一下removeAll(Collection<?>)方法:

1
2
3
4
public boolean removeAll(Collection<?> c) {
Objects.requireNonNull(c);
return batchRemove(c, false);
}

这个方法表示移除ArrayList中所有在c中能找到的元素,其中Objects.requireNonNull(c);的作用是判空;
batchRemove(c,false);表示批量移除:

1
2
3
4
5
6
7
8
9
10
11
12
13
14
15
16
17
18
19
20
21
22
23
24
25
26
27
28
private boolean batchRemove(Collection<?> c, boolean complement) {
final Object[] elementData = this.elementData;
int r = 0, w = 0;
boolean modified = false;
try {
for (; r < size; r++)
if (c.contains(elementData[r]) == complement)
elementData[w++] = elementData[r];
} finally {
// Preserve behavioral compatibility with AbstractCollection,
// even if c.contains() throws.
if (r != size) {
System.arraycopy(elementData, r,
elementData, w,
size - r);
w += size - r;
}
if (w != size) {
// clear to let GC do its work
for (int i = w; i < size; i++)
elementData[i] = null;
modCount += size - w;
size = w;
modified = true;
}
}
return modified;
}

这个方法稍微有点复杂,需要结合实例来理解.
假设elementData的数据为{1,2,3,4,5,6,7},集合c为{3,5,100},下面我们逐步分析:

step1:w=0,r=0,由于c不包含{1},故c.contains(elementData[r])== false,注意此时complement就是false;从而进行复制,即element[0]=elementData[0];
step2:w=1,r=1,类似的,element[1]=element[1];
step3:w=2,r=2,但是此时c包含3这个元素,所以此时不复制;
step4:w=2,r=3,由于c不包含4,故element[2]=element[3],即element[2]=4;
step5:w=3,r=4,由于c包含5这个元素,故不进行复制;
step6:w=3,r=5,由于c不包含6这个元素,故进行复制,即element[3]=element[5],即element[3]=6;此时elementData为{1,2,4,6,5,6,7};
step7:w=4,r=6,类似的,需要复制,从而element[4]=element[6],即element[4]=7,此时elementData为{1,2,4,6,7,6,7};

遍历结束,注意到此时elementData中不需要移除的元素已经排列在左边了,finally块中的代码就是释放从w(此时w=5)处开始的元素,即elementData[5]和elementData[6];

2.3 并发

ArrayList并不是线程安全的,如果需要在多线程情形下使用,可以考虑Vector和CopyOnWriteArrayList;

3.Map架构

需要注意的是,Map并不属于集合的范畴,但是它与集合的关系非常紧密,所以就放在这里一起讨论。
下面是Map的架构:

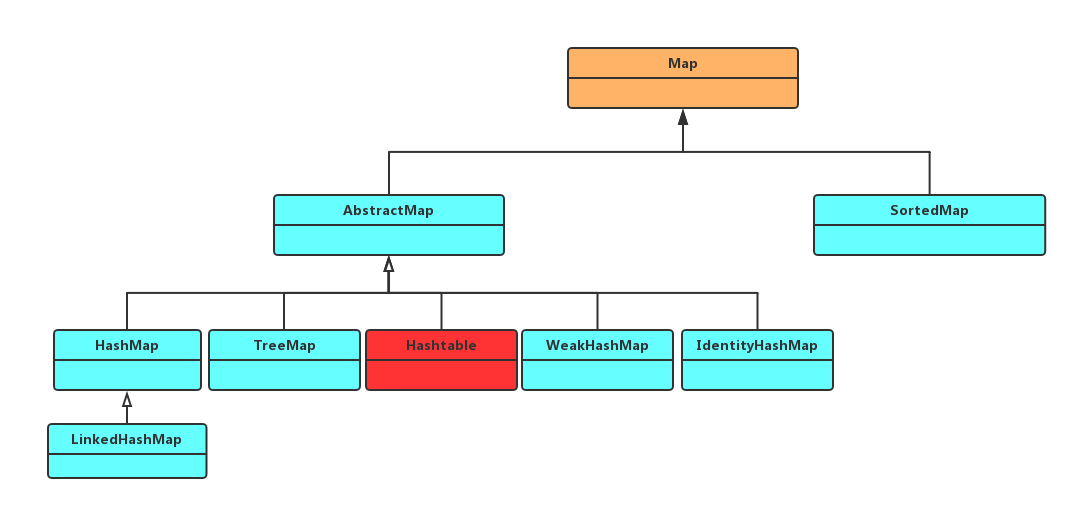
其中Hashtable是我认为无论是从命名规范还是实现上都十分差劲的一个类,真不知道当时的团队是怎么做code review的,”这一定是临时工干的”!