Android插件化(二):OpenAtlas插件安装过程分析

在前一篇博客Android插件化(一):OpenAtlas架构以及实现原理概要中,我们对应Android插件化存在的问题,实现原理,以及目前的实现方案进行了简单的叙述。从这篇开始,我们要深入到OpenAtlas的源码中进行插件安装过程的分析。

插件的安装分为3种:宿主启动时立即安装,宿主启动时延时安装,使用时安装,其中使用时安装采用的是一种类似懒加载的机制。

这3种方式只是前面的处理有所不同,最后安装逻辑都是一样的。限于篇幅,本文只分析宿主启动时安装,使用时安装在下一篇分析。

由于宿主启动时安装和宿主启动时延时安装的逻辑大体相同,所以放在一起讲解,它们的流程如下:
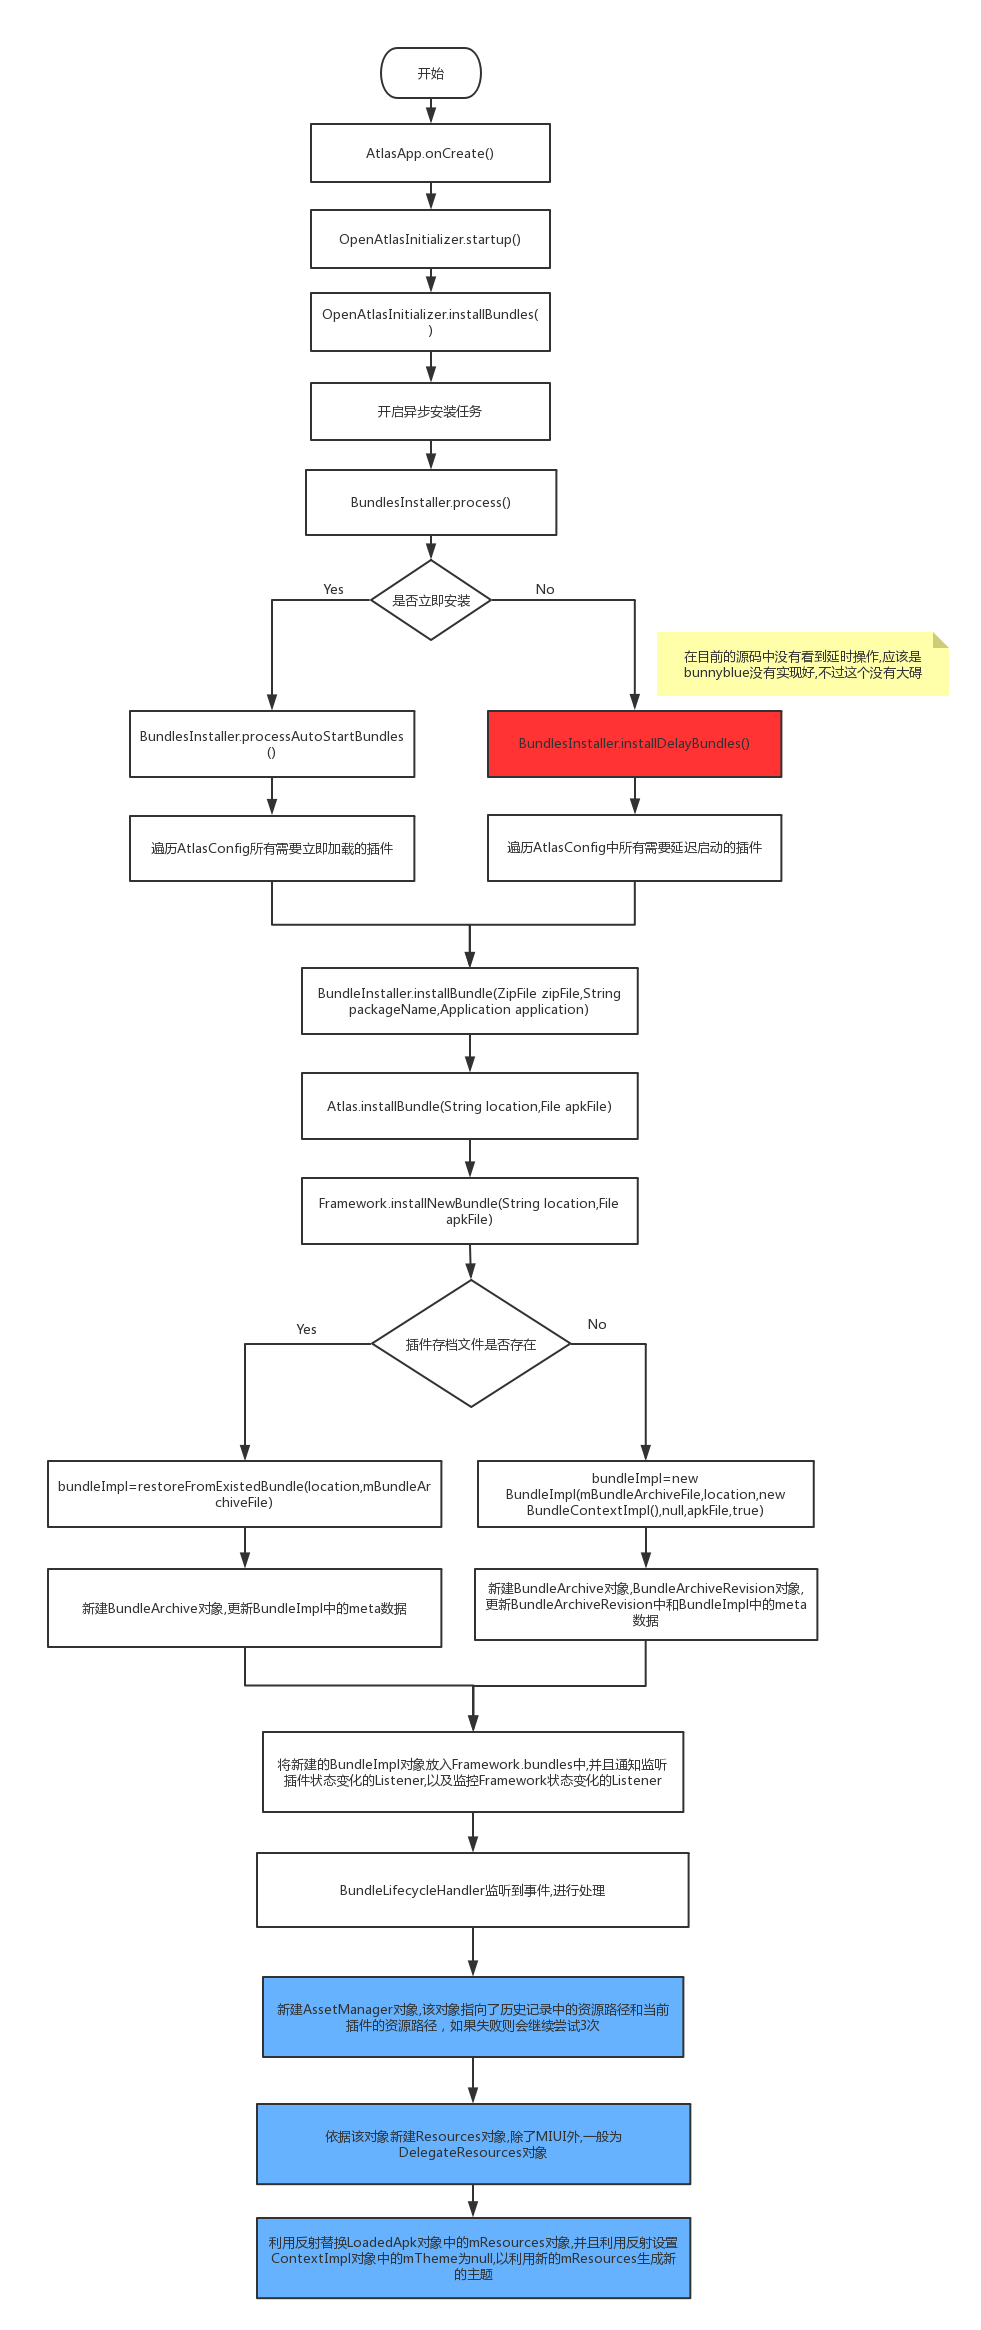
关键流程分析如下:

1.初始化分析

需要实现插件化,自定义的宿主Application就需要继承AtlasApp,而在AtlasApp的attachBaseContext()中完成json文件的解析等初始化工作。在AtlasApp的onCreate()中调用OpenAtlasInitializer进行插件安装等初始化工作,代码如下:

1
2
3
4
5
6
@Override
public void onCreate() {
super.onCreate();
registerActivityLifecycleCallbacks(new ActivityLifecycleCallbacksCompatImpl(this));
this.mAtlasInitializer.startUp();
}

2.OpenAtlasInitizlizer.startup()分析

进入OpenAtlasInitializer.startup()方法中,在这个方法中有非常多的内容,先看代码:

1
2
3
4
5
6
7
8
9
10
11
12
13
14
15
16
17
18
19
20
21
22
23
24
25
26
27
28
29
30
31
32
33
34
35
36
37
38
39
40
41
42
43
44
45
46
47
48
49
public void startUp() {
this.init = isMatchVersion();
if (this.init) {
killMe();
ensureBaselineInfo();
}
Properties properties = new Properties();
properties.put(PlatformConfigure.BOOT_ACTIVITY, PlatformConfigure.BOOT_ACTIVITY);
properties.put(PlatformConfigure.COM_OPENATLAS_DEBUG_BUNDLES, "true");
properties.put(PlatformConfigure.ATLAS_APP_DIRECTORY, this.mApp.getFilesDir().getParent());
try {
Field declaredField = Globals.class.getDeclaredField("sApplication");
declaredField.setAccessible(true);
declaredField.set(null, this.mApp);
declaredField = Globals.class.getDeclaredField("sClassLoader");
declaredField.setAccessible(true);
declaredField.set(null, Atlas.getInstance().getDelegateClassLoader());
// this.d = new AwbDebug();
if (this.mApp.getPackageName().equals(this.pkgName)) {
if (verifyRumtime() || !ApkUtils.isRootSystem()) {
properties.put(PlatformConfigure.OPENATLAS_PUBLIC_KEY, SecurityFrameListener.PUBLIC_KEY);
Atlas.getInstance().addFrameworkListener(new SecurityFrameListener());
}
if (this.init) {
properties.put("osgi.init", "true");
}
}
BundlesInstaller mBundlesInstaller = BundlesInstaller.getInstance();
OptDexProcess mOptDexProcess = OptDexProcess.getInstance();
if (this.mApp.getPackageName().equals(this.pkgName) && (this.init)) {
mBundlesInstaller.init(this.mApp, isAppPkg);
mOptDexProcess.init(this.mApp);
}
System.out.println("Atlas framework prepare starting in process " + this.pkgName + " " + (System.currentTimeMillis() - time) + " ms");
Atlas.getInstance().setClassNotFoundInterceptorCallback(new ClassNotFoundInterceptor());
try {
Atlas.getInstance().startup(properties);
installBundles(mBundlesInstaller, mOptDexProcess);
System.out.println("Atlas framework end startUp in process " + this.pkgName + " " + (System.currentTimeMillis() - time) + " ms");
} catch (Throwable e) {
Log.e("AtlasInitializer", "Could not start up atlas framework !!!", e);
throw new RuntimeException(e);
}
} catch (Throwable e2) {
e2.printStackTrace();
throw new RuntimeException("Could not set Globals !!!", e2);
}
}

这个方法主要做了以下事情:

  • 首先,调用isMatchVersion()检查版本号是否匹配,如果版本号匹配则init为true,此时会检查包名,如果包名不匹配则直接杀死进程;
  • 如果版本号匹配,进行平台属性的设置;
  • 利用反射将Globals中的sApplication替换为当前的Application对象,将Globals中的sClassLoader替换为DelegateClassLoader对象;
  • 初始化BundlesInstaller,OptDexProcess对象,然后调用Atlas.getInstance().startup(properties);进行初始话工作,主要是属性的设置和获取;
  • 最后调用installBundles(mBundlesInstaller,mOptDexProcess);开始插件的安装;

3.条件判断与设置

OpenAtlassInitializer中的installBundles()方法比较简单,就是如果InstallSolutionConfig.install_when_oncreate_auto为true,则发布异步任务进行插件的安装,其中InstallSolutionConfig中的各个属性可以由开发者进行配置; 如果InstallSolutionConfig.install_when_oncreate_auto为true,则会在启动时遍历AtlasConfig中的AUTO数组,安装AUTO数组中的所有插件;

4.安装条件检查与真正进入安装流程

进入BundleInstaller.process()方法中,这个方法其实很简单:先是从zipFile(路径类似/data/app/XX-1.apk)中获取所有lib/armeabi/下以libcom_为前缀,.so为后缀的插件文件路径。之后检查空间是否足够,如果足够则进入安装阶段,否则弹出Toast提示.另外,就是在这里区分立即安装和延时安装。代码如下:

1
2
3
4
5
6
7
8
9
10
11
12
13
14
15
16
17
18
19
20
21
22
23
24
25
26
27
28
29
30
31
32
33
34
35
36
37
38
39
40
41
42
43
44
45
46
47
48
49
50
51
52
53
54
55
56
57
58
59
60
61
62
63
64
65
66
67
public synchronized void process(boolean installAuto, boolean updatePackageVersion) {
if (!this.isinitialized) {
Log.e("BundlesInstaller", "Bundle Installer not initialized yet, process abort!");
} else if (!this.isInstalled || updatePackageVersion) { //isInstalled和updatePackageVersion一般都为false
ZipFile zipFile = null;
try { //bundleList类似{"lib/armeabi/libcom_lizhangqu_test.so","lib/armeabi/libcom_lizhangqu_zxing.so"}
zipFile = new ZipFile(this.mApplication.getApplicationInfo().sourceDir);
List<String> bundleList = fetchBundleFileList(zipFile, "lib/" + AtlasConfig.PRELOAD_DIR + "/libcom_", ".so");
if (bundleList != null && bundleList.size() > 0 && getAvailableSize() < (((bundleList.size() * 2) * 4096) * 4096)) {
new Handler(Looper.getMainLooper()).post(new Runnable() {
@Override
public void run() {
Toast.makeText(RuntimeVariables.androidApplication, "Ops 可用空间不足!", 1).show();
}
});
}
if (installAuto) { //installAuto一般为true
List<String> arrayList = new ArrayList<String>();
for (String str : bundleList) { //bundleList是类似{"lib/armeabi/libcom_lizhangqu_test.so","lib/armeabi/libcom_lizhangqu_zxing.so"}
for (String replace : AtlasConfig.AUTO) {
if (str.contains(replace.replace(".", "_"))) { //将可能存在的"."替换为"_",替换完后arrayList为{"lib/armeabi/liccom_lizhangqu_test.so","lib/armeabi/libcom_lizhangqu_zxing.so"}
arrayList.add(str);
}
}
} //在processAutoStartBundles()中会进行autostart类型的插件的安装
processAutoStartBundles(zipFile, arrayList, this.mApplication);
} else {
installDelayBundles(zipFile, bundleList, this.mApplication);
}
if (!updatePackageVersion) {
Utils.UpdatePackageVersion(this.mApplication);
}
if (zipFile != null) {
try {
zipFile.close();
} catch (IOException e2) {
e2.printStackTrace();
}
}
} catch (IOException e5) {
//isInstalled = e5;
Log.e("BundlesInstaller", "IOException while processLibsBundles >>>", e5);
if (updatePackageVersion) {
this.isInstalled = true;
}
} catch (Throwable th2) {
th2.printStackTrace();
if (zipFile != null) {
try {
zipFile.close();
} catch (IOException e1) {
// TODO Auto-generated catch block
e1.printStackTrace();
}
}
}
if (updatePackageVersion) {
this.isInstalled = true;
}
}
}

由于这里bunnyblue对于延时安装实现的并不好,而且到了ACDD的时候没有这个功能了,所以这里就不再分析延时安装,直接进入到后面的安装过程。

5.安装过程

进入BundlesInstaller.processAutoStartBundles()方法中,代码如下:

1
2
3
4
5
6
7
8
9
10
11
12
13
14
15
16
17
public void processAutoStartBundles(ZipFile zipFile, List<String> list, Application application) {
for (String a : list) {
installBundle(zipFile, a, application);
}
if (autoStart) {
for (String bundle : AtlasConfig.AUTO) {
Bundle bundle2 = Atlas.getInstance().getBundle(bundle);
if (bundle2 != null) {
try {
bundle2.start();
} catch (Throwable e) {
Log.e("BundlesInstaller", "Could not auto start bundle: " + bundle2.getLocation(), e);
}
}
}
}
}

显然是先安装插件再启动。而安装插件的代码如下:

1
2
3
4
5
6
7
8
9
10
11
12
13
14
15
16
17
18
19
20
21
22
23
24
25
26
//packageName类似"lib/armeabi/libcom_lizhangqu_test.so",zipFile类似"data/app/cn.edu.zafu.atlasdemo-1.apk"这样的文件
private boolean installBundle(ZipFile zipFile, String packageName, Application application) {
System.out.println("processLibsBundle entryName " + packageName);
//this.a.a(str); //fileNameFromEntryName类似"libcom_lizhangqu_test.so",packageNameFromEntryName类似"com.lizhangqu.test"
String fileNameFromEntryName = Utils.getFileNameFromEntryName(packageName);
String packageNameFromEntryName = Utils.getPackageNameFromEntryName(packageName);
if (packageNameFromEntryName == null || packageNameFromEntryName.length() <= 0) {
return false;
} //file类似"/data/data/cn.edu.zafu.atlasdemo/lib/libcom_lizhangqu_test.so"这样的文件
File file = new File(new File(application.getFilesDir().getParentFile(), "lib"), fileNameFromEntryName);
if (Atlas.getInstance().getBundle(packageNameFromEntryName) != null) {
return false;
}
try {
if (file.exists()) { //最终还是走到了这个安装逻辑
Atlas.getInstance().installBundle(packageNameFromEntryName, file);
} else {
Atlas.getInstance().installBundle(packageNameFromEntryName, zipFile.getInputStream(zipFile.getEntry(packageName)));
}
System.out.println("Succeed to install bundle " + packageNameFromEntryName);
return true;
} catch (Throwable e) {
Log.e("BundlesInstaller", "Could not install bundle.", e);
return false;
}
}

注意zipFile是类似/data/app/cn.edu.zafu.atlasdemo-1.apk这样的压缩文件,而file则是类似/data/data/cn.edu.zafu.atlasdemo/lib/libcom_lizhangqu_test.so这样的文件,其实是由于/data/app/下存放第三方软件;而/data/data存放所有软件(包括/system/app和/data/app以及/mnt/asec中的软件)的一些lib和xml文件等数据信息. 也就是说安装完宿主APK之后,lib会解压到/data/data/pckageName/lib下面.但是,如果这个文件不存在(例如不小心被删除了),那么就需要从zipFile这个文件中读出我们需要的插件文件了,如根据”lib/armeabi/libcom_lizhangqu_test.so”就可以读取到libcom_lizhangqu_test.so这个文件。

一般file是存在的,进入Atlas.installBundle()进行分析。

6.Framework.installNewBundle()分析

Atlas.installBundle(String,File)直接调用Framework进行安装工作,可见Atlas其实是使用了装饰模式,真正完成工作的是Framework.进入Framework.installNewBundle(String,File)中分析,代码如下:

1
2
3
4
5
6
7
8
9
10
11
12
13
14
15
16
17
18
19
20
21
22
23
24
25
26
27
28
29
30
31
32
33
34
35
36
37
38
static BundleImpl installNewBundle(String location, File apkFile) throws BundleException {
BundleImpl bundleImpl;
File mBundleArchiveFile = null;
try { //注意:要从第四行打断点才行,前面两行都是被编译器优化了
BundleLock.WriteLock(location);
bundleImpl = (BundleImpl) Framework.getBundle(location);
if (bundleImpl != null) {
BundleLock.WriteUnLock(location);
} else { //STORAGE_LOCATION类似"/data/data/cn.edu.zafu.atlasdemo/files/storage/",mBundleArchiveFile类似"/data/data/cn.edu.zafu.atlasdemo/files/storage/com.lizhangqu.test"
mBundleArchiveFile = new File(STORAGE_LOCATION, location);
OpenAtlasFileLock.getInstance().LockExclusive(mBundleArchiveFile);
if (mBundleArchiveFile.exists()) {
bundleImpl = restoreFromExistedBundle(location, mBundleArchiveFile);
if (bundleImpl != null) {
BundleLock.WriteUnLock(location);
if (mBundleArchiveFile != null) {
OpenAtlasFileLock.getInstance().unLock(mBundleArchiveFile);
}
}
}
//这里是有可能重复创建吧!当mBundleArchiveFile.exists()为true时,会重复创建.apkFile类似"/data/data/cn.edu.zafu.altasdemo/lib/libcom_lizhangqu_test.so"这样的文件
bundleImpl = new BundleImpl(mBundleArchiveFile, location, new BundleContextImpl(), null, apkFile, true);
storeMetadata();
BundleLock.WriteUnLock(location);
if (mBundleArchiveFile != null) {
OpenAtlasFileLock.getInstance().unLock(mBundleArchiveFile);
}
}
} catch (Throwable e) {
e.printStackTrace();
BundleLock.WriteUnLock(location);
throw new BundleException(e.getMessage());
}
return bundleImpl;
}

显然,这里利用了线程锁,首次安装时Framework.getBundle(location);的结果为空,所以进入到else分支,之后会先判断mBundleArchiveFile这个插件档案文件是否存在(路径类似”/data/data/cn.edu.zafu.atlasdemo/files/storage/com.lizhangqu.test”),如果存在,就可以由这个存档文件直接生成BundleImpl对象.
不过这里有一个小bug,就是调用restoreFromExistedBundle()生成BundleImpl对象之后,其实到了BundleLock.WriteLock(location);之后,可以直接返回的,现在的逻辑是到了下面还会创建一个BundleImpl对象,显然不对。

那么这个mBundleArchiveFile到底是什么呢?其实它是一个类似”/data/data/cn.edu.zafu.atlasdemo/files/storage/com.lizhangqu.test”这样的目录,在这个目录下面保存着与插件相关的数据。那么到底有哪些数据呢?

我们只要先看一下mBundleArchiveFile不存在时安装插件的情形,就可以发现在这个过程中新建了哪些文件。

此时会调用BundleImpl(File,String,BundleContextImpl,InputStream,File,boolean)这个构造方法:

1
2
3
4
5
6
7
8
9
10
11
12
13
14
15
16
17
18
19
20
21
22
23
24
25
26
27
28
29
30
31
32
33
34
35
36
37
38
39
40
41
42
43
44
45
46
//archiveFile是类似指向"/data/data/cn.edu.zafu.atlasdemo/lib/libcom_lizhangqu_test.so"的File,bundleDir类似"/data/data/cn.edu.zafu.atlasdemo/files/storage/com.lizhangqu.test"
BundleImpl(File bundleDir, String location, BundleContextImpl bundleContextImpl,
InputStream archiveInputStream, File archiveFile, boolean isInstall)
throws BundleException, IOException {
this.persistently = false;
this.domain = null;
this.registeredServices = null;
this.registeredFrameworkListeners = null;
this.registeredBundleListeners = null;
this.registeredServiceListeners = null;
this.staleExportedPackages = null;
long currentTimeMillis = System.currentTimeMillis();
this.location = location;
bundleContextImpl.bundle = this;
this.context = bundleContextImpl;
this.currentStartlevel = Framework.initStartlevel;
this.bundleDir = bundleDir;
if (archiveInputStream != null) {
// try {
this.archive = new BundleArchive(location, bundleDir, archiveInputStream);
// } catch (Throwable e) {
// Framework.deleteDirectory(bundleDir);
// throw new BundleException("Could not install bundle " + location, e);
// }
} else if (archiveFile != null) {
try {
this.archive = new BundleArchive(location, bundleDir, archiveFile);
} catch (IOException e) {
// TODO Auto-generated catch block
e.printStackTrace();
}
}
this.state = BundleEvent.STARTED;
updateMetadata();
if (isInstall) {
Framework.bundles.put(location, this);
resolveBundle(false);
Framework.notifyBundleListeners(1, this);
}
if (Framework.DEBUG_BUNDLES && log.isInfoEnabled()) {
log.info("Framework: Bundle " + toString() + " created. "
+ (System.currentTimeMillis() - currentTimeMillis) + " ms");
}
}

这里由于archiveInputStream为null,故调用this.archive=new BundleArchive(location,bundleDir,archiveFile);创建BundleArchive对象,而对应的构造方法如下:

1
2
3
4
5
6
7
8
public BundleArchive(String location, File bundleDir, File archiveFile) throws IOException {
this.revisions = new TreeMap<Long, BundleArchiveRevision>();
this.bundleDir = bundleDir;
BundleArchiveRevision bundleArchiveRevision = new BundleArchiveRevision(
location, 1, new File(bundleDir, "version." + String.valueOf(1)), archiveFile);
this.revisions.put(Long.valueOf(1), bundleArchiveRevision);
this.currentRevision = bundleArchiveRevision;
}

其中的location其实是包名,类似”com.lizhangqu.test”,而bundleDir类似指向/data/data/cn.edu.zafu.atlasdemo/files/storage/com.lizhangqu.test这样的目录,archiveFile其实是插件文件,类似/data/data/cn.edu.zafu.atlasdemo/lib/libcom_lizhangqu_test.so这样的,可见在BundleArchive()中会创建revisions这个TreeMap对象,并将版本号以及新建的BundleArchiveRevision对象保存到revisions中。下面看一下BundleArchiveRevision对应的构造方法:

1
2
3
4
5
6
7
8
9
10
11
12
13
14
15
16
17
18
19
20
21
22
23
24
25
26
27
28
29
30
31
32
33
34
35
36
37
38
39
40
41
42
43
44
45
46
47
48
49
50
51
52
53
54
55
56
57
58
59
//revisionNum的值类似为1,revisionDir的值类似为"/data/data/cn.edu.zafu.atlasdemo/files/storage/com.lizhangqu.test/version.1",packageName类似"com.lizhangqu.test",archiveDir类似"/data/data/cn.edu.zafu.atlasdemo/lib/libcom_lizhangqu_test.so"的文件
BundleArchiveRevision(String packageName, long revisionNum, File revisionDir, File archiveFile)
throws IOException {
boolean hasSO = false;
this.revisionNum = revisionNum;
this.revisionDir = revisionDir;
BundleInfoList instance = BundleInfoList.getInstance();
if (instance == null || !instance.getHasSO(packageName)) {
} else {
hasSO = true;
}
if (!this.revisionDir.exists()) {
this.revisionDir.mkdirs();
}//archiveFile一般不可写
if (archiveFile.canWrite()) {
if (isSameDriver(revisionDir, archiveFile)) {
this.revisionLocation = FILE_PROTOCOL;
this.bundleFile = new File(revisionDir, BUNDLE_FILE_NAME);
archiveFile.renameTo(this.bundleFile);
} else {
this.revisionLocation = FILE_PROTOCOL;
this.bundleFile = new File(revisionDir, BUNDLE_FILE_NAME);
ApkUtils.copyInputStreamToFile(new FileInputStream(archiveFile),
this.bundleFile);
}
if (hasSO) {
installSoLib(this.bundleFile);
}
} else if (Build.HARDWARE.toLowerCase().contains("mt6592")
&& archiveFile.getName().endsWith(".so")) {
this.revisionLocation = FILE_PROTOCOL;
this.bundleFile = new File(revisionDir, BUNDLE_FILE_NAME);
Runtime.getRuntime().exec(
String.format("ln -s %s %s",
new Object[]{archiveFile.getAbsolutePath(),
this.bundleFile.getAbsolutePath()}));
if (hasSO) {
installSoLib(archiveFile);
}
} else if (OpenAtlasHacks.LexFile == null
|| OpenAtlasHacks.LexFile.getmClass() == null) { //一般会走这个分支
this.revisionLocation = REFERENCE_PROTOCOL
+ archiveFile.getAbsolutePath();//revisionLocation类似"reference:/data/data/cn.edu.zafu.atlasdemo/lib/libcom_lizhangqu_test.so"
this.bundleFile = archiveFile; //bundleFile类似"/data/data/cn.edu.zafu.atlasdemo/lib/libcom_lizhangqu_test.so"
if (hasSO) {
installSoLib(archiveFile);
}
} else {
this.revisionLocation = FILE_PROTOCOL;
this.bundleFile = new File(revisionDir, BUNDLE_FILE_NAME);
ApkUtils.copyInputStreamToFile(new FileInputStream(archiveFile),
this.bundleFile);
if (hasSO) {
installSoLib(this.bundleFile);
}
}
updateMetadata();
}

首先是记录版本号和当前插件版本的目录,revisionDir类似”/data/data/cn.edu.zafu.atlasdemo/files/storage/com.lizhangqu.test/version.1”这样,显然,这个其实就是bundleDir+”/version.”+revisionNum生成的,archiveFile仍然是类似/data/data/cn.edu.zafu.atlasdemo/lib/libcom_lizhangqu_test.so这样的文件。

BundleInfoList是在AtlasApp的attachBaseContext()中解析assets中的json文件获得的插件信息,所以可以通过包名来获取对应的插件信息。

之后是对一些特殊ROM等做兼容,比如对于第一种情况,会判断是否为同一个路径(有的ROM可能在安装时解压路径比较奇怪),如果是则直接rename即可;否则将解压后的插件文件(如/data/data/cn.edu.zafu.atlasdemo/lib/libcom_lizhangqu_test.so)复制到bundleFile中即可,而bundleFile的路径类似”/data/data/cn.edu.zafu.atlasdemo/files/storage/com.lizhangqu.test/version.1/bundle.zip”;

第二种情况则是对于mt6592这个奇葩ROM,需要建立软链接;

大多数情况会走到第三个分支,此时不需要复制插件文件,只是revisionLocation变为REFERENCE_PROTOCOL+archiveFile.getAbsolutePath(),之后安装插件中的so库(如果有的话).

最后一种情况则是对YunOS进行兼容(YunOS使用的是阿里自己的虚拟机,运行的文件为.lex文件而非.dex文件)也是复制插件文件;

最后,调用updateMetadata()更新元数据:

1
2
3
4
5
6
7
8
9
10
11
12
13
14
15
16
17
18
19
20
21
22
23
24
25
26
27
28
29
30
31
32
33
34
35
36
37
38
//revisionDir是类似"/data/data/cn.edu.zafu.atlasdemo/files/storage/com.lizhangqu.test/version.1"这样的路径,metaFile是类似"/data/data/cn.edu.zafu.atlasdemo/files/storage/com.lizhangqu.test/version.1/meta"这样的文件
void updateMetadata() throws IOException {
File metaFile = new File(this.revisionDir, "meta");
DataOutputStream dataOutputStream = null;
try {
if (!metaFile.getParentFile().exists()) {
metaFile.getParentFile().mkdirs();
}
dataOutputStream = new DataOutputStream(new FileOutputStream(metaFile));
//revisionLocation的值类似"reference:/data/data/cn.edu.zafu.atlasdemo/lib/libcom_lizhangqu_test.so"这样的值
dataOutputStream.writeUTF(this.revisionLocation);
dataOutputStream.flush();
{
try {
dataOutputStream.close();
return;
} catch (IOException e) {
e.printStackTrace();
return;
}
}
} catch (IOException e) {
throw new IOException("Could not save meta data " + metaFile.getAbsolutePath(), e);
} finally {
if (dataOutputStream != null) {
try {
dataOutputStream.close();
} catch (IOException e) {
e.printStackTrace();
}
}
}
}

其中的注释已经写得很清楚,metaFile就是类似/data/data/cn.edu.zafu.atlasdemo/files/storage/com.lizhangqu.test/version.1/meta这样的文件,updateMetadata()就是往其中写入revisionLocation这个字符串,显然metaFile这个文件就是用于记录文件协议和插件文件位置的。

BundleArchive和BundleArchiveRevision的对象创建都分析完之后,发现其实到这里为止就创建了一个类似/data/data/cn.edu.zafu.atlasdemo/files/storage/com.lizhangqu.test/version.1/meta 这样的元数据文件。

再回到BundleImpl()中,看建立BundleArchive对象之后的部分:

1
2
3
4
5
6
7
8
9
10
11
12
13
14
...
this.state = BundleEvent.STARTED;
updateMetadata();
if (isInstall) {
Framework.bundles.put(location, this);
resolveBundle(false);
Framework.notifyBundleListeners(1, this);
}
if (Framework.DEBUG_BUNDLES && log.isInfoEnabled()) {
log.info("Framework: Bundle " + toString() + " created. "
+ (System.currentTimeMillis() - currentTimeMillis) + " ms");
}

主要就是状态变为BundleEvent.STARTED,之后调用updateMetadata()更新数据,由于是安装,isInstall为true,故会将当前对象插入到Framework.bundles这个Map中,key是包名;

下面就看一下这里的updateMetadata()做了什么:

1
2
3
4
5
6
7
8
9
10
11
12
13
14
15
16
17
18
19
20
21
22
23
24
25
26
27
void updateMetadata() {
File file = new File(this.bundleDir, "meta"); //file类似指向"/data/data/cn.edu.zafu.atlasdemo/files/storage/com.lizhangqu.test/meta"
DataOutputStream dataOutputStream = null;
try {
if (!file.getParentFile().exists()) {
file.getParentFile().mkdirs();
}
FileOutputStream fileOutputStream = new FileOutputStream(file);
dataOutputStream = new DataOutputStream(fileOutputStream);
dataOutputStream.writeUTF(this.location);//location一般为"com.lizhangqu.test"这样的插件包名
dataOutputStream.writeInt(this.currentStartlevel); //currentStartLevel一般为1
dataOutputStream.writeBoolean(this.persistently); //persistently一般为false
dataOutputStream.flush();
fileOutputStream.getFD().sync();
} catch (IOException e) {
e.printStackTrace();
} finally {
if (dataOutputStream != null) {
try {
dataOutputStream.close();
} catch (IOException e) {
e.printStackTrace();
}
}
}
}

其中location为插件的包名,如”com.lizhangqu.test”,currentStartlevel为Framework.initStartlevel,这个值一般为1;而persistently表示当前插件的对应的BundleImpl对象是否已经启动,启动后则为true,否则为false;所以在每次persistently变动之后,都需要调用updateMetadata()进行数据更新;

而这个file对应的路径类似”/data/data/cn.edu.zafu.atlasdemo/files/storage/com.lizhangqu.test/meta”,显然和BundleArchiveRevision中的metaFile的路径是不同的,作用也是不同的,这个是与插件的版本无关的,直接在插件数据目录下的;

但是文件的I/O是非常低效的,如果改用数据库来进行数据的持久化,效率要高很多,这也是OpenAtlas的一个不足之处.可能也是手淘启动时卡顿的原因!

再回到前面那个问题,其实对于大部分ROM来说,建立BundleImpl过程中新建了两个meta文件,一个直接在插件目录下,里面保存了插件的包名,启动level和当前启动状态;另一个在插件对应版本的目录下,里面保存了文件协议和插件文件的位置。

那么Framework中restoreFromExistedBundle()是如何依据这个就建立插件对象(BundleImpl对象)的呢?
这个放到下一篇博客分析.