Android插件化(五):OpenAtlasの四大组件的Hack

引言

到目前为止,我们已经分析了OpenAtlas中插件的安装,卸载,更新,以及安装好插件之后组件类的加载过程,但是对于这些是如何引发的还不知道,比如,在宿主的一个Activit中调用startActivity()跳转到插件中的一个Activity,如何判断这个Activity在的插件是否已经安装,如果没有,需要在哪里判断并安装呢?

要回答这些问题,就需要对于Android中四大组件的启动过程非常熟悉(主要涉及到ActivityThread,ApplicationThread,H,Instrumentation,ActivityManagerNative,
ActivityManagerProxy,AMS等),之后Hook一些关键的对象,然后在关键的位置进行判断并安装插件

1.startActivity()过程分析及Hook

startActivity()依据上下文可分为Activity.startActivity(),Application.startActivity()和Fragment.startActivity().这些情况都要考虑到,幸运的是,这些方法只是在开始时有区别,到了后面就一样了,所以先分析Activity.startActivity(),剩下的两个就简单了。

1.1 Activity.startActivity()分析

Activity.startActivity(Intent)如下:

1
2
3
4
5
6
7
8
9
10
11
12
13
14
15
@Override
public void startActivity(Intent intent) {
this.startActivity(intent, null);
}
@Override
public void startActivity(Intent intent, @Nullable Bundle options) {
if (options != null) {
startActivityForResult(intent, -1, options);
} else {
// Note we want to go through this call for compatibility with
// applications that may have overridden the method.
startActivityForResult(intent, -1);
}
}

由于options==null,故执行startActivityForResult(intent,-1);而startActivityForResult(Intent,int)如下:

1
2
3
4
5
6
7
8
9
10
11
12
13
14
15
16
17
18
19
20
21
22
23
24
25
26
27
28
29
30
31
32
33
34
35
36
37
38
39
40
41
42
43
public void startActivityForResult(Intent intent, int requestCode) {
startActivityForResult(intent, requestCode, null);
}
public void startActivityForResult(Intent intent, int requestCode, @Nullable Bundle options) {
if (mParent == null) {
Instrumentation.ActivityResult ar = mInstrumentation.execStartActivity(this,
mMainThread.getApplicationThread(), mToken, this, intent, requestCode, options);
if (ar != null) {
mMainThread.sendActivityResult(mToken, mEmbeddedID, requestCode, ar.getResultCode(),
ar.getResultData());
}
if (requestCode >= 0) {
// If this start is requesting a result, we can avoid making
// the activity visible until the result is received. Setting
// this code during onCreate(Bundle savedInstanceState) or
// onResume() will keep the
// activity hidden during this time, to avoid flickering.
// This can only be done when a result is requested because
// that guarantees we will get information back when the
// activity is finished, no matter what happens to it.
mStartedActivity = true;
}
final View decor = mWindow != null ? mWindow.peekDecorView() : null;
if (decor != null) {
decor.cancelPendingInputEvents();
}
// TODO Consider clearing/flushing other event sources and events
// for child windows.
} else {
if (options != null) {
mParent.startActivityFromChild(this, intent, requestCode, options);
} else {
// Note we want to go through this method for compatibility with
// existing applications that may have overridden it.
mParent.startActivityFromChild(this, intent, requestCode);
}
}
if (options != null && !isTopOfTask()) {
mActivityTransitionState.startExitOutTransition(this, options);
}
}

在这里会调用Instrumentation对象的execStartActivity()方法;而Instrumentation的execStartActivity()方法如下:

1
2
3
4
5
6
7
8
9
10
11
12
13
14
15
16
17
18
19
20
21
22
23
24
25
26
27
28
29
30
31
32
public ActivityResult execStartActivity(
Context who, IBinder contextThread, IBinder token, Activity target,
Intent intent, int requestCode, Bundle options) {
IApplicationThread whoThread = (IApplicationThread) contextThread;
if (mActivityMonitors != null) {
synchronized (mSync) {
final int N = mActivityMonitors.size();
for (int i=0; i<N; i++) {
final ActivityMonitor am = mActivityMonitors.get(i);
if (am.match(who, null, intent)) {
am.mHits++;
if (am.isBlocking()) {
return requestCode >= 0 ? am.getResult() : null;
}
break;
}
}
}
}
try {
intent.migrateExtraStreamToClipData();
intent.prepareToLeaveProcess();
int result = ActivityManagerNative.getDefault()
.startActivity(whoThread, who.getBasePackageName(), intent,
intent.resolveTypeIfNeeded(who.getContentResolver()),
token, target != null ? target.mEmbeddedID : null,
requestCode, 0, null, options);
checkStartActivityResult(result, intent);
} catch (RemoteException e) {
}
return null;
}

注意到这里最终调用了ActivityManagerNative.getDefault().startActivity()方法,那么这个ActivityManagerNative.getDefault()到底是什么对象呢?

ActivityManagerNative#getDefault()方法如下:

1
2
3
static public IActivityManager getDefault() {
return gDefault.get();
}

而gDefault的定义如下:

1
2
3
4
5
6
7
8
9
10
11
12
13
14
private static final Singleton<IActivityManager> gDefault = new Singleton<IActivityManager>() {
protected IActivityManager create() {
//b是一个BinderProxy对象,该对象的mObject对应new BpBinder(handle)对象;
IBinder b = ServiceManager.getService("activity");
if (false) {
Log.v("ActivityManager", "default service binder = " + b);
}
IActivityManager am = asInterface(b);
if (false) {
Log.v("ActivityManager", "default service = " + am);
}
return am;
}
};

注释中已经写了,b是一个BinderProxy对象,这是怎么来的呢?

1.2 BinderProxy对象的来源

看一下ServiceManager的getService()方法即可:

1
2
3
4
5
6
7
8
9
10
11
12
13
public static IBinder getService(String name) {
try {
IBinder service = sCache.get(name);
if (service != null) {
return service;
} else {
return getIServiceManager().getService(name);
}
} catch (RemoteException e) {
Log.e(TAG, "error in getService", e);
}
return null;
}

其中getIServiceManager()方法如下:

1
2
3
4
5
6
7
8
9
private static IServiceManager getIServiceManager() {
if (sServiceManager != null) {
return sServiceManager;
}
// Find the service manager
sServiceManager = ServiceManagerNative.asInterface(BinderInternal.getContextObject());
return sServiceManager;
}

为了知道ServiceManagerNative.asInterface()的结果是什么,需要先看一下BinderInternal.getContextObject()的结果是什么.

1
public static final native IBinder getContextObject();

这是一个native方法,它对应的C++方法在/frameworks/base/core/android_util_Binder.cpp中,如下:

1
2
3
4
5
static jobject android_os_BinderInternal_getContextObject(JNIEnv* env, jobject clazz)
{
sp<IBinder> b = ProcessState::self()->getContextObject(NULL);
return javaObjectForIBinder(env, b);
}

而ProcessState::self()返回的是一个ProcessState对象:

1
2
3
4
5
6
7
8
9
sp<ProcessState> ProcessState::self()
{
Mutex::Autolock _l(gProcessMutex);
if (gProcess != NULL) {
return gProcess;
}
gProcess = new ProcessState;
return gProcess;
}

ProcessState::getContextObject()方法如下:

1
2
3
4
sp<IBinder> ProcessState::getContextObject(const sp<IBinder>& /*caller*/)
{
return getStrongProxyForHandle(0);
}

其中的0就是ServiceManager对应的句柄,或者说ServiceManager的注册号。而getStrongProxyForHandle()函数如下:

1
2
3
4
5
6
7
8
9
10
11
12
13
14
15
16
17
18
19
20
21
22
23
24
25
26
27
28
29
30
31
32
33
34
35
36
37
38
39
40
41
42
43
44
45
46
47
48
49
50
51
52
53
54
55
56
sp<IBinder> ProcessState::getStrongProxyForHandle(int32_t handle)
{
sp<IBinder> result;
AutoMutex _l(mLock);
handle_entry* e = lookupHandleLocked(handle);
if (e != NULL) {
// We need to create a new BpBinder if there isn't currently one, OR we
// are unable to acquire a weak reference on this current one. See comment
// in getWeakProxyForHandle() for more info about this.
IBinder* b = e->binder;
if (b == NULL || !e->refs->attemptIncWeak(this)) {
if (handle == 0) {
// Special case for context manager...
// The context manager is the only object for which we create
// a BpBinder proxy without already holding a reference.
// Perform a dummy transaction to ensure the context manager
// is registered before we create the first local reference
// to it (which will occur when creating the BpBinder).
// If a local reference is created for the BpBinder when the
// context manager is not present, the driver will fail to
// provide a reference to the context manager, but the
// driver API does not return status.
//
// Note that this is not race-free if the context manager
// dies while this code runs.
//
// TODO: add a driver API to wait for context manager, or
// stop special casing handle 0 for context manager and add
// a driver API to get a handle to the context manager with
// proper reference counting.
Parcel data;
status_t status = IPCThreadState::self()->transact(
0, IBinder::PING_TRANSACTION, data, NULL, 0);
if (status == DEAD_OBJECT)
return NULL;
}
b = new BpBinder(handle);
e->binder = b;
if (b) e->refs = b->getWeakRefs();
result = b;
} else {
// This little bit of nastyness is to allow us to add a primary
// reference to the remote proxy when this team doesn't have one
// but another team is sending the handle to us.
result.force_set(b);
e->refs->decWeak(this);
}
}
return result;
}

这个方法比较简单,其实就是返回一个句柄(handle)为0的BpBinder对象,只是由于context manager(java层的ServiceManager在C++层对应的叫context manager)比较特殊,如果发现通过弱引用获取不到的话,需要通过一个空事件来保证context manager已经注册。

在回到android_os_BinderInternal_getContextObject()方法中,显然,在返回之前,做了一个包装,将这个BpBinder对象(C++对象)包装成一个java对象,方法如下:

1
2
3
4
5
6
7
8
9
10
11
12
13
14
15
16
17
18
19
20
21
22
23
24
25
26
27
28
29
30
31
32
33
34
35
36
37
38
39
40
41
42
43
44
45
46
47
48
49
50
51
52
53
54
55
jobject javaObjectForIBinder(JNIEnv* env, const sp<IBinder>& val)
{
if (val == NULL) return NULL;
if (val->checkSubclass(&gBinderOffsets)) {
// One of our own!
jobject object = static_cast<JavaBBinder*>(val.get())->object();
LOGDEATH("objectForBinder %p: it's our own %p!\n", val.get(), object);
return object;
}
// For the rest of the function we will hold this lock, to serialize
// looking/creation of Java proxies for native Binder proxies.
AutoMutex _l(mProxyLock);
// Someone else's... do we know about it?
jobject object = (jobject)val->findObject(&gBinderProxyOffsets);
if (object != NULL) {
jobject res = jniGetReferent(env, object);
if (res != NULL) {
ALOGV("objectForBinder %p: found existing %p!\n", val.get(), res);
return res;
}
LOGDEATH("Proxy object %p of IBinder %p no longer in working set!!!", object, val.get());
android_atomic_dec(&gNumProxyRefs);
val->detachObject(&gBinderProxyOffsets);
env->DeleteGlobalRef(object);
}
object = env->NewObject(gBinderProxyOffsets.mClass, gBinderProxyOffsets.mConstructor);
if (object != NULL) {
LOGDEATH("objectForBinder %p: created new proxy %p !\n", val.get(), object);
// The proxy holds a reference to the native object.
env->SetLongField(object, gBinderProxyOffsets.mObject, (jlong)val.get());
val->incStrong((void*)javaObjectForIBinder);
// The native object needs to hold a weak reference back to the
// proxy, so we can retrieve the same proxy if it is still active.
jobject refObject = env->NewGlobalRef(
env->GetObjectField(object, gBinderProxyOffsets.mSelf));
val->attachObject(&gBinderProxyOffsets, refObject,
jnienv_to_javavm(env), proxy_cleanup);
// Also remember the death recipients registered on this proxy
sp<DeathRecipientList> drl = new DeathRecipientList;
drl->incStrong((void*)javaObjectForIBinder);
env->SetLongField(object, gBinderProxyOffsets.mOrgue, reinterpret_cast<jlong>(drl.get()));
// Note that a new object reference has been created.
android_atomic_inc(&gNumProxyRefs);
incRefsCreated(env);
}
return object;
}
  • checkSubclass()是IBinder中的方法,默认返回false,而继承IBinder的BpBinder并没有重写这个方法,故val->checkSubclass()为false
  • jobject object=(jobject)val->findObject(&gBinderProxyOffsets);是根据gBinderProxyOffsets这个结构体变量的地址查找之前创建的BinderProxy对象,假设我们这里是首次创建,则返回null
  • object=env->NewObject(gBinderProxyOffsets.mClass,gBinderProxyOffsets.mConstructor);是调用gBinderProxyOffset这个结构体变量中的类和构造方法创建java对象,那么这个gBinderProxyOffsets是何时被赋值的呢?

答案就在android_util_Binder.cpp的int_register_android_os_BinderProxy(JNIEnv*env)中:

1
2
3
4
5
6
7
8
9
10
11
12
13
14
15
16
17
18
19
20
21
22
23
24
25
26
27
28
29
30
31
32
33
34
35
36
37
38
static int int_register_android_os_BinderProxy(JNIEnv* env)
{
jclass clazz;
clazz = env->FindClass("java/lang/Error");
LOG_FATAL_IF(clazz == NULL, "Unable to find class java.lang.Error");
gErrorOffsets.mClass = (jclass) env->NewGlobalRef(clazz);
clazz = env->FindClass(kBinderProxyPathName);
LOG_FATAL_IF(clazz == NULL, "Unable to find class android.os.BinderProxy");
gBinderProxyOffsets.mClass = (jclass) env->NewGlobalRef(clazz);
gBinderProxyOffsets.mConstructor
= env->GetMethodID(clazz, "<init>", "()V");
assert(gBinderProxyOffsets.mConstructor);
gBinderProxyOffsets.mSendDeathNotice
= env->GetStaticMethodID(clazz, "sendDeathNotice", "(Landroid/os/IBinder$DeathRecipient;)V");
assert(gBinderProxyOffsets.mSendDeathNotice);
gBinderProxyOffsets.mObject
= env->GetFieldID(clazz, "mObject", "J");
assert(gBinderProxyOffsets.mObject);
gBinderProxyOffsets.mSelf
= env->GetFieldID(clazz, "mSelf", "Ljava/lang/ref/WeakReference;");
assert(gBinderProxyOffsets.mSelf);
gBinderProxyOffsets.mOrgue
= env->GetFieldID(clazz, "mOrgue", "J");
assert(gBinderProxyOffsets.mOrgue);
clazz = env->FindClass("java/lang/Class");
LOG_FATAL_IF(clazz == NULL, "Unable to find java.lang.Class");
gClassOffsets.mGetName = env->GetMethodID(clazz, "getName", "()Ljava/lang/String;");
assert(gClassOffsets.mGetName);
return AndroidRuntime::registerNativeMethods(
env, kBinderProxyPathName,
gBinderProxyMethods, NELEM(gBinderProxyMethods));
}

显然,在这里对gBinderProxyOffsets进行了赋值。而int_register_android_os_BinderProxy是在register_android_os_Binder()中调用的,register_android_os_Binder()又是在AndroidRuntime中调用的,AndroidRuntime是用于启动虚拟机的,这个不是本篇讨论的重点,所以不深入了,感兴趣的童鞋可以看我之前的博客,比如Java服务框架分析.

回到javaObjectForIBinder()方法中,可知此时先创建一个BinderProxy对象,然后将val.get()即handle为0的BpBinder对象作为BinderProxy对象的属性mObject保存,最后它返回的就是一个BinderProxy对象.

再回到getIServiceManager()方法中,此时它就等价于:

1
2
3
4
5
6
7
8
9
private static IServiceManager getIServiceManager() {
if (sServiceManager != null) {
return sServiceManager;
}
// Find the service manager
sServiceManager = ServiceManagerNative.asInterface(new BinderProxy());
return sServiceManager;
}

并且该BinderProxy对象中含有handle为0的BpBinder对象(保存在BinderProxy中的mObject中).
而ServiceManagerNative.asInterface()方法如下:

1
2
3
4
5
6
7
8
9
10
11
12
13
14
15
16
17
/**
* Cast a Binder object into a service manager interface, generating
* a proxy if needed.
*/
static public IServiceManager asInterface(IBinder obj)
{
if (obj == null) {
return null;
}
IServiceManager in =
(IServiceManager)obj.queryLocalInterface(descriptor);
if (in != null) {
return in;
}
return new ServiceManagerProxy(obj);
}

由于BinderProxy的queryLocalInterface()方法返回null,故最后返回的是一个ServiceManagerProxy对象,该对象的mRemote中保存着BinderProxy对象,而BinderProxy对象中又保存着一个handle为0的BpBinder对象。

所以getIServiceManager().getService(name)其实是调用ServiceManagerProxy对象的getService()方法,最终会返回一个BinderProxy对象,并且该BinderProxy对象的mObject为一个BpBinder对象,该BpBinder对象中的handle值为ActivityManagerService的句柄。由于这个涉及到Java层Service的注册,篇幅较长,感兴趣的可以看我的这篇博客:Java服务框架分析.

1.3 ActivityManagerNative.asInterface()的结果

再回到ActivityManagerNative的asInterface()方法中,显然,gDefault就是一个实现了IActivityManager的对象,其实如果对Binder通信熟悉的话,看到这里就知道am是什么了。我们继续往下看,ActivityManagerNative的asInterface()方法如下,注意传入其中的参数b是一个BinderProxy对象:

1
2
3
4
5
6
7
8
9
10
11
12
static public IActivityManager asInterface(IBinder obj) {
if (obj == null) {
return null;
}
IActivityManager in =
(IActivityManager)obj.queryLocalInterface(descriptor);
if (in != null) {
return in;
}
return new ActivityManagerProxy(obj);
}

其中obj是BinderProxy对象,为了知道obj.queryLocalInterface(descriptor);的结果是什么,需要看一下BinderProxy的定义:

1
2
3
4
5
6
7
8
9
10
11
12
13
14
15
16
17
18
19
20
21
22
23
24
25
26
27
28
29
30
31
32
33
34
35
36
37
38
39
40
41
42
43
44
45
46
47
48
49
50
51
52
53
54
55
56
57
58
59
60
61
62
63
64
65
66
67
68
69
70
71
72
73
74
75
76
77
final class BinderProxy implements IBinder {
public native boolean pingBinder();
public native boolean isBinderAlive();
public IInterface queryLocalInterface(String descriptor) {
return null;
}
public boolean transact(int code, Parcel data, Parcel reply, int flags) throws RemoteException {
Binder.checkParcel(this, code, data, "Unreasonably large binder buffer");
return transactNative(code, data, reply, flags);
}
public native String getInterfaceDescriptor() throws RemoteException;
public native boolean transactNative(int code, Parcel data, Parcel reply,
int flags) throws RemoteException;
public native void linkToDeath(DeathRecipient recipient, int flags)
throws RemoteException;
public native boolean unlinkToDeath(DeathRecipient recipient, int flags);
public void dump(FileDescriptor fd, String[] args) throws RemoteException {
Parcel data = Parcel.obtain();
Parcel reply = Parcel.obtain();
data.writeFileDescriptor(fd);
data.writeStringArray(args);
try {
transact(DUMP_TRANSACTION, data, reply, 0);
reply.readException();
} finally {
data.recycle();
reply.recycle();
}
}
public void dumpAsync(FileDescriptor fd, String[] args) throws RemoteException {
Parcel data = Parcel.obtain();
Parcel reply = Parcel.obtain();
data.writeFileDescriptor(fd);
data.writeStringArray(args);
try {
transact(DUMP_TRANSACTION, data, reply, FLAG_ONEWAY);
} finally {
data.recycle();
reply.recycle();
}
}
BinderProxy() {
mSelf = new WeakReference(this);
}
@Override
protected void finalize() throws Throwable {
try {
destroy();
} finally {
super.finalize();
}
}
private native final void destroy();
private static final void sendDeathNotice(DeathRecipient recipient) {
if (false) Log.v("JavaBinder", "sendDeathNotice to " + recipient);
try {
recipient.binderDied();
}
catch (RuntimeException exc) {
Log.w("BinderNative", "Uncaught exception from death notification",
exc);
}
}
final private WeakReference mSelf;
private long mObject;
private long mOrgue;
}

显然,BinderProxy的queryLocalInterface()方法返回null,所以这里会返回ActivityManagerProxy对象,其中的mRemote就是BinderProxy对象。

1.4 继续Instrumentation中execStartActivity()分析

由上面的分析可知ActivityManagerNative.getDefault()的结果为ActivityManagerProxy对象,所以接下来分析ActivityManagerProxy的startActivity()方法:

1
2
3
4
5
6
7
8
9
10
11
12
13
14
15
16
17
18
19
20
21
22
23
24
25
26
27
28
29
30
31
32
33
public int startActivity(IApplicationThread caller, String callingPackage, Intent intent,
String resolvedType, IBinder resultTo, String resultWho, int requestCode,
int startFlags, ProfilerInfo profilerInfo, Bundle options) throws RemoteException {
Parcel data = Parcel.obtain();
Parcel reply = Parcel.obtain();
data.writeInterfaceToken(IActivityManager.descriptor);
data.writeStrongBinder(caller != null ? caller.asBinder() : null);
data.writeString(callingPackage);
intent.writeToParcel(data, 0);
data.writeString(resolvedType);
data.writeStrongBinder(resultTo);
data.writeString(resultWho);
data.writeInt(requestCode);
data.writeInt(startFlags);
if (profilerInfo != null) {
data.writeInt(1);
profilerInfo.writeToParcel(data, Parcelable.PARCELABLE_WRITE_RETURN_VALUE);
} else {
data.writeInt(0);
}
if (options != null) {
data.writeInt(1);
options.writeToParcel(data, 0);
} else {
data.writeInt(0);
}
mRemote.transact(START_ACTIVITY_TRANSACTION, data, reply, 0);
reply.readException();
int result = reply.readInt();
reply.recycle();
data.recycle();
return result;
}

这里是非常典型的Binder通信,最终会调用到继承ActivityManagerNative的AMS中的startActivity()方法:

1
2
3
4
5
6
7
8
@Override
public final int startActivity(IApplicationThread caller, String callingPackage,
Intent intent, String resolvedType, IBinder resultTo, String resultWho, int requestCode,
int startFlags, ProfilerInfo profilerInfo, Bundle options) {
return startActivityAsUser(caller, callingPackage, intent, resolvedType, resultTo,
resultWho, requestCode, startFlags, profilerInfo, options,
UserHandle.getCallingUserId());
}

这里直接调用了startActivityAsUser()方法,接着是ActivityStackSupervisor的startActivityMayWait()方法,在startActivityMayWait()中又调用了startActivityLocked()方法,这个方法非常重要,因为在这个方法中进行了一系列的检查,比如权限检查,代码如下:

1
2
3
4
5
6
7
8
9
10
11
12
13
14
15
16
17
18
19
20
21
22
23
24
25
26
27
28
29
30
final int startActivityLocked(IApplicationThread caller,
Intent intent, String resolvedType, ActivityInfo aInfo,
IVoiceInteractionSession voiceSession, IVoiceInteractor voiceInteractor,
IBinder resultTo, String resultWho, int requestCode,
int callingPid, int callingUid, String callingPackage,
int realCallingPid, int realCallingUid, int startFlags, Bundle options,
boolean componentSpecified, ActivityRecord[] outActivity, ActivityContainer container,
TaskRecord inTask) {
...
if (err == ActivityManager.START_SUCCESS && aInfo == null) {
// We couldn't find the specific class specified in the Intent.
// Also the end of the line.
err = ActivityManager.START_CLASS_NOT_FOUND;
}
...
err = startActivityUncheckedLocked(r, sourceRecord, voiceSession, voiceInteractor,
startFlags, true, options, inTask);
if (err < 0) {
// If someone asked to have the keyguard dismissed on the next
// activity start, but we are not actually doing an activity
// switch... just dismiss the keyguard now, because we
// probably want to see whatever is behind it.
notifyActivityDrawnForKeyguard();
}
return err;
}

如果在宿主的Manifest文件中没有声明该Activty,就会导致ActivityInfo对象aInfo==null,从而返回START_CLASS_NOT_FOUND结果。之后,在Instrumentation的execStartActivity()返回之后会检查这个值,发现是这个结果就会抛出异常:

1
2
3
4
5
6
7
8
9
10
11
12
13
14
15
16
17
18
19
20
21
22
23
24
25
26
27
28
29
30
31
32
33
/** @hide */
public static void checkStartActivityResult(int res, Object intent) {
if (res >= ActivityManager.START_SUCCESS) {
return;
}
switch (res) {
case ActivityManager.START_INTENT_NOT_RESOLVED:
case ActivityManager.START_CLASS_NOT_FOUND:
if (intent instanceof Intent && ((Intent)intent).getComponent() != null)
throw new ActivityNotFoundException(
"Unable to find explicit activity class "
+ ((Intent)intent).getComponent().toShortString()
+ "; have you declared this activity in your AndroidManifest.xml?");
throw new ActivityNotFoundException(
"No Activity found to handle " + intent);
case ActivityManager.START_PERMISSION_DENIED:
throw new SecurityException("Not allowed to start activity "
+ intent);
case ActivityManager.START_FORWARD_AND_REQUEST_CONFLICT:
throw new AndroidRuntimeException(
"FORWARD_RESULT_FLAG used while also requesting a result");
case ActivityManager.START_NOT_ACTIVITY:
throw new IllegalArgumentException(
"PendingIntent is not an activity");
case ActivityManager.START_NOT_VOICE_COMPATIBLE:
throw new SecurityException(
"Starting under voice control not allowed for: " + intent);
default:
throw new AndroidRuntimeException("Unknown error code "
+ res + " when starting " + intent);
}
}

到这里就解释了为什么一定要在宿主的Manifest文件中声明插件的组件信息。

之后主要是ActivityStackSupervisor和ActivityStack()之间的跳转,一直到ActivityStackSupervisor的realStartActivtyLock()方法,由于其中没有特别需要注意的地方,就直接放流程图了(其实画时序图更好,这里偷个懒):

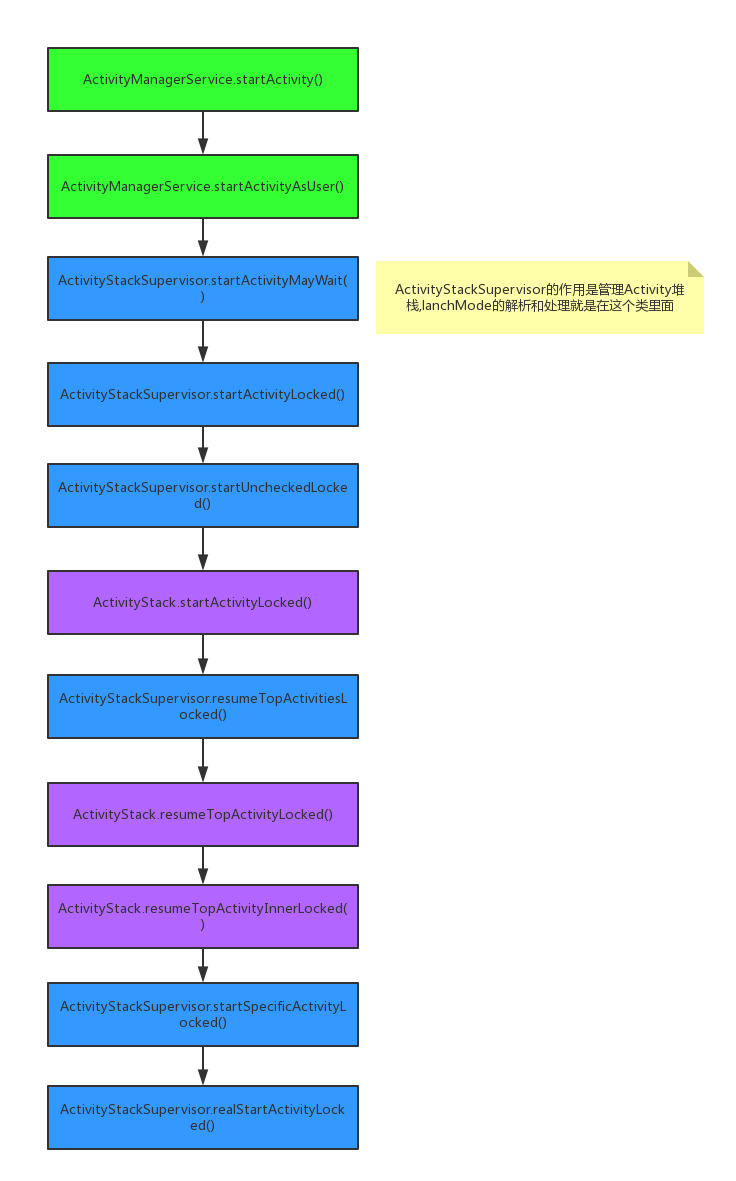
显然,最终会调用到realStartActivityLock()方法,该方法如下:

1
2
3
4
5
6
7
8
9
10
11
12
13
14
15
16
final boolean realStartActivityLocked(ActivityRecord r,
ProcessRecord app, boolean andResume, boolean checkConfig)
throws RemoteException {
...
app.thread.scheduleLaunchActivity(new Intent(r.intent), r.appToken,
System.identityHashCode(r), r.info, new Configuration(mService.mConfiguration),
r.compat, r.task.voiceInteractor, app.repProcState, r.icicle, r.persistentState,
results, newIntents, !andResume, mService.isNextTransitionForward(),
profilerInfo);
...
return true;
}

那这个app.thread是什么呢?其实是ApplicationThreadProxy对象,感兴趣的可以跟踪一下,是在ActivityManagerNative的onTransact()中赋值的:

1
2
3
4
5
6
7
8
9
10
11
12
13
14
15
16
17
18
19
20
21
@Override
public boolean onTransact(int code, Parcel data, Parcel reply, int flags)
throws RemoteException {
switch (code) {
case ATTACH_APPLICATION_TRANSACTION: {
data.enforceInterface(IActivityManager.descriptor);
IApplicationThread app = ApplicationThreadNative.asInterface(
data.readStrongBinder());
if (app != null) {
attachApplication(app);
}
reply.writeNoException();
return true;
}
}
return super.onTransact(code, data, reply, flags);
}

其中ApplicationThreadNative.asInterface(data.readStrongBinder());返回一个ApplicationThreadProxy对象,这个与前面ServieManagerNative.asInterface()类似,不再赘述.

1.5 AMS与ApplicationThread的Binder IPC过程

再回到realStartActivityLocked方法,这就很明显是要进行Binder IPC了,而且此时AMS是client,ApplicationThread是server,最终会调用ApplicationThread(ApplicationThread继承自ApplicationThreadNative)中的onTransact()方法,注意现在已经从AMS所在的System Server进程切换到了ActivityThread是在的进程,即宿主App运行的进程:

1
2
3
4
5
6
7
8
9
10
11
12
13
14
15
16
17
18
19
20
21
22
23
24
25
26
27
28
29
30
31
@Override
public boolean onTransact(int code, Parcel data, Parcel reply, int flags)
throws RemoteException {
...
case SCHEDULE_LAUNCH_ACTIVITY_TRANSACTION:
{
data.enforceInterface(IApplicationThread.descriptor);
Intent intent = Intent.CREATOR.createFromParcel(data);
IBinder b = data.readStrongBinder();
int ident = data.readInt();
ActivityInfo info = ActivityInfo.CREATOR.createFromParcel(data);
Configuration curConfig = Configuration.CREATOR.createFromParcel(data);
CompatibilityInfo compatInfo = CompatibilityInfo.CREATOR.createFromParcel(data);
IVoiceInteractor voiceInteractor = IVoiceInteractor.Stub.asInterface(
data.readStrongBinder());
int procState = data.readInt();
Bundle state = data.readBundle();
PersistableBundle persistentState = data.readPersistableBundle();
List<ResultInfo> ri = data.createTypedArrayList(ResultInfo.CREATOR);
List<Intent> pi = data.createTypedArrayList(Intent.CREATOR);
boolean notResumed = data.readInt() != 0;
boolean isForward = data.readInt() != 0;
ProfilerInfo profilerInfo = data.readInt() != 0
? ProfilerInfo.CREATOR.createFromParcel(data) : null;
scheduleLaunchActivity(intent, b, ident, info, curConfig, compatInfo, voiceInteractor,
procState, state, persistentState, ri, pi, notResumed, isForward, profilerInfo);
return true;
}
...
}

而ApplicationThread中的scheduleLaunchActivity方法如下:

1
2
3
4
5
6
7
8
9
10
11
12
13
14
15
16
17
18
19
20
21
22
23
24
25
26
27
28
29
30
31
32
// we use token to identify this activity without having to send the
// activity itself back to the activity manager. (matters more with ipc)
public final void scheduleLaunchActivity(Intent intent, IBinder token, int ident, ActivityInfo info,
Configuration curConfig, CompatibilityInfo compatInfo, IVoiceInteractor voiceInteractor, int procState,
Bundle state, PersistableBundle persistentState, List<ResultInfo> pendingResults,
List<Intent> pendingNewIntents, boolean notResumed, boolean isForward, ProfilerInfo profilerInfo) {
updateProcessState(procState, false);
ActivityClientRecord r = new ActivityClientRecord();
r.token = token;
r.ident = ident;
r.intent = intent;
r.voiceInteractor = voiceInteractor;
r.activityInfo = info;
r.compatInfo = compatInfo;
r.state = state;
r.persistentState = persistentState;
r.pendingResults = pendingResults;
r.pendingIntents = pendingNewIntents;
r.startsNotResumed = notResumed;
r.isForward = isForward;
r.profilerInfo = profilerInfo;
updatePendingConfiguration(curConfig);
sendMessage(H.LAUNCH_ACTIVITY, r);
}

注意最后面的H.LAUNCH_ACTIVITY,会通过H(继承自Handler)发送消息H.LAUNCH_ACTIVITY,而H中对这个消息的处理如下:

1
2
3
4
5
6
7
8
9
10
11
12
13
14
public void handleMessage(Message msg) {
...
switch (msg.what) {
case LAUNCH_ACTIVITY: {
Trace.traceBegin(Trace.TRACE_TAG_ACTIVITY_MANAGER, "activityStart");
final ActivityClientRecord r = (ActivityClientRecord) msg.obj;
r.packageInfo = getPackageInfoNoCheck(r.activityInfo.applicationInfo, r.compatInfo);
handleLaunchActivity(r, null);
Trace.traceEnd(Trace.TRACE_TAG_ACTIVITY_MANAGER);
}
...
}
}

而handleLaunchActivity方法如下:

1
2
3
4
5
6
7
8
9
10
11
12
13
14
15
16
17
18
19
20
21
private void handleLaunchActivity(ActivityClientRecord r, Intent customIntent) {
// If we are getting ready to gc after going to the background, well
// we are back active so skip it.
unscheduleGcIdler();
mSomeActivitiesChanged = true;
if (r.profilerInfo != null) {
mProfiler.setProfiler(r.profilerInfo);
mProfiler.startProfiling();
}
// Make sure we are running with the most recent config.
handleConfigurationChanged(null, null);
if (localLOGV)
Slog.v(TAG, "Handling launch of " + r);
Activity a = performLaunchActivity(r, customIntent);
...
}

这里又调用了performLaunchActivity()方法:

1
2
3
4
5
6
7
8
9
10
11
12
13
14
15
16
17
18
19
20
21
22
23
24
25
26
27
28
29
30
31
32
33
34
35
36
37
38
39
private Activity performLaunchActivity(ActivityClientRecord r, Intent customIntent) {
// System.out.println("##### [" + System.currentTimeMillis() + "]
// ActivityThread.performLaunchActivity(" + r + ")");
ActivityInfo aInfo = r.activityInfo;
if (r.packageInfo == null) {
r.packageInfo = getPackageInfo(aInfo.applicationInfo, r.compatInfo, Context.CONTEXT_INCLUDE_CODE);
}
ComponentName component = r.intent.getComponent();
if (component == null) {
component = r.intent.resolveActivity(mInitialApplication.getPackageManager());
r.intent.setComponent(component);
}
if (r.activityInfo.targetActivity != null) {
component = new ComponentName(r.activityInfo.packageName, r.activityInfo.targetActivity);
}
Activity activity = null;
try {
java.lang.ClassLoader cl = r.packageInfo.getClassLoader();
activity = mInstrumentation.newActivity(cl, component.getClassName(), r.intent);
StrictMode.incrementExpectedActivityCount(activity.getClass());
r.intent.setExtrasClassLoader(cl);
r.intent.prepareToEnterProcess();
if (r.state != null) {
r.state.setClassLoader(cl);
}
} catch (Exception e) {
if (!mInstrumentation.onException(activity, e)) {
throw new RuntimeException("Unable to instantiate activity " + component + ": " + e.toString(), e);
}
}
...
return activity;
}

注意两点:
1) r.packageInfo.getClassLoader()中的r.packageInfo是LoadedApk对象,Atlas中的init方法中AndroidHack.injectClassLoader(packageName,delegateClassLoader);中利用反射将LoadedApk中的mClassLoader对象替换为DelegateClassLoader对象:

1
2
3
4
5
6
7
8
9
10
11
12
13
14
15
16
17
18
19
20
21
22
23
24
25
26
/**
* 用DelegateClassLoader替换掉LoadedApk(宿主的LoadedApk)中的ClassLoader对象,这样在findClass时可以到特定的Bundle中寻找,
* 即ClassLoadFromBundle.loadFromInstalledBundles(className).第一次调用时由于getLoadedApk返回null,故调用createNewLoadedApk()来创建LoadedApk对象,不利用系统的是为了方便使用.
* 这样对于Service的创建不需要特殊处理即可.
* @param str
* @param classLoader
* @throws Exception
*/
public static void injectClassLoader(String str, ClassLoader classLoader)
throws Exception {
Object activityThread = getActivityThread();
if (activityThread == null) {
throw new Exception(
"Failed to get ActivityThread.sCurrentActivityThread");
}
Object loadedApk = getLoadedApk(RuntimeVariables.androidApplication,
activityThread, str);
if (loadedApk == null) {
loadedApk = createNewLoadedApk(RuntimeVariables.androidApplication,
activityThread);
}
if (loadedApk == null) {
throw new Exception("Failed to get ActivityThread.mLoadedApk");
}
OpenAtlasHacks.LoadedApk_mClassLoader.set(loadedApk, classLoader);
}

2)其中调用了Instrumentation的newActivity方法来创建Activity,所以,如果需要hook的话,就需要重写这个方法。

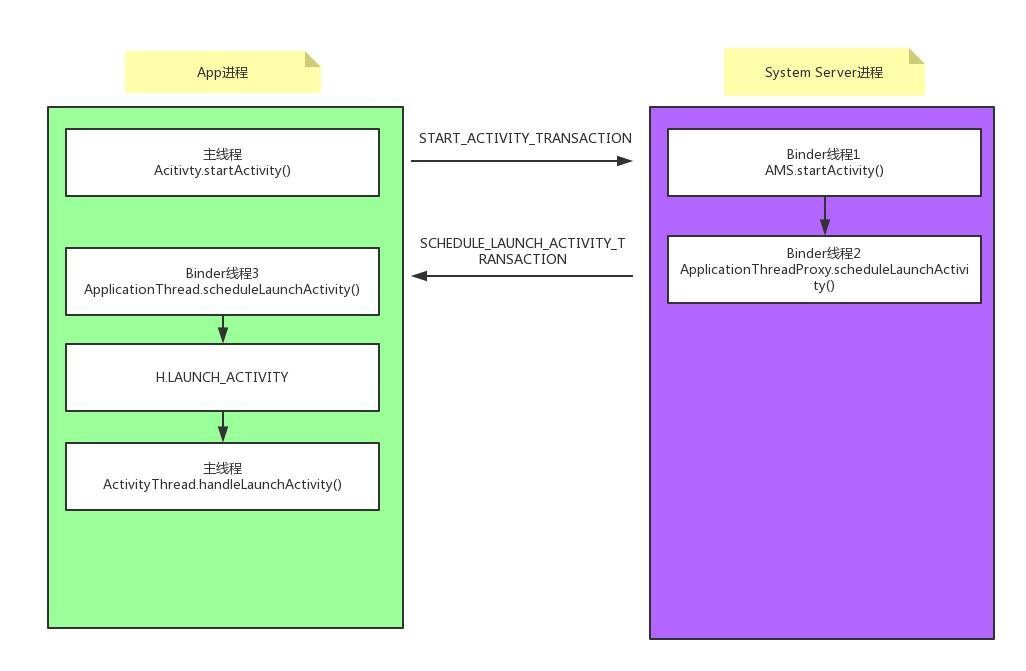
到这里,我们可以总结出Activity.startActivity()过程中ActivityThread(主要是其中的ApplicationThread)和AMS的跨进程通信过程:

1.6 Activity.startActivity()的Hook点

要Hook掉Instrumentation,就要先获取ActivityThread对象。那么如何获取呢?注意到ActivityThread中的一个static方法currentActivityThread:

1
2
3
public static ActivityThread currentActivityThread() {
return sCurrentActivityThread;
}

要注意ActivityThread是@hide修饰的,需要通过反射调用该方法:

1
2
3
4
5
6
7
8
9
10
11
12
13
14
15
16
public static Object getActivityThread() throws Exception {
if (_sActivityThread == null) {
if (Thread.currentThread().getId() == Looper.getMainLooper()
.getThread().getId()) {
_sActivityThread = OpenAtlasHacks.ActivityThread_currentActivityThread
.invoke(null);
} else {
Handler handler = new Handler(Looper.getMainLooper());
synchronized (OpenAtlasHacks.ActivityThread_currentActivityThread) {
handler.post(new ActvityThreadGetter());
OpenAtlasHacks.ActivityThread_currentActivityThread.wait();
}
}
}
return _sActivityThread;
}

这样就获取到了当前App进程的ActivityThread对象,另外注意到ActivityThread中的Instrumentation对象为包访问权限,所以也需要使用反射来Hook:

1
2
3
4
5
6
7
8
9
10
11
12
13
14
15
16
17
18
19
20
21
//Atlas的init方法
public void init(Application application)
throws Exception {
....
AndroidHack.injectInstrumentationHook(new InstrumentationHook(AndroidHack
.getInstrumentation(), application.getBaseContext()));
...
}
//AndroidHack中的injectInstrumentationHook方法
public static void injectInstrumentationHook(Instrumentation instrumentation)
throws Exception {
Object activityThread = getActivityThread();
if (activityThread == null) {
throw new Exception(
"Failed to get ActivityThread.sCurrentActivityThread");
}
OpenAtlasHacks.ActivityThread_mInstrumentation.set(activityThread,
instrumentation);
}

这样,就利用InstrumentationHook对象替换掉了ActivityThread中的mInstrumentation.

1.7 InstrumentationHook需要重写哪些方法

在1.6中我们已经将mInstrumentation给hook掉了,那么需要重写哪些方法呢?

先看一下,除了Activity.startActivity()之外,还有哪些地方会有startActivity()方法?
其实还有Application.startActivity(),Fragment.startActivity()方法,总共这3种方法的流程关系如下:

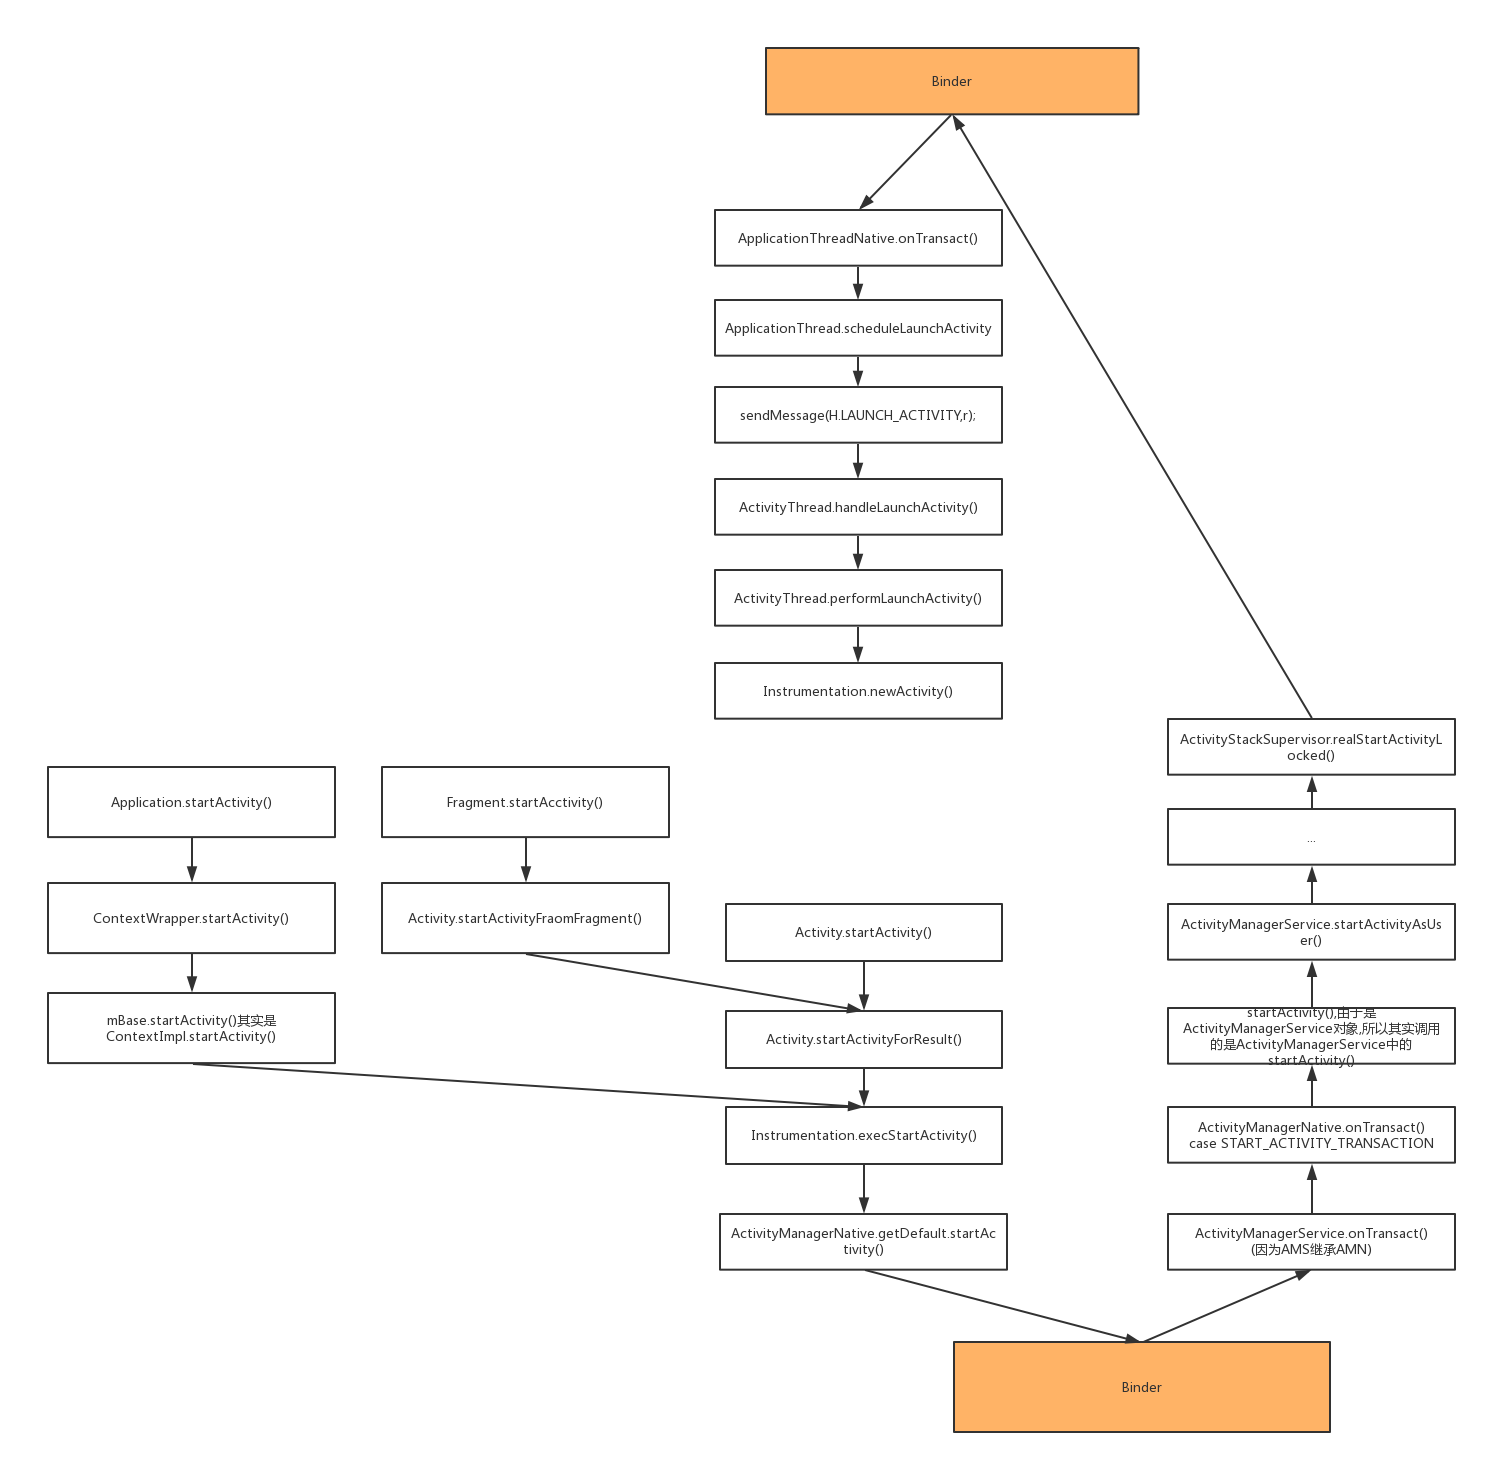
显然,这3中调用方式只是前面的几步流程不太一样,从Instrumentation的execStartActivity方法开始就完全一样了。

所以execStartActivity方法需要重写,注意它有多个重载方法。

在ActivityThread的handleLaunchActivity方法中,调用了performLaunchActivity方法来创建Activity,该方法如下:

1
2
3
4
5
6
7
8
9
10
11
12
13
14
15
16
17
18
19
20
21
22
23
24
25
26
27
28
29
30
31
32
33
34
35
36
37
38
39
40
41
42
43
44
45
46
47
48
49
50
51
52
53
54
55
56
57
58
59
60
61
62
63
64
65
66
67
68
69
70
71
72
73
74
75
76
77
78
79
80
81
82
private Activity performLaunchActivity(ActivityClientRecord r, Intent customIntent) {
// System.out.println("##### [" + System.currentTimeMillis() + "]
// ActivityThread.performLaunchActivity(" + r + ")");
ActivityInfo aInfo = r.activityInfo;
if (r.packageInfo == null) {
r.packageInfo = getPackageInfo(aInfo.applicationInfo, r.compatInfo, Context.CONTEXT_INCLUDE_CODE);
}
ComponentName component = r.intent.getComponent();
if (component == null) {
component = r.intent.resolveActivity(mInitialApplication.getPackageManager());
r.intent.setComponent(component);
}
if (r.activityInfo.targetActivity != null) {
component = new ComponentName(r.activityInfo.packageName, r.activityInfo.targetActivity);
}
Activity activity = null;
try {
java.lang.ClassLoader cl = r.packageInfo.getClassLoader();
activity = mInstrumentation.newActivity(cl, component.getClassName(), r.intent);
StrictMode.incrementExpectedActivityCount(activity.getClass());
r.intent.setExtrasClassLoader(cl);
r.intent.prepareToEnterProcess();
if (r.state != null) {
r.state.setClassLoader(cl);
}
} catch (Exception e) {
if (!mInstrumentation.onException(activity, e)) {
throw new RuntimeException("Unable to instantiate activity " + component + ": " + e.toString(), e);
}
}
try {
Application app = r.packageInfo.makeApplication(false, mInstrumentation);
...
if (activity != null) {
Context appContext = createBaseContextForActivity(r, activity);
CharSequence title = r.activityInfo.loadLabel(appContext.getPackageManager());
Configuration config = new Configuration(mCompatConfiguration);
if (DEBUG_CONFIGURATION)
Slog.v(TAG, "Launching activity " + r.activityInfo.name + " with config " + config);
activity.attach(appContext, this, getInstrumentation(), r.token, r.ident, app, r.intent, r.activityInfo,
title, r.parent, r.embeddedID, r.lastNonConfigurationInstances, config, r.voiceInteractor);
if (customIntent != null) {
activity.mIntent = customIntent;
}
r.lastNonConfigurationInstances = null;
activity.mStartedActivity = false;
int theme = r.activityInfo.getThemeResource();
if (theme != 0) {
activity.setTheme(theme);
}
activity.mCalled = false;
if (r.isPersistable()) {
mInstrumentation.callActivityOnCreate(activity, r.state, r.persistentState);
} else {
mInstrumentation.callActivityOnCreate(activity, r.state);
}
...
}
r.paused = true;
mActivities.put(r.token, r);
} catch (SuperNotCalledException e) {
throw e;
} catch (Exception e) {
if (!mInstrumentation.onException(activity, e)) {
throw new RuntimeException("Unable to start activity " + component + ": " + e.toString(), e);
}
}
return activity;
}
  • 注意其中调用了Instrumentation的newActivity()方法来创建Activity,注意这是一个重要的方法,需要在我们自己的Instrumentation类中重写该方法。
  • 注意在后面调用了activity.setTheme应用主题,所以如果需要将我们的delegateResources这个Resources对象应用到主题中,就需要在newActivity()中进行hook,所以在InstrumentatinoHook的newActivity代码如下:
1
2
3
4
5
6
7
8
9
10
11
12
13
14
15
16
17
18
19
20
21
22
23
24
25
26
27
28
29
30
31
32
33
34
35
36
37
38
39
40
41
42
43
@Override
public Activity newActivity(ClassLoader cl, String className, Intent intent) throws InstantiationException,
IllegalAccessException, ClassNotFoundException {
Activity newActivity;
String defaultBootActivityName = null;
try {
//这里会调用DelegateClassLoader区加载插件中的组件,如com.lizhangqu.test.MainActivity,不过DelegateClassLoader只是一个封装,最终调用的还是对应插件的某个BundleClassLoader
newActivity = this.mBase.newActivity(cl, className, intent);
} catch (ClassNotFoundException e) {
ClassNotFoundException classNotFoundException = e;
CharSequence property = Framework.getProperty(PlatformConfigure.BOOT_ACTIVITY,
PlatformConfigure.BOOT_ACTIVITY_DEFAULT);
if (TextUtils.isEmpty(property)) {
defaultBootActivityName = PlatformConfigure.BOOT_ACTIVITY_DEFAULT;
} else {
@SuppressWarnings("unused")
CharSequence charSequence = property;
}
if (TextUtils.isEmpty(defaultBootActivityName)) {
throw classNotFoundException;
}
@SuppressWarnings("deprecation")
List<RunningTaskInfo> runningTasks = ((ActivityManager) this.context.getSystemService(Context.ACTIVITY_SERVICE))
.getRunningTasks(1);
if (runningTasks != null && runningTasks.size() > 0
&& runningTasks.get(0).numActivities > 1
&& Framework.getClassNotFoundCallback() != null) {
if (intent.getComponent() == null) {
intent.setClassName(this.context, className);
}
Framework.getClassNotFoundCallback().returnIntent(intent);
}
log.warn("Could not find activity class: " + className);
log.warn("Redirect to welcome activity: " + defaultBootActivityName);
//如果找不到,则要使用bootActivity(欢迎页面代替)
newActivity = this.mBase.newActivity(cl, defaultBootActivityName, intent);
}
//运用代理资源
if ((cl instanceof DelegateClassLoader) && OpenAtlasHacks.ContextThemeWrapper_mResources != null) {
OpenAtlasHacks.ContextThemeWrapper_mResources.set(newActivity, RuntimeVariables.delegateResources);
}
return newActivity;
}

至于在ContextImplHook中重写写startActivity()方法,纯粹是为了:
1)提前进行必要的插件安装;
2)提前进行判断,如果没有插件存在该Activity,则在这里就可以进行异常处理,比如跳到欢迎页面

但是注意ContextImplHook中重写bindService和startService的目的不是这个。因为ContextImplHook对象是要替换Activity等ContextWrapper子类(共同点是对含有mBase)中的mBase(ContextImpl对象)的,而bindService和startService的hook点不像startActivity那么多,所以在ContextImplHook中重写是为了在启动插件中的Service之前,保证插件已经安装,并且在插件安装完之后,在BundleLifecycleHandler的case BundleEvent.LOADED事件处理中进行插件资源和ClassLoader的替换。

2.startService()过程分析

由于前面分析过startActivity()的过程,而startService()的过程和startActivity()的过程有很多类似的地方,特别是App进程与System Server进程中的AMS进行Binder IPC的地方。

所以这里就直接给出流程图:

注意最后ActivityThread的handleCreateService方法:

1
2
3
4
5
6
7
8
9
10
11
12
13
14
15
16
17
18
19
20
21
22
23
24
25
26
27
28
29
30
31
32
33
34
35
36
37
38
private void handleCreateService(CreateServiceData data) {
// If we are getting ready to gc after going to the background, well
// we are back active so skip it.
unscheduleGcIdler();
LoadedApk packageInfo = getPackageInfoNoCheck(data.info.applicationInfo, data.compatInfo);
Service service = null;
try {
java.lang.ClassLoader cl = packageInfo.getClassLoader();
service = (Service) cl.loadClass(data.info.name).newInstance();
} catch (Exception e) {
if (!mInstrumentation.onException(service, e)) {
throw new RuntimeException("Unable to instantiate service " + data.info.name + ": " + e.toString(), e);
}
}
try {
if (localLOGV)
Slog.v(TAG, "Creating service " + data.info.name);
ContextImpl context = ContextImpl.createAppContext(this, packageInfo);
context.setOuterContext(service);
Application app = packageInfo.makeApplication(false, mInstrumentation);
service.attach(context, this, data.info.name, data.token, app, ActivityManagerNative.getDefault());
service.onCreate();
mServices.put(data.token, service);
try {
ActivityManagerNative.getDefault().serviceDoneExecuting(data.token, 0, 0, 0);
} catch (RemoteException e) {
// nothing to do.
}
} catch (Exception e) {
if (!mInstrumentation.onException(service, e)) {
throw new RuntimeException("Unable to create service " + data.info.name + ": " + e.toString(), e);
}
}
}

在其中利用LoadedApk中的ClassLoader来加载该Service类并生成对象。而由于在ContextImplHook中已经将LoadedApk中的ClassLoader替换为DelegateClassLoader对象,所以最终可以加载到插件中的Service类。