RePlugin解析之类的加载

1. 类加载器层次

RePlugin号称只有一个唯一的hook点,这个唯一的hook点就是替换掉系统本身的PathClassLoader对象。那它是怎么做的呢?

1.1 替换PathClassLoader

调用路径为RePluginApplication.attachBaseContext()—>RePlugin.attachBaseContext()—>PMF.init()—>PatchClassLoaderUtils.patch(), 而PatchClassLoaderUtils.patch()方法如下:

1
2
3
4
5
6
7
8
9
10
11
12
13
14
15
16
17
18
19
20
21
22
23
24
25
26
27
28
29
30
31
32
33
34
35
36
37
38
39
40
41
42
43
44
45
46
public static boolean patch(Application application) {
try {
// 获取Application的BaseContext (来自ContextWrapper)
Context oBase = application.getBaseContext();
if (oBase == null) {
...
return false;
}
// 获取mBase.mPackageInfo
// 1. ApplicationContext - Android 2.1
// 2. ContextImpl - Android 2.2 and higher
// 3. AppContextImpl - Android 2.2 and higher
Object oPackageInfo = ReflectUtils.readField(oBase, "mPackageInfo");
if (oPackageInfo == null) {
...
return false;
}
// mPackageInfo的类型主要有两种:
// 1. android.app.ActivityThread$PackageInfo - Android 2.1 - 2.3
// 2. android.app.LoadedApk - Android 2.3.3 and higher
...
// 获取mPackageInfo.mClassLoader
ClassLoader oClassLoader = (ClassLoader) ReflectUtils.readField(oPackageInfo, "mClassLoader");
if (oClassLoader == null) {
...
return false;
}
// 外界可自定义ClassLoader的实现,但一定要基于RePluginClassLoader类
ClassLoader cl = RePlugin.getConfig().getCallbacks().createClassLoader(oClassLoader.getParent(), oClassLoader);
// 将新的ClassLoader写入mPackageInfo.mClassLoader
ReflectUtils.writeField(oPackageInfo, "mClassLoader", cl);
// 设置线程上下文中的ClassLoader为RePluginClassLoader
// 防止在个别Java库用到了Thread.currentThread().getContextClassLoader()时,“用了原来的PathClassLoader”,或为空指针
Thread.currentThread().setContextClassLoader(cl);
...
} catch (Throwable e) {
e.printStackTrace();
return false;
}
return true;
}

这个方法看起来很长,其实做的事情很简单,就是将App的PathClassLoader替换为我们自己的RePluginClassLoader对象,那么App的PathClassLoader对象是藏在哪里呢?

其实就在ContextWrapper.mBase—>ContextImpl.mPackageInfo—>LoadedApk.mClassLoader中,首先Application继承自ContextWrapper,而ContextWrapper中的成员如下:

1
2
3
4
5
6
7
8
9
10
11
12
13
14
15
16
17
18
19
20
21
22
public class ContextWrapper extends Context {
Context mBase;
public ContextWrapper(Context base) {
mBase = base;
}
/**
* Set the base context for this ContextWrapper. All calls will then be
* delegated to the base context. Throws
* IllegalStateException if a base context has already been set.
*
* @param base The new base context for this wrapper.
*/
protected void attachBaseContext(Context base) {
if (mBase != null) {
throw new IllegalStateException("Base context already set");
}
mBase = base;
}
...
}

而这个mBase其实是ContextImpl对象,感兴趣的读者跟一下ContextWrapper.attachBaseContext()路径就知道了,这个ContextImpl是在ActivityThread中创建的,这里不再展开来讲了。

而ContextImpl的成员如下:

1
2
3
4
5
6
7
8
9
10
11
12
13
14
15
16
17
/**
* Common implementation of Context API, which provides the base
* context object for Activity and other application components.
*/
class ContextImpl extends Context {
private final static String TAG = "ContextImpl";
private final static boolean DEBUG = false;
/**
* Map from package name, to preference name, to cached preferences.
*/
private static ArrayMap<String, ArrayMap<String, SharedPreferencesImpl>> sSharedPrefs;
final ActivityThread mMainThread;
final LoadedApk mPackageInfo;
...
}

其中的LoadedApk对象mPackageInfo就含有加载进来的APK的各种数据,包括我们要替换的PathClassLoader对象。

LoadedApk中的成员如下:

1
2
3
4
5
6
7
8
9
10
11
12
13
14
15
16
17
18
19
20
21
22
23
24
25
26
27
28
29
30
31
32
33
34
35
public final class LoadedApk {
private static final String TAG = "LoadedApk";
private final ActivityThread mActivityThread;
private ApplicationInfo mApplicationInfo;
final String mPackageName;
private final String mAppDir;
private final String mResDir;
private final String[] mSplitAppDirs;
private final String[] mSplitResDirs;
private final String[] mOverlayDirs;
private final String[] mSharedLibraries;
private final String mDataDir;
private final String mLibDir;
private final File mDataDirFile;
private final ClassLoader mBaseClassLoader;
private final boolean mSecurityViolation;
private final boolean mIncludeCode;
private final boolean mRegisterPackage;
private final DisplayAdjustments mDisplayAdjustments = new DisplayAdjustments();
Resources mResources;
private ClassLoader mClassLoader;
private Application mApplication;
private final ArrayMap<Context, ArrayMap<BroadcastReceiver, ReceiverDispatcher>> mReceivers
= new ArrayMap<Context, ArrayMap<BroadcastReceiver, LoadedApk.ReceiverDispatcher>>();
private final ArrayMap<Context, ArrayMap<BroadcastReceiver, LoadedApk.ReceiverDispatcher>> mUnregisteredReceivers
= new ArrayMap<Context, ArrayMap<BroadcastReceiver, LoadedApk.ReceiverDispatcher>>();
private final ArrayMap<Context, ArrayMap<ServiceConnection, LoadedApk.ServiceDispatcher>> mServices
= new ArrayMap<Context, ArrayMap<ServiceConnection, LoadedApk.ServiceDispatcher>>();
private final ArrayMap<Context, ArrayMap<ServiceConnection, LoadedApk.ServiceDispatcher>> mUnboundServices
= new ArrayMap<Context, ArrayMap<ServiceConnection, LoadedApk.ServiceDispatcher>>();
...
}

注意其中的mClassLoader就是PathClassLoader对象

怎么知道它是PathClassLoader对象呢?

看下它的创建过程即LoadedApk.getClassLoader()方法就知道了:

1
2
3
4
5
6
7
8
9
10
11
12
13
14
15
16
17
18
19
20
21
22
23
24
25
26
27
28
29
30
31
32
33
34
35
36
37
38
39
40
41
42
43
44
45
46
47
48
49
50
51
52
53
54
55
56
57
58
59
60
61
62
63
64
65
66
67
68
69
70
71
72
73
74
75
76
77
78
79
80
81
82
83
84
85
86
87
88
89
90
91
92
93
94
95
96
97
98
99
100
101
102
103
104
105
106
107
108
109
110
111
112
113
114
115
116
117
118
119
120
121
122
123
124
125
126
127
128
129
130
131
public ClassLoader getClassLoader() {
synchronized (this) {
if (mClassLoader != null) {
return mClassLoader;
}
if (mIncludeCode && !mPackageName.equals("android")) {
// Avoid the binder call when the package is the current application package.
// The activity manager will perform ensure that dexopt is performed before
// spinning up the process.
if (!Objects.equals(mPackageName, ActivityThread.currentPackageName())) {
final String isa = VMRuntime.getRuntime().vmInstructionSet();
try {
ActivityThread.getPackageManager().performDexOptIfNeeded(mPackageName, isa);
} catch (RemoteException re) {
// Ignored.
}
}
final List<String> zipPaths = new ArrayList<>();
final List<String> apkPaths = new ArrayList<>();
final List<String> libPaths = new ArrayList<>();
if (mRegisterPackage) {
try {
ActivityManagerNative.getDefault().addPackageDependency(mPackageName);
} catch (RemoteException e) {
}
}
zipPaths.add(mAppDir);
if (mSplitAppDirs != null) {
Collections.addAll(zipPaths, mSplitAppDirs);
}
libPaths.add(mLibDir);
/*
* The following is a bit of a hack to inject
* instrumentation into the system: If the app
* being started matches one of the instrumentation names,
* then we combine both the "instrumentation" and
* "instrumented" app into the path, along with the
* concatenation of both apps' shared library lists.
*/
String instrumentationPackageName = mActivityThread.mInstrumentationPackageName;
String instrumentationAppDir = mActivityThread.mInstrumentationAppDir;
String[] instrumentationSplitAppDirs = mActivityThread.mInstrumentationSplitAppDirs;
String instrumentationLibDir = mActivityThread.mInstrumentationLibDir;
String instrumentedAppDir = mActivityThread.mInstrumentedAppDir;
String[] instrumentedSplitAppDirs = mActivityThread.mInstrumentedSplitAppDirs;
String instrumentedLibDir = mActivityThread.mInstrumentedLibDir;
String[] instrumentationLibs = null;
if (mAppDir.equals(instrumentationAppDir)
|| mAppDir.equals(instrumentedAppDir)) {
zipPaths.clear();
zipPaths.add(instrumentationAppDir);
if (instrumentationSplitAppDirs != null) {
Collections.addAll(zipPaths, instrumentationSplitAppDirs);
}
zipPaths.add(instrumentedAppDir);
if (instrumentedSplitAppDirs != null) {
Collections.addAll(zipPaths, instrumentedSplitAppDirs);
}
libPaths.clear();
libPaths.add(instrumentationLibDir);
libPaths.add(instrumentedLibDir);
if (!instrumentedAppDir.equals(instrumentationAppDir)) {
instrumentationLibs = getLibrariesFor(instrumentationPackageName);
}
}
apkPaths.addAll(zipPaths);
if (mSharedLibraries != null) {
for (String lib : mSharedLibraries) {
if (!zipPaths.contains(lib)) {
zipPaths.add(0, lib);
}
}
}
if (instrumentationLibs != null) {
for (String lib : instrumentationLibs) {
if (!zipPaths.contains(lib)) {
zipPaths.add(0, lib);
}
}
}
final String zip = TextUtils.join(File.pathSeparator, zipPaths);
// Add path to libraries in apk for current abi
if (mApplicationInfo.primaryCpuAbi != null) {
for (String apk : apkPaths) {
libPaths.add(apk + "!/lib/" + mApplicationInfo.primaryCpuAbi);
}
}
final String lib = TextUtils.join(File.pathSeparator, libPaths);
/*
* With all the combination done (if necessary, actually
* create the class loader.
*/
if (ActivityThread.localLOGV)
...
// Temporarily disable logging of disk reads on the Looper thread
// as this is early and necessary.
StrictMode.ThreadPolicy oldPolicy = StrictMode.allowThreadDiskReads();
mClassLoader = ApplicationLoaders.getDefault().getClassLoader(zip, lib,
mBaseClassLoader);
StrictMode.setThreadPolicy(oldPolicy);
} else {
if (mBaseClassLoader == null) {
mClassLoader = ClassLoader.getSystemClassLoader();
} else {
mClassLoader = mBaseClassLoader;
}
}
return mClassLoader;
}
}

这个方法虽然有点长,但是其实逻辑很简单,就是如果包名不是”android”(普通App的包名都不是),那么就调用ApplicationLoaders.getClassLoader()方法创建PathClassLoader,该方法如下:

1
2
3
4
5
6
7
8
9
10
11
12
13
14
15
16
17
18
19
20
21
22
23
24
25
26
27
28
29
30
31
32
33
34
35
36
37
38
39
40
41
public ClassLoader getClassLoader(String zip, String libPath, ClassLoader parent)
{
/*
* This is the parent we use if they pass "null" in. In theory
* this should be the "system" class loader; in practice we
* don't use that and can happily (and more efficiently) use the
* bootstrap class loader.
*/
ClassLoader baseParent = ClassLoader.getSystemClassLoader().getParent();
synchronized (mLoaders) {
if (parent == null) {
parent = baseParent;
}
/*
* If we're one step up from the base class loader, find
* something in our cache. Otherwise, we create a whole
* new ClassLoader for the zip archive.
*/
if (parent == baseParent) {
ClassLoader loader = mLoaders.get(zip);
if (loader != null) {
return loader;
}
Trace.traceBegin(Trace.TRACE_TAG_ACTIVITY_MANAGER, zip);
PathClassLoader pathClassloader =
new PathClassLoader(zip, libPath, parent);
Trace.traceEnd(Trace.TRACE_TAG_ACTIVITY_MANAGER);
mLoaders.put(zip, pathClassloader);
return pathClassloader;
}
Trace.traceBegin(Trace.TRACE_TAG_ACTIVITY_MANAGER, zip);
PathClassLoader pathClassloader = new PathClassLoader(zip, parent);
Trace.traceEnd(Trace.TRACE_TAG_ACTIVITY_MANAGER);
return pathClassloader;
}
}

可以看到在最后调用了PathClassLoader的构造方法创建了PathClassLoader对象。

1.2 RePluginClassLoader

回到PatchClassLoaderUtils.patch()方法,它在最后调用RePluginCallbacks.createClassLoader()方法:

1
2
3
4
5
6
7
8
9
10
11
12
13
/**
* 创建【宿主用的】 RePluginClassLoader 对象以支持大多数插件化特征。默认为:RePluginClassLoader的实例
* <p>
* 子类可复写此方法,来创建自己的ClassLoader,做相应的事情(如Hook宿主的ClassLoader做一些特殊的事)
*
* @param parent 该ClassLoader的父亲,通常为BootClassLoader
* @param original 宿主的原ClassLoader,通常为PathClassLoader
* @return 支持插件化方案的ClassLoader对象,可直接返回RePluginClassLoader
* @see RePluginClassLoader
*/
public RePluginClassLoader createClassLoader(ClassLoader parent, ClassLoader original) {
return new RePluginClassLoader(parent, original);
}

官方注释都已经写得很清楚了,我就不多解释了。

下面看RePluginClassLoader的构造方法:

1
2
3
4
5
6
7
8
9
10
11
12
13
14
public RePluginClassLoader(ClassLoader parent, ClassLoader orig) {
// 由于PathClassLoader在初始化时会做一些Dir的处理,所以这里必须要传一些内容进来
// 但我们最终不用它,而是拷贝所有的Fields
super("", "", parent);
mOrig = orig;
// 将原来宿主里的关键字段,拷贝到这个对象上,这样骗系统以为用的还是以前的东西(尤其是DexPathList)
// 注意,这里用的是“浅拷贝”
// Added by Jiongxuan Zhang
copyFromOriginal(orig);
initMethods(orig);
}

注意这里的mOrig就是系统的PathClassLoader对象。而copyFromOriginal()方法是PathClassLoader中的一些关键字段(包括libPath, libraryPathElements, mDexs, mFiles, mPaths, mZips等)拷贝到RePluginClassLoader中,initMethods()则是初始化反射要调用的方法。

在前一小节中提到,在初始化时会将系统的PathClassLoader对象替换为RePluginClassLoader对象,那么之后有类需要加载时,就会调用到RePluginClassLoader的loadClass()方法:

1
2
3
4
5
6
7
8
9
10
11
12
13
14
15
16
17
18
19
20
@Override
protected Class<?> loadClass(String className, boolean resolve) throws ClassNotFoundException {
//
Class<?> c = null;
c = PMF.loadClass(className, resolve);
if (c != null) {
return c;
}
//
try {
c = mOrig.loadClass(className);
// 只有开启“详细日志”才会输出,防止“刷屏”现象
...
return c;
} catch (Throwable e) {
//
}
//
return super.loadClass(className, resolve);
}

显然,这里是先调用PMF.loadClass()加载类(实际上宿主和插件中的业务相关的类都是由它加载的),如果返回null才调用原始的PathClassLoader的loadClass()方法去加载。

PMF只是一个装饰类,最后会调用到PmBase的loadClass()方法:

1
2
3
4
5
6
7
8
9
10
11
12
13
14
15
16
17
18
19
20
21
22
23
24
25
26
27
28
29
30
31
32
33
34
35
36
37
38
39
40
41
42
43
44
45
46
47
48
49
50
51
52
53
54
55
56
57
58
59
60
61
62
63
64
65
66
67
68
69
70
71
72
73
74
75
76
77
78
79
80
81
82
83
84
85
86
87
88
89
90
91
92
93
94
95
96
97
98
99
100
101
102
103
104
105
106
107
108
109
110
111
112
113
114
115
final Class<?> loadClass(String className, boolean resolve) {
// 加载Service中介坑位
if (className.startsWith(PluginPitService.class.getName())) {
...
return PluginPitService.class;
}
//
if (mContainerActivities.contains(className)) {
Class<?> c = mClient.resolveActivityClass(className);
if (c != null) {
return c;
}
// 输出warn日志便于查看
// use DummyActivity orig=
...
return DummyActivity.class;
}
//
if (mContainerServices.contains(className)) {
Class<?> c = loadServiceClass(className);
if (c != null) {
return c;
}
// 输出warn日志便于查看
// use DummyService orig=
...
return DummyService.class;
}
//
if (mContainerProviders.contains(className)) {
Class<?> c = loadProviderClass(className);
if (c != null) {
return c;
}
...
return DummyProvider.class;
}
// 插件定制表
DynamicClass dc = mDynamicClasses.get(className);
if (dc != null) {
final Context context = RePluginInternal.getAppContext();
PluginDesc desc = PluginDesc.get(dc.plugin);
...
// 加载动态类时,如果其对应的插件未下载,则转到代理类
if (desc != null) {
String plugin = desc.getPluginName();
if (PluginTable.getPluginInfo(plugin) == null) {
...
return DynamicClassProxyActivity.class;
}
}
/* 加载未安装的大插件时,启动一个过度 Activity */
// todo fixme 仅对 activity 类型才弹窗
boolean needStartLoadingActivity = (desc != null && desc.isLarge() && !RePlugin.isPluginDexExtracted(dc.plugin));
...
if (needStartLoadingActivity) {
Intent intent = new Intent();
intent.setFlags(Intent.FLAG_ACTIVITY_NEW_TASK);
// fixme 将 PluginLoadingActivity2 移到 replugin 中来,不写死
intent.setComponent(new ComponentName(IPC.getPackageName(), "com.qihoo360.loader2.updater.PluginLoadingActivity2"));
context.startActivity(intent);
}
Plugin p = loadAppPlugin(dc.plugin);
if (LOG) {
LogDebug.d("loadClass", "p=" + p);
}
if (p != null) {
try {
Class<?> cls = p.getClassLoader().loadClass(dc.className);
if (needStartLoadingActivity) {
// 发广播给过度 Activity,让其关闭
// fixme 发送给 UI 进程
Tasks.postDelayed2Thread(new Runnable() {
@Override
public void run() {
...
IPC.sendLocalBroadcast2All(context, new Intent("com.qihoo360.replugin.load_large_plugin.dismiss_dlg"));
}
}, 300);
// IPC.sendLocalBroadcast2Process(context, IPC.getPersistentProcessName(), new Intent("com.qihoo360.replugin.load_large_plugin.dismiss_dlg"), )
}
return cls;
} catch (Throwable e) {
...
}
} else {
...
Tasks.postDelayed2Thread(new Runnable() {
@Override
public void run() {
IPC.sendLocalBroadcast2All(context, new Intent("com.qihoo360.replugin.load_large_plugin.dismiss_dlg"));
}
}, 300);
}
...
// return dummy class
if ("activity".equals(dc.classType)) {
return DummyActivity.class;
} else if ("service".equals(dc.classType)) {
return DummyService.class;
} else if ("provider".equals(dc.classType)) {
return DummyProvider.class;
}
return dc.defClass;
}
//
return loadDefaultClass(className);
}

这个方法虽然看起来很长,实际上分成如下几个部分就很好理解了:

  • 如果类名是以”PluginPitService”开头,则说明需要加载Service中介坑位,返回PluginPitService.class
  • 如果mContainerActivities包含该activity名称,就调用PluginProcessPer.resolveActivityClass()方法进行加载,注意这里的activity是坑位名称,实际上只要是通过RePlugin分配坑位的,都会记录在mContainerActivities. 下面进入PluginProcessPer.resolveActivityClass()方法:

    1
    2
    3
    4
    5
    6
    7
    8
    9
    10
    11
    12
    13
    14
    15
    16
    17
    18
    19
    20
    21
    22
    23
    24
    25
    26
    27
    28
    29
    30
    31
    32
    33
    34
    35
    36
    37
    /**
    * 类加载器根据容器解析到目标的activity
    * @param container
    * @return
    */
    final Class<?> resolveActivityClass(String container) {
    String plugin = null;
    String activity = null;
    // 先找登记的,如果找不到,则用forward activity
    PluginContainers.ActivityState state = mACM.lookupByContainer(container);
    if (state == null) {
    // PACM: loadActivityClass, not register, use forward activity, container=
    ...
    return ForwardActivity.class;
    }
    plugin = state.plugin;
    activity = state.activity;
    ...
    Plugin p = mPluginMgr.loadAppPlugin(plugin);
    if (p == null) {
    // PACM: loadActivityClass, not found plugin
    ...
    return null;
    }
    ClassLoader cl = p.getClassLoader();
    ...
    Class<?> c = null;
    try {
    c = cl.loadClass(activity);
    } catch (Throwable e) {
    ...
    }
    ...
    return c;
    }

首先,为了加载真正要启动的activity,需要根据当前的坑位(container)找到记录了要启动的activity名称的ActivityState(ActivityState中记录了插件名称和真正要启动的activity名称),调用PluginContainers.lookupByContainer()进行查找:

1
2
3
4
5
6
7
8
9
10
11
12
13
14
15
16
17
18
19
20
21
22
23
24
/**
* 容器对应的类
*
* @param container
* @return 注意,对于返回值:可能是登记的,可能是activity退出的残留,也可能是进程恢复后上次的记录
*/
final ActivityState lookupByContainer(String container) {
if (container == null) {
return null;
}
synchronized (mLock) {
HashMap<String, ActivityState> map = mStates;
ActivityState state = map.get(container);
if (state != null && state.state != STATE_NONE) {
...
return new ActivityState(state);
}
}
// PC: lookupByContainer
...
return null;
}

这个逻辑很简单,就是调用mStates.get(container)获取到对应的ActivityState,而这个ActivityState中的activity是什么时候赋值的呢?

就是在之前在allocLocked()方法分配坑位时,调用了ActivityState的occupy()方法,在occupy()方法中将真正要启动的activity记录在了ActivityState的activity字段中,如果有不了解的童鞋,可以看我前面一篇文章: RePlugin解析-startActivity流程分析

再回到PluginProcessPer.resolveActivityClass()方法中,获取到ActivityState对象后,取出其中的plugin和activity字段,之后调用PmBase.loadAppPlugin()方法获取对应的插件:

1
2
3
4
5
6
7
8
9
10
11
12
13
14
15
final Plugin loadAppPlugin(String plugin) {
return loadPlugin(mPlugins.get(plugin), Plugin.LOAD_APP, true);
}
// 底层接口
final Plugin loadPlugin(Plugin p, int loadType, boolean useCache) {
if (p == null) {
return null;
}
if (!p.load(loadType, useCache)) {
...
return null;
}
return p;
}

可见这里有两个操作:

  • 第一,通过mPlugins这个HashMap获取到对应的Plugin对象;

  • 第二,调用Plugin.load()方法加载插件,并且加载类型为Plugin.LOAD_APP;而Plugin.load()方法如下:

    1
    2
    3
    4
    5
    6
    7
    8
    9
    10
    11
    12
    13
    14
    15
    16
    final boolean load(int load, boolean useCache) {
    PluginInfo info = mInfo;
    boolean rc = loadLocked(load, useCache);
    // 尝试在此处调用Application.onCreate方法
    // Added by Jiongxuan Zhang
    if (load == LOAD_APP && rc) {
    callApp();
    }
    // 如果info改了,通知一下常驻
    // 只针对P-n的Type转化来处理,一定要通知,这样Framework_Version也会得到更新
    if (rc && mInfo != info) {
    UpdateInfoTask task = new UpdateInfoTask((PluginInfo) mInfo.clone());
    Tasks.post2Thread(task);
    }
    return rc;
    }

    其中loadLocked()方法在RePlugin解析之插件的安装与加载一文中介绍过loadLocked()方法,主要做的事情如下:

    插件加载过程中主要做了以下事情:

    • 将插件文件解压到目标目录中

    • 解析插件的所有组件信息

    • 调整插件的进程信息(其实就是进行映射)
    • 调整插件中Activity的taskAffinity
    • 解析插件中的资源
    • 创建PluginDexClassLoader

    下面讲callApp()方法:

    1
    2
    3
    4
    5
    6
    7
    8
    9
    10
    11
    12
    13
    private void callApp() {
    if (Looper.myLooper() == Looper.getMainLooper()) {
    callAppLocked();
    } else {
    // 确保一定在UI的最早消息处调用
    mMainH.postAtFrontOfQueue(new Runnable() {
    @Override
    public void run() {
    callAppLocked();
    }
    });
    }
    }

    显然,这就是为了在主线程中调用callAppLocked()方法:

    1
    2
    3
    4
    5
    6
    7
    8
    9
    10
    11
    12
    13
    14
    15
    16
    17
    18
    19
    20
    21
    22
    23
    private void callAppLocked() {
    // 获取并调用Application的几个核心方法
    if (!mDummyPlugin) {
    // NOTE 不排除A的Application中调到了B,B又调回到A,或在同一插件内的onCreate开启Service/Activity,而内部逻辑又调用fetchContext并再次走到这里
    // NOTE 因此需要对mApplicationClient做判断,确保永远只执行一次,无论是否成功
    if (mApplicationClient != null) {
    // 已经初始化过,无需再次处理
    return;
    }
    mApplicationClient = PluginApplicationClient.getOrCreate(
    mInfo.getName(), mLoader.mClassLoader, mLoader.mComponents, mLoader.mPluginObj.mInfo);
    if (mApplicationClient != null) {
    mApplicationClient.callAttachBaseContext(mLoader.mPkgContext);
    mApplicationClient.callOnCreate();
    }
    } else {
    if (LOGR) {
    LogRelease.e(PLUGIN_TAG, "p.cal dm " + mInfo.getName());
    }
    }
    }

    显然,这里就是通过包装一些方法到PluginApplicationClient中,最终调用到插件Application的attachBaseContext()和onCreate()方法

再回到PluginProcessPer.resolveActivityClass()方法,ClassLoader cl=p.getClassLoader()返回的就是在loadLocked()中创建的PluginDexClassLoader, 其loadClass()方法如下:

1
2
3
4
5
6
7
8
9
10
11
12
13
14
15
16
17
18
19
20
21
22
23
24
25
26
27
28
29
30
31
protected Class<?> loadClass(String className, boolean resolve) throws ClassNotFoundException {
// 插件自己的Class。从自己开始一直到BootClassLoader,采用正常的双亲委派模型流程,读到了就直接返回
Class<?> pc = null;
ClassNotFoundException cnfException = null;
try {
pc = super.loadClass(className, resolve);
if (pc != null) {
return pc;
}
} catch (ClassNotFoundException e) {
// Do not throw "e" now
cnfException = e;
}
// 若插件里没有此类,则会从宿主ClassLoader中找,找到了则直接返回
// 注意:需要读取isUseHostClassIfNotFound开关。默认为关闭的。可参见该开关的说明
if (RePlugin.getConfig().isUseHostClassIfNotFound()) {
try {
return loadClassFromHost(className, resolve);
} catch (ClassNotFoundException e) {
// Do not throw "e" now
cnfException = e;
}
}
// At this point we can throw the previous exception
if (cnfException != null) {
throw cnfException;
}
return null;
}

注意PluginDexClassLoader继承自DexClassLoader,所以上述方法中的super.loadClass()其实是采用了双亲委托模型,如果插件中没有此类,那么 就要从宿主ClassLoader中找

1.3 总结

所以,归纳起来,RePlugin中的类加载层次跟Atlas类似,都是从宿主到插件的加载顺序,用图形表示如下:
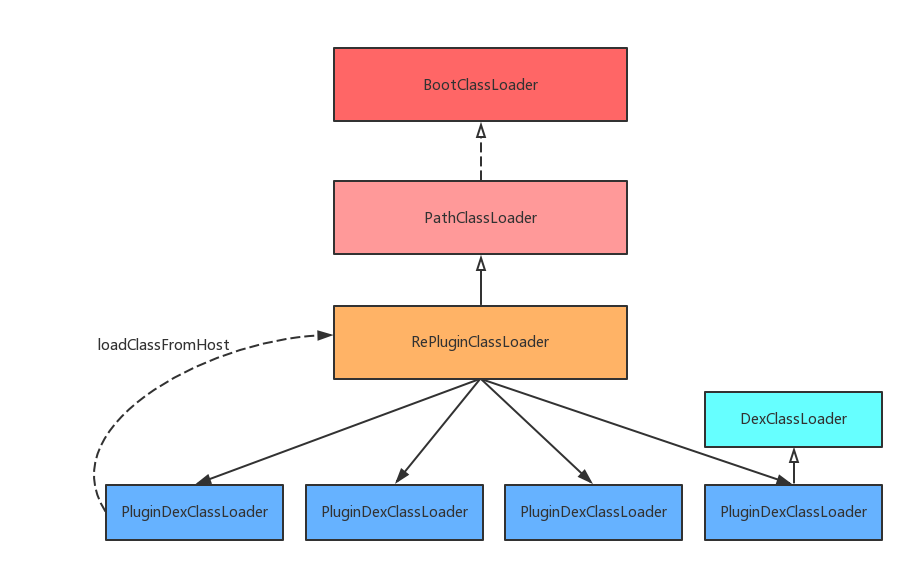
2. 四大组件的加载

2.1 activity的加载

在第一节中,就以activity的加载为例进行讲解,这里就不再赘述了。

2.2 service的加载

跟activity类似,只需要根据service坑位进行还原真实的service,然后调用插件的PluginDexClassLoader.loadClass()即可。

2.3 ContentProvider的加载

与service类似,不再赘述。

2.4 broadcast receiver的加载

由于把所有的broadcast receiver都动态注册,不涉及任何坑位的替换等问题,所以跟普通类的加载是一样的,分析见下一节。

3.普通类的加载

其他类的加载是在PmBase.loadDefaultClass()方法中:

1
2
3
4
5
6
7
8
9
10
11
12
13
14
15
16
17
18
19
20
21
22
23
24
25
26
27
28
29
30
31
private final Class<?> loadDefaultClass(String className) {
//
Plugin p = mDefaultPlugin;
if (p == null) {
if (PluginManager.isPluginProcess()) {
...
}
return null;
}
ClassLoader cl = p.getClassLoader();
...
Class<?> c = null;
try {
c = cl.loadClass(className);
} catch (Throwable e) {
if (LOG) {
if (e != null && e.getCause() instanceof ClassNotFoundException) {
if (LOG) {
LogDebug.d(PLUGIN_TAG, "plugin classloader not found className=" + className);
}
} else {
if (LOG) {
LogDebug.d(PLUGIN_TAG, e.getMessage(), e);
}
}
}
}
...
return c;
}

这个方法很简单,就是调用插件的PluginDexClassLoader.loadClass()方法,其实也很好理解,对于插件中除四大组件之外的普通类,不需要根据坑位还原真实组件名称的操作,所以直接调用加载了插件dex文件的PluignDexClassLoader的loadClass()方法即可。