Android插件化(三):OpenAtlas的插件重建以及使用时安装

在上一篇博客Android插件化(二):OpenAtlas插件安装过程分析中深入分析了OpenAtlas的随宿主启动的插件安装过程,本文将对插件的重建,”使用时插件的安装”过程,以及插件安装后类的加载过程进行分析,其中”使用时安装”这是我自己的定义,它类似懒加载机制,比如在需要用到插件中的某个组件时,会先check一下,如果发现有插件存在该组件,并且插件还未安装,就会先安装该插件

1.插件的重建

Framework.restoreFromExistedBundle()方法如下:

1
2
3
4
5
6
7
8
9
10
private static BundleImpl restoreFromExistedBundle(String location, File file) {
try {
return new BundleImpl(file, new BundleContextImpl());
} catch (Throwable e) {
OpenAtlasMonitor.getInstance().trace(Integer.valueOf(-1), "", "", "restore bundle failed " + location + e);
log.error("restore bundle failed" + location, e);
return null;
}
}

其中的file其实是插件数据目录,类似”/data/data/cn.edu.zafu.atlasdemo/files/storage/com.lizhangqu.test”,进入到对应的BundleImpl(File,BundleContextImpl)构造方法中:

1
2
3
4
5
6
7
8
9
10
11
12
13
14
15
16
17
18
19
20
21
22
23
24
//file是类似"/data/data/cn.edu.zafu.atlasdemo/files/storage/com.lizhangqu.test"这样的目录
BundleImpl(File file, BundleContextImpl bundleContextImpl) throws Exception {
long currentTimeMillis = System.currentTimeMillis();
DataInputStream dataInputStream = new DataInputStream(new FileInputStream(new File(file, "meta")));
this.location = dataInputStream.readUTF();
this.currentStartlevel = dataInputStream.readInt();
this.persistently = dataInputStream.readBoolean();
dataInputStream.close();
bundleContextImpl.bundle = this;
this.context = bundleContextImpl;
this.bundleDir = file;
this.state = BundleEvent.STARTED;
try {
this.archive = new BundleArchive(this.location, file);
resolveBundle(false);
Framework.bundles.put(this.location, this);
Framework.notifyBundleListeners(1, this);
if (Framework.DEBUG_BUNDLES && log.isInfoEnabled()) {
log.info("Framework: Bundle " + toString() + " loaded. " + (System.currentTimeMillis() - currentTimeMillis) + " ms");
}
} catch (Exception e) {
throw new BundleException("Could not load bundle " + this.location, e.getCause());
}
}

显然,通过读取/data/data/cn.edu.zafu.atlasdemo/files/storage/com.lizhangqu.test目录下的meta文件,获取了包名,启动级别,启动状态信息。之后也是要创建BundleArchive对象,但是调用的构造方法和前面的不同,代码如下:

1
2
3
4
5
6
7
8
9
10
11
12
13
14
15
16
17
18
19
20
21
22
23
24
25
26
27
28
29
30
31
32
33
34
35
36
37
38
39
40
41
42
43
44
45
46
47
48
49
50
51
52
53
54
55
56
57
58
59
60
61
62
//bundleDir类似"data/data/cn.edu.zafu.atlasdemo/files/storage/com.lizhangqu.test"
public BundleArchive(String location, File bundleDir) throws IOException {
this.revisions = new TreeMap<Long, BundleArchiveRevision>();
File[] listFiles = bundleDir.listFiles();
String currentProcessName = OpenAtlasUtils.getProcessNameByPID(android.os.Process.myPid());
if (listFiles != null) {
for (File file : listFiles) {
if (file.getName().startsWith(REVISION_DIRECTORY)) {
if (new File(file, DEPRECATED_MARK).exists()) {
try {
if (!TextUtils.isEmpty(currentProcessName) && currentProcessName.equals(RuntimeVariables.androidApplication.getPackageName())) {
for (File delete : file.listFiles()) {
delete.delete();
}
file.delete();
}
} catch (Exception e) {
}
} else {
long parseLong = Long.parseLong(StringUtils.substringAfter(file.getName(), "."));
if (parseLong > 0) {
this.revisions.put(Long.valueOf(parseLong), null);
}
}
}
}
}
if (this.revisions.isEmpty()) {
try {
if (!TextUtils.isEmpty(currentProcessName) && currentProcessName.equals(RuntimeVariables.androidApplication.getPackageName())) {
for (File file : listFiles) {
file.delete();
}
bundleDir.delete();
}
} catch (Exception e2) {
}
throw new IOException("No valid revisions in bundle archive directory: " + bundleDir);
}
this.bundleDir = bundleDir;
long longValue = this.revisions.lastKey().longValue();
BundleArchiveRevision bundleArchiveRevision = new BundleArchiveRevision(location, longValue, new File(bundleDir, "version." + String.valueOf(longValue)));
this.revisions.put(Long.valueOf(longValue), bundleArchiveRevision);
this.currentRevision = bundleArchiveRevision;
//remove old version
for (int i = 1; i < longValue; i++) { //mBundleDir类似"/data/data/cn.edu.zafu.atlasdemo/files/storage/com.lizhangqu.test/version.1"
File mBundleDir = new File(bundleDir, "version." + String.valueOf(i));
if (mBundleDir.isDirectory()) {
File[] listFilesSub = mBundleDir.listFiles();
for (File file : listFilesSub) {
file.delete();
}
mBundleDir.delete();
}
log.info("remove old bundle@" + mBundleDir.getAbsolutePath() + " last version : " + currentRevision);
}
//remove old version
}

代码有点长,但是其实不难。

  • 同样的,新建了revisions这个TreeMap对象;
  • 获取插件目录bundleDir(类似”/data/data/cn.edu.zafu.atalasdemo/files/storage/com.lizhangqu.test”)下所有文件,如果是以”version”开头,则进行判断,如果这个版本的目录下有DEPRECATED_MARK文件存在,则说明是不推荐的版本,为了节约空间,直接将这个版本的插件目录以及其中的文件删除;否则将对应版本号的值置为null,即this.revisions.put(Long.valueOf(parseLong),null);这样做的原因是不能有两个版本的插件共存,需要安装(或重建)当前插件的话,就需要先把其他版本的插件从内存中消除;
  • 如果revisions为空,则对进行这个操作的进程进行检查,保证是宿主进程在进行插件的重建工作,这样是为了防止Hacker将自己的插件安装到宿主中进行破坏活动;
  • 注意longValue=this.revisions.lastKey().longValue();这里,会返回键值最大的那个,也就是版本号最大的那个;可以保证获取到最后一次安装时的版本号,而这个版本号就是我们要重建的插件版本号;
  • 之后类似的,也要创建BundleArchiveRevision对象,但是调用的是不同的构造方法:
1
2
3
4
5
6
7
8
9
10
11
12
13
14
15
16
17
18
19
20
21
22
23
24
25
26
27
BundleArchiveRevision(String location, long revisionNum, File revisionDir) throws IOException {
File metaFile = new File(revisionDir, "meta");
if (metaFile.exists()) {
DataInputStream dataInputStream = new DataInputStream(
new FileInputStream(metaFile));
this.revisionLocation = dataInputStream.readUTF();
dataInputStream.close();
this.revisionNum = revisionNum;
this.revisionDir = revisionDir;
if (!this.revisionDir.exists()) {
this.revisionDir.mkdirs();
}
if (StringUtils
.startWith(this.revisionLocation, REFERENCE_PROTOCOL)) {
this.bundleFile = new File(StringUtils.substringAfter(
this.revisionLocation, REFERENCE_PROTOCOL));
return;
} else {
this.bundleFile = new File(revisionDir, BUNDLE_FILE_NAME);
return;
}
}
throw new IOException("Could not find meta file in "
+ revisionDir.getAbsolutePath());
}

这个构造方法就是记录包名,版本号和版本目录;
之后从安装时创建的meta file中读出插件文件的位置,并且用bundleFile记录下来。这个bundleFile非常重要,在之后加载类,读取Manifest中的信息,以及加载插件中的资源都会用到。

到这里,记录插件信息的BundleImpl对象中的属性都已经初始化完毕,所以重建完毕。

到这里,插件的安装过程就完成了。之后,在BundleImpl中会调用Framework.bundles.put(location,this);将插件对象插入到Framework.bundles这个map中;之后调用resolveBundle(false);主要是新建了classLoader对象和将state该为4(BundleEvent.STOPPED),并通知BundleListeners,不过这里状态是BundleEvent.LOADED,表示当前插件已经加载完毕;最后调用Framework.notifyBundleListeners通知BundleListener,通知的状态为BundleEvent.INSTALLED,表示当前插件已经安装完毕。

再回到Framework中的installNewBundle(String,File)方法,之后会调用storeMetadata(),该方法如下:

1
2
3
4
5
6
7
8
9
10
11
12
13
14
15
16
17
18
19
20
static void storeMetadata() {
try {
File metaFile = new File(STORAGE_LOCATION, "meta");
DataOutputStream dataOutputStream = new DataOutputStream(new FileOutputStream(metaFile));
dataOutputStream.writeInt(startlevel);
String join = StringUtils.join(writeAheads.toArray(), ",");
if (join == null) {
join = "";
}
dataOutputStream.writeUTF(join);
dataOutputStream.flush();
dataOutputStream.close();
} catch (IOException e) {
OpenAtlasMonitor.getInstance().trace(Integer.valueOf(OpenAtlasMonitor.WRITE_META_FAIL), "", "", "storeMetadata failed ", e);
log.error("Could not save meta data.", e);
}
}

这个方法非常简单,就是将startLevel和writeAheads(首个插件安装时startlevel为-1,writeAheads为空),写入到类似/data/data/cn.edu.atlasdemo/files/storage/meta这样的文件中。

需要注意的是,到这里并没有完成全部工作,回到BundleInstaller.processAutoStartBundles()中,发现如果是随宿主启动的话,就会立即开启各个BundleImpl对象,BundleImpl.start()的代码如下:

1
2
3
4
5
6
7
8
9
@Override
public synchronized void start() throws BundleException {
this.persistently = true;
//因为persistently是metaFile中的一部分,persistently变化了,当然metaFile也要更新.
updateMetadata();
if (this.currentStartlevel <= Framework.startlevel) { //"com.lizhangqu.test"时currentStartLevel==1,Framework.startLevel==-1
startBundle();
}
}

可见这里主要就是更改persistently的状态,而且当当前插件的启动level比总体的启动level低时,就需要startBundle(),不过首次安装插件时this.currentStartlevel>Framework.startlevel,所以不会执行startBundle();

再一路回到OpenAtlasInitializer中的installBundles()方法中,安装完插件之后调用的是mOptDexProcess.processPackage(false,false);方法:

1
2
3
4
5
6
7
8
9
10
11
12
13
14
15
16
17
18
19
20
21
22
23
24
25
26
27
28
29
30
31
32
33
34
35
36
37
/**
* 处理Bundles
*
* @param optAuto
* 是否只处理安装方式为AUTO的Bundle
* @param notifyResult
* 通知UI安装结果
* ******/
public synchronized void processPackages(boolean optAuto, boolean notifyResult) {
if (!this.isInitialized) {
Log.e("OptDexProcess", "Bundle Installer not initialized yet, process abort!");
} else if (!this.isExecuted || notifyResult) {
long currentTimeMillis;
if (optAuto) { //optAuto一般为true
currentTimeMillis = System.currentTimeMillis();
optAUTODex();
if (!notifyResult) {
finishInstalled();
}
Log.e("debug", "dexopt auto start bundles cost time = " + (System.currentTimeMillis() - currentTimeMillis) + " ms");
} else {
currentTimeMillis = System.currentTimeMillis();
optStoreDex();
Log.e("debug", "dexopt bundles not delayed cost time = " + (System.currentTimeMillis() - currentTimeMillis) + " ms");
if (!notifyResult) {
finishInstalled();
}
currentTimeMillis = System.currentTimeMillis();
getInstance().optStoreDex2();
Log.e("debug", "dexopt delayed bundles cost time = " + (System.currentTimeMillis() - currentTimeMillis) + " ms");
}
if (!notifyResult) {
this.isExecuted = true;
}
}
}

这里的逻辑其实有点混乱,到了ACDD就修改好了.
由于optAuto和notifyResult都为false,故执行optStoreDex()方法:

1
2
3
4
5
6
7
8
9
10
11
12
13
14
15
16
17
18
19
20
21
22
23
24
25
26
27
28
29
30
31
/**** 对已安装并且安装方式不为STORE的Bundle进行dexopt操作 ****/
private void optStoreDex() {
for (Bundle bundle : Atlas.getInstance().getBundles()) {
if (!(bundle == null || contains(AtlasConfig.STORE, bundle.getLocation()))) {
try {
((BundleImpl) bundle).optDexFile();
} catch (Throwable e) {
if (e instanceof DexLoadException) {
throw ((RuntimeException) e);
}
Log.e("OptDexProcess", "Error while dexopt >>>", e);
}
}
}
}
/**** 对全部安装方式为Store的Bundle进行dexopt操作 ***/
private void optStoreDex2() {
for (String bundle : AtlasConfig.STORE) {
Bundle bundle2 = Atlas.getInstance().getBundle(bundle);
if (bundle2 != null) {
try {
((BundleImpl) bundle2).optDexFile();
} catch (Throwable e) {
if (e instanceof DexLoadException) {
throw ((RuntimeException) e);
}
Log.e("OptDexProcess", "Error while dexopt >>>", e);
}
}
}
}

这两个综合起来就是对已经安装或者安装方式为STORE的插件进行dex优化工作,BundleImpl的optDexFile()方法如下:

1
2
3
public synchronized void optDexFile() {
getArchive().optDexFile();
}

显然,就是调用BundleArchive的optDexFile()方法,而BundleArchive的optDexFile()又是调用BundleArchiveRevision的optDexFile()方法:

1
2
3
4
5
6
7
8
9
10
11
12
13
14
15
16
17
18
19
20
21
22
23
24
25
26
27
28
29
30
31
32
33
34
35
36
37
38
39
public synchronized void optDexFile() {
if (!isDexOpted()) {
if (OpenAtlasHacks.LexFile == null
|| OpenAtlasHacks.LexFile.getmClass() == null) {
File oDexFile = new File(this.revisionDir, BUNDLE_ODEX_FILE);
long currentTimeMillis = System.currentTimeMillis();
try {
if (!OpenAtlasFileLock.getInstance().LockExclusive(oDexFile)) {
log.error("Failed to get file lock for "
+ this.bundleFile.getAbsolutePath());
}
if (oDexFile.length() <= 0) {
InitExecutor.optDexFile(
this.bundleFile.getAbsolutePath(),
oDexFile.getAbsolutePath());
loadDex(oDexFile);
OpenAtlasFileLock.getInstance().unLock(oDexFile);
// "bundle archieve dexopt bundle " +
// this.bundleFile.getAbsolutePath() + " cost time = " +
// (System.currentTimeMillis() - currentTimeMillis) +
// " ms";
}
} catch (Throwable e) {
log.error(
"Failed optDexFile '"
+ this.bundleFile.getAbsolutePath()
+ "' >>> ", e);
} finally {
OpenAtlasFileLock mAtlasFileLock = OpenAtlasFileLock.getInstance();
mAtlasFileLock.unLock(oDexFile);
}
} else {
DexClassLoader dexClassLoader = new DexClassLoader(
this.bundleFile.getAbsolutePath(),
this.revisionDir.getAbsolutePath(), null,
ClassLoader.getSystemClassLoader());
}
}
}

显然,这里就是进行dex优化工作,优化后的目标文件位置类似”/data/data/cn.edu.zafu.atlasdemo/files/storage/com.lizhangqu.test/version.1/bundle.dex”,先是调用了InitExecutor.optDexFile()进行了优化工作:

1
2
3
4
5
6
7
8
9
10
11
12
13
14
15
16
17
18
19
20
/****
* 在低于Android 4.4的系统上调用dexopt进行优化Bundle
****/
public static boolean optDexFile(String srcDexPath, String oDexFilePath) {
try {
if (sDexOptLoaded) {
if (isART&& AtlasConfig.optART) {
dexopt(srcDexPath, oDexFilePath, true, defaultInstruction);
} else {
dexopt(srcDexPath, oDexFilePath, false, "");
}
return true;
}
} catch (Throwable e) {
log.error("Exception while try to call native dexopt >>>", e);
}
return false;
}

由于ART虚拟机和Dalvik虚拟机的优化方式不同,所以需要区分,而dexopt是个native方法:

1
2
@SuppressWarnings("JniMissingFunction")
private static native void dexopt(String srcZipPath, String oDexFilePath, boolean runtime, String defaultInstruction);

它对应的C++方法如下:

1
2
3
4
5
6
7
8
9
10
11
12
13
14
15
16
17
18
19
20
21
22
23
24
25
26
27
28
29
30
31
32
33
34
35
36
37
38
39
40
41
42
43
44
45
46
47
48
49
50
51
52
53
54
55
56
57
58
59
60
61
62
63
64
65
66
67
68
69
70
71
72
73
74
75
76
77
78
79
80
81
82
83
84
85
86
87
88
89
90
91
92
93
94
95
96
int dexopt(const char *zipName, const char *odexName,bool isART, const char *defaultInstuction) {
int zipFd, odexFd;
/*
* Open the zip archive and the odex file, creating the latter (and
* failing if it already exists). This must be done while we still
* have sufficient privileges to read the source file and create a file
* in the target directory. The "classes.dex" file will be extracted.
*/
zipFd = open(zipName, O_RDONLY, 0);
if (zipFd < 0) {
#ifdef OPENATLAS_DEXOPT_DEBUG
LOGE("Unable to open '%s': %s\n", zipName, strerror(errno));
#endif
return 1;
}
odexFd = open(odexName, O_RDWR | O_CREAT | O_EXCL, 0644);
if (odexFd < 0) {
#ifdef OPENATLAS_DEXOPT_DEBUG
LOGE("Unable to create '%s': %s\n", odexName, strerror(errno));
#endif
close(zipFd);
return 1;
}
#ifdef OPENATLAS_DEXOPT_DEBUG
LOGI("--- BEGIN '%s' (bootstrap=%d) ---\n", zipName, 0);
#endif
pid_t pid = fork();
if (pid == 0) {
/* lock the input file */
if (flock(odexFd, LOCK_EX | LOCK_NB) != 0) {
#ifdef OPENATLAS_DEXOPT_DEBUG
LOGE("Unable to lock '%s': %s\n",odexName, strerror(errno));
#endif
exit(65);
}
if(isART){//run dex2oat vm safe is false
run_dex2oat(zipFd, odexFd, zipName,odexName,defaultInstuction,false);
} else{//
run_dexopt(zipFd, odexFd, zipName, "v=n,o=v");
}
exit(67); /* usually */
} else {
/* parent -- wait for child to finish */
#ifdef OPENATLAS_DEXOPT_DEBUG
LOGI("--- waiting for verify+opt, pid=%d\n", (int) pid);
#endif
int status, oldStatus;
pid_t gotPid;
close(zipFd);
close(odexFd);
/*
* Wait for the optimization process to finish.
*/
while (true) {
gotPid = waitpid(pid, &status, 0);
if (gotPid == -1 && errno == EINTR) {
#ifdef OPENATLAS_DEXOPT_DEBUG
LOGI("waitpid interrupted, retrying\n");
#endif
} else {
break;
}
}
if (gotPid != pid) {
#ifdef OPENATLAS_DEXOPT_DEBUG
LOGE("waitpid failed: wanted %d, got %d: %s\n", (int) pid, (int) gotPid, strerror(errno));
#endif
return 1;
}
if (WIFEXITED(status) && WEXITSTATUS(status) == 0) {
#ifdef OPENATLAS_DEXOPT_DEBUG
LOGI("--- END '%s' (success) ---\n", zipName);
#endif
return 0;
} else {
#ifdef OPENATLAS_DEXOPT_DEBUG
LOGI("--- END '%s' --- status=0x%04x, process failed\n",
zipName, status);
#endif
return 1;
}
}
/* notreached */
}

显然,对于ART虚拟机,调用的是run_dex2oat()进行优化,而对于Dalvik虚拟机,则调用run_dexopt()进行优化工作。

优化完了之后,调用loadDex()方法:

1
2
3
4
5
6
private synchronized void loadDex(File file) throws IOException {
if (this.dexFile == null) {
this.dexFile = DexFile.loadDex(this.bundleFile.getAbsolutePath(),
file.getAbsolutePath(), 0);
}
}

这个其实就是将优化过的odex或oat文件中的数据加载到内存中,调用的是DexFile.loadDex()方法进行解析,由于这里涉及到较多的dex文件格式,虚拟机以及优化的问题,展开的话内容太多,会在后面专门写博客分析。这里先跳过,只要记住:在调用DexFile.loadDex()生成DexFile对象之后,就可以利用它来查找插件中定义的类了。DexFile本来也是有public Class loadClass(String,ClassLoader)方法的。

到这里,可以总结一下安装插件过程中主要做了哪些事:

  • 新建了BundleImpl对象,在新建这个对象的过程中,新建了BundleArchive和BundleArchiveRevision,BundleClassLoader对象;
  • 对一些特殊的ROM进行了兼容,方法是复制插件文件到目标位置或者建立软链接;
  • 新建了插件版本元数据文件metaFile,就是类似/data/data/cn.edu.zafu.atlasdemo/files/storage/com.lizhangqu.test/version.1/meta这样的文件,用于记录文件协议和插件文件位置;
  • 新建(或打开)了类似/data/data/cn.edu.zafu.atlasdemo/files/storage/com.lizhangqu.test/meta这样的插件元数据文件,往其中写入了包名,启动级别和启动状态;
  • 新建(或打开)了类似/data/data/cn.edu.atlasdemo/files/storage/meta这样的记录总体插件状态的元数据文件,其中记录了当前Framework中的startLevel;
  • 对于dex文件进行了优化
  • 将BundleEvent.LOADED和BundleEvent.STARTED事件通知BundleListener

2.使用时安装流程

前面说过,使用时安装类似懒加载机制,比如在需要用到插件中的某个组件时,会先check一下,如果发现有插件存在该组件,并且插件还未安装,就会先安装该插件。

使用时安装的流程如下:

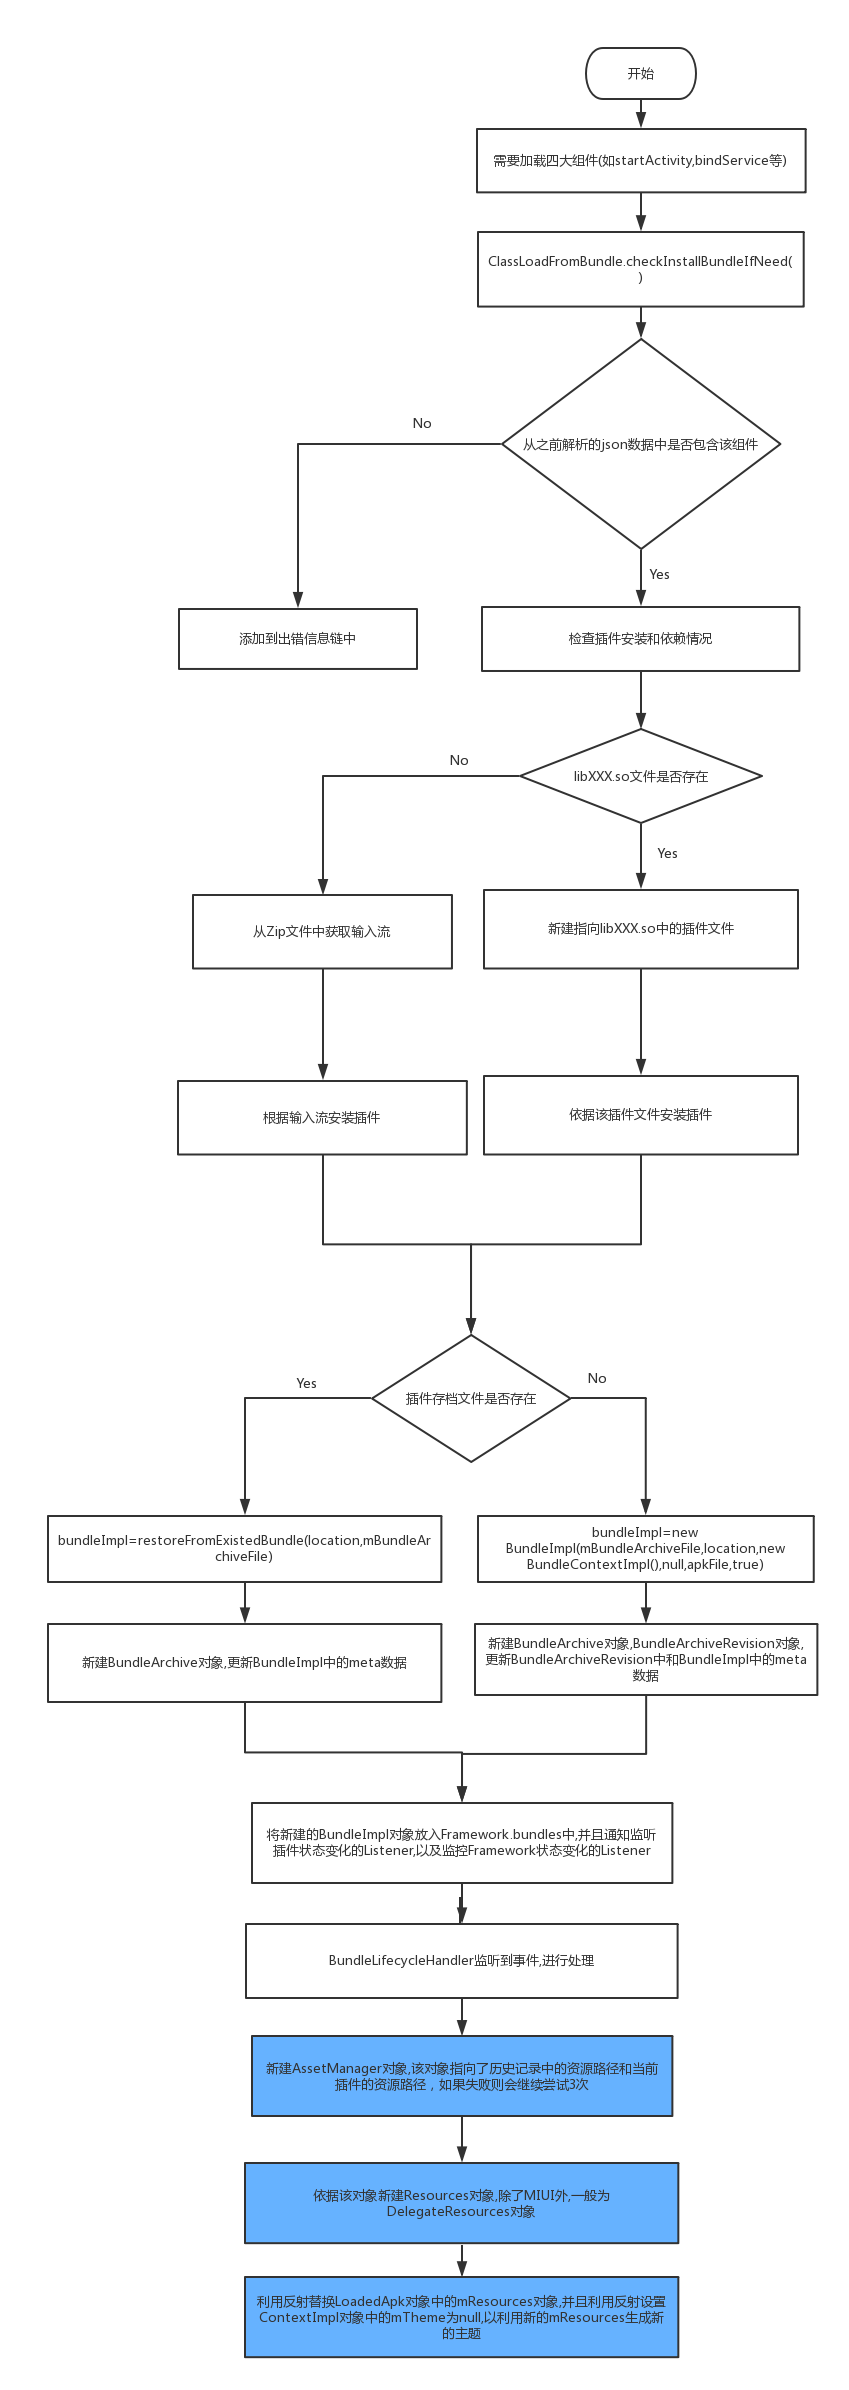
从以上两图中可以看出,宿主启动时安装和使用时安装只是前面部分不同,从判断插件存档文件是否存在开始,流程就一样了。

而会引起使用时的情况有很多,如ContextImplHook.bindService(),ContextImplHook.startActivity(),ContextImplHook.startService(),
ContextImplHook.findClass(),InstrumentationHook.execStartActivityInternal(),由于其他几种在后面会专门分析,这里就只分析ContextImpl.findClass()这种情况:

1
2
3
4
5
6
7
8
9
@Override
protected Class<?> findClass(String className) throws ClassNotFoundException {
ClassLoadFromBundle.checkInstallBundleIfNeed(className);
Class<?> loadFromInstalledBundles = ClassLoadFromBundle.loadFromInstalledBundles(className);
if (loadFromInstalledBundles != null) {
return loadFromInstalledBundles;
}
throw new ClassNotFoundException("Can't find class " + className + printExceptionInfo() + " " + ClassLoadFromBundle.getClassNotFoundReason(className));
}

ClassLoadFromBundle.checkInstallBundleIfNeed()方法如下:

1
2
3
4
5
6
7
8
9
10
11
12
13
14
15
16
public static void checkInstallBundleIfNeed(String bundleName) {
synchronized (bundleName) {
if (sInternalBundles == null) {
resolveInternalBundles();
}
String bundleForComponet = BundleInfoList.getInstance().getBundleNameForComponet(bundleName);
if (TextUtils.isEmpty(bundleForComponet)) {
Log.e(TAG, "Failed to find the bundle in BundleInfoList for component " + bundleForComponet);
insertToReasonList(bundleName, "not found in BundleInfoList!");
}
if (sInternalBundles == null || sInternalBundles.contains(bundleForComponet)) {
checkInstallBundleAndDependency(bundleForComponet);
return;
}
}
}

首次查找时sInternalBundles==null,故进入resolveInternalBundles();

1
2
3
4
5
6
7
8
9
10
11
12
13
14
15
16
17
18
19
20
21
22
23
public static synchronized void resolveInternalBundles() {
synchronized (ClassLoadFromBundle.class) {
if (sInternalBundles == null || sInternalBundles.size() == 0) {
String str = "lib/" + AtlasConfig.PRELOAD_DIR + "/libcom_";
String str2 = ".so";
List<String> arrayList = new ArrayList<String>();
try {
sZipFile = new ZipFile(RuntimeVariables.androidApplication.getApplicationInfo().sourceDir);
Enumeration<?> entries = sZipFile.entries();
while (entries.hasMoreElements()) {
String name = ((ZipEntry) entries.nextElement()).getName();
if (name.startsWith(str) && name.endsWith(str2)) {
arrayList.add(getPackageNameFromEntryName(name));
}
}
sInternalBundles = arrayList;
} catch (Exception e) {
Log.e(TAG, "Exception while get bundles in assets or lib", e);
}
}
}
}

利用的是寻找目录下ZipFile(其实确切地说是解压缩文件)的方法,其实效率非常低,因为打log发现sZipFile的entries有AndroidManifest.xml,META-INF/CERT.RSA,META-INF/CERT.SF,META-INF/MANIFEST.MF,classes.dex,
lib/armeabi/libcom_lizhangqu_test.so,lib/armeabi/libcom_lizhangqu_zxing.so,lib/armeabi/libdexopt.so,
lib/x86/libdexopt.so,res/anim/…,res/color/..,res/color-v11/..,res/drawable/..,res/drawable-../..,res/layout-../..所有这些文件,其实就是apk解压后的文件,如果宿主apk比较大,其中的资源和so文件较多,那么这样的查找就很费时。其实完全可以利用之前BundleParser的解析结果,然后按照约定去检查指定文件是否存在即可。

经过resolveInternalBundles()之后,sInternalBundles就包含了所有的插件名称,如{“com.lizhangqu.test”,”com.lizhangqu.zxing”},之后从解析的json文件结果中获取传入的组件对应的插件名称,如果sInternalBundles中含有该插件名称的话,就安装该插件。

其实这里的逻辑有冗余的地方,因为其实只要利用json文件解析的结果进行判断就行了,如果某个插件中含有该组件,就直接安装即可(如果之前没有安装的话),而且其实后面的checkInstallBundleAndDependency()方法中还会对插件文件是否存在进行判断.

之后进入checkInstallBundleAndDependency()中:

1
2
3
4
5
6
7
8
9
10
11
12
13
14
15
16
17
18
19
20
21
22
23
24
25
26
27
28
29
30
31
32
33
34
35
//检查插件的安装以及依赖情况.location是类似"com.lizhangqu.test"这样的包名,concat是类似"libcom_lizhangqu_test.so"这样的
public static void checkInstallBundleAndDependency(String location) {
List<String> dependencyForBundle = BundleInfoList.getInstance().getDependencyForBundle(location);
if (dependencyForBundle != null && dependencyForBundle.size() > 0) {
for (int i = 0; i < dependencyForBundle.size(); i++) {
checkInstallBundleAndDependency(dependencyForBundle.get(i));
}
}
if (Atlas.getInstance().getBundle(location) == null) {
String concat = "lib".concat(location.replace(".", "_")).concat(".so");
File file = new File(new File(Framework.getProperty(PlatformConfigure.ATLAS_APP_DIRECTORY), "lib"), concat);
if (file.exists()) { //如果so文件存在,如libcom_lizhangqu_test.so文件存在,就进行安装
try {
if (checkAvailableDisk()) {
Atlas.getInstance().installBundle(location, file);
return;
}
log.error("disk size not enough");
OpenAtlasMonitor.getInstance().trace(Integer.valueOf(-1), location, "", "disk size not enough");
} catch (Throwable e) {
log.error("failed to install bundle " + location, e);
OpenAtlasMonitor.getInstance().trace(Integer.valueOf(-1), location, "",
"failed to install bundle ", e);
throw new RuntimeException("atlas-2.3.47failed to install bundle " + location, e);
}
} else if (sInternalBundles == null || !sInternalBundles.contains(location)) {
log.error(" can not find the library " + concat + " for bundle" + location);
OpenAtlasMonitor.getInstance().trace(Integer.valueOf(-1), "" + location, "",
"can not find the library " + concat);
} else {
installFromApkZip(location, concat);
}
}
}

这个方法其实很简单:

  • 先检查当前插件对其他插件的依赖情况,如果依赖其他的插件,则需要先安装其他的插件,其他的插件如果仍然有依赖,则还需要先安装依赖,所以这是一个递归方法;
  • 检查插件文件是否存在,如果存在而且磁盘空间充足,就安装插件;之后插件的安装过程就跟前面随宿主启动时安装的过程一样了,不再赘述。

3.安装完插件后类的加载过程

在回到DelegateClassLoader的findClass()方法中,在调用ClassLoadFromBundle.checkInstallBundleIfNeed(className);安装完插件之后,接着就需要加载类了。

这里是通过调用ClassLoadFromBundle.loadFromInstalledBundles()来进行加载:

1
2
3
4
5
6
7
8
9
10
11
12
13
14
15
16
17
18
19
20
21
22
23
24
25
26
27
28
29
30
31
32
33
34
35
36
37
38
39
40
41
42
43
44
45
46
47
48
49
50
51
52
53
54
55
56
57
58
59
60
61
62
63
//component是类似"com.lizhangqu.test.MainActivity"这样的,其实这里查找bundle的效率太低,如果利用HashMap和packageName来进行查找的话要快的多,其中的classLoader其实是BundleClassLoader对象
static Class<?> loadFromInstalledBundles(String componet) throws ClassNotFoundException {
BundleImpl bundleImpl;
int i = 0;
Class<?> cls = null;
List<Bundle> bundles = Framework.getBundles();
if (!(bundles == null || bundles.isEmpty())) {
for (Bundle bundle : bundles) {
bundleImpl = (BundleImpl) bundle;
PackageLite packageLite = DelegateComponent.getPackage(bundleImpl.getLocation());
if (packageLite != null && packageLite.components.contains(componet)) {
bundleImpl.getArchive().optDexFile();
ClassLoader classLoader = bundleImpl.getClassLoader(); //classLoader是BundleClassLoader对象
if (classLoader != null) {
try {
cls = classLoader.loadClass(componet);
if (cls != null) {
return cls;
}
} catch (ClassNotFoundException e) {
throw new ClassNotFoundException("Can't find class " + componet + " in BundleClassLoader: "
+ bundleImpl.getLocation() + " [" + (bundles == null ? 0 : bundles.size()) + "]"
+ "classloader is: " + (classLoader == null ? "null" : "not null")
+ " packageversion " + getPackageVersion() + " exception:" + e.getMessage());
}
}
StringBuilder append = new StringBuilder().append("Can't find class ").append(componet)
.append(" in BundleClassLoader: ").append(bundleImpl.getLocation()).append(" [");
if (bundles != null) {
i = bundles.size();
}
throw new ClassNotFoundException(append.append(i).append("]")
.append(classLoader == null ? "classloader is null" : "classloader not null")
.append(" packageversion ").append(getPackageVersion()).toString());
}
}
}
//一般在上面就会返回,走不到这个分支.如果之前加载过(通过bundleImpl.getArchive().isDexOpted()可知),并且现在要加载的类并不是4大组件之一,则可以利用之前保存在bundleImpl中的ClassLoader对象直接解析
if (!(bundles == null || bundles.isEmpty())) {
Class<?> cls2 = null;
for (Bundle bundle2 : Framework.getBundles()) {
bundleImpl = (BundleImpl) bundle2;
if (bundleImpl.getArchive().isDexOpted()) {
Class<?> loadClass = null;
ClassLoader classLoader2 = bundleImpl.getClassLoader();
if (classLoader2 != null) {
try {
loadClass = classLoader2.loadClass(componet);
if (loadClass != null) {
return loadClass;
}
} catch (ClassNotFoundException e2) {
}
} else {
loadClass = cls2;
}
cls2 = loadClass;
}
}
cls = cls2;
}
return cls;
}

这个方法其实比较简单,主要是以下部分:

  • 遍历Framework中注册的所有插件,如果该插件的组件中包含该组件名,则进入下一步;
  • 调用bundleImpl.getArchive().optDexFile();而BundleImpl.getArchive().optDexFile();在前面mOptDexProcess.processPackage(false,false)分析过,这个就是先对dex进行优化(如果之前没有优化的话),然后利用DexFile.loadDex(odexFile);加载优化后的odex文件,并生成DexFile对象,之后bundleImpl.getClassLoader()返回BundleClassLoader对象,而BundleClassLoader其实是利用装饰模式,加载插件中的类时调用的是findOwnClass(),之后的调用流程为BundleClassLoader.findOwnClass()–>BundleArchive.findClass(String,ClassLoader)–>BundleArchiveRevision.findClass(String,ClassLoader),而该方法代码如下:
1
2
3
4
5
6
7
8
9
10
11
12
13
14
15
16
17
18
19
20
21
22
23
24
25
26
27
28
29
30
31
32
33
34
35
36
37
38
39
40
41
//str是类似"com.lizhangqu.test.MainActivity"或"com.lizhangqu.test.MusicService"这样,而classLoader是BundleClassLoader对象,revisionDir类似"/data/data/cn.deu.zafu.atlasdemo/files/storage/com.lizhangqu.test/version.1"
Class<?> findClass(String str, ClassLoader classLoader)
throws ClassNotFoundException {
try {
if (OpenAtlasHacks.LexFile == null
|| OpenAtlasHacks.LexFile.getmClass() == null) {
if (!isDexOpted()) {
optDexFile();
}
if (this.dexFile == null) {
loadDex(new File(this.revisionDir, BUNDLE_ODEX_FILE));
}
Class<?> loadClass = this.dexFile.loadClass(str, classLoader);
this.isDexFileUsed = true;
return loadClass;
}
if (this.dexClassLoader == null) {
File file = new File(RuntimeVariables.androidApplication
.getFilesDir().getParentFile(), "lib");
this.dexClassLoader = new BundleArchiveRevisionClassLoader(
this.bundleFile.getAbsolutePath(),
this.revisionDir.getAbsolutePath(),
file.getAbsolutePath(), classLoader);
}
return (Class) OpenAtlasHacks.DexClassLoader_findClass.invoke(
this.dexClassLoader, str);
} catch (IllegalArgumentException e) {
return null;
} catch (InvocationTargetException e2) {
return null;
} catch (Throwable e3) {
if (!(e3 instanceof ClassNotFoundException)) {
if (e3 instanceof DexLoadException) {
throw ((DexLoadException) e3);
}
log.error("Exception while find class in archive revision: "
+ this.bundleFile.getAbsolutePath(), e3);
}
return null;
}
}

显然,对应普通的ROM(非YunOS),在loadDex()之后,利用dexFile就可以加载到我们需要的类。
但是,对应YunOS(即lexFile!=null),这里先生成BundleArchiveRevisionClassLoader对象(BundleArchiveRevisionClassLoader继承自DexClassLoader),之后利用反射调用DexClassLoader的findClass()方法来加载类(其实findClass()方法是BaseDexClassLoader中的,不过DexClassLoader继承自BaseDexClassLoader).

如下是BundleArchiveRevision的内部类BundleArchiveRevisionClassLoader的定义:

1
2
3
4
5
6
7
8
9
10
11
12
13
14
15
16
17
18
19
20
21
22
23
24
25
26
27
28
29
30
31
32
33
class BundleArchiveRevisionClassLoader extends DexClassLoader {
/**
* @param dexPath the list of jar/apk files containing classes and resources, delimited by File.pathSeparator, which defaults to ":" on Android
* @param optimizedDirectory directory where optimized dex files should be written; must not be null
* @param libraryPath the list of directories containing native libraries, delimited by File.pathSeparator; may be null
* @param
* **/
BundleArchiveRevisionClassLoader(String dexPath, String optimizedDirectory, String libraryPath,
ClassLoader parent) {
super(dexPath, optimizedDirectory, libraryPath, parent);
}
@Override
public String findLibrary(String name) {
String findLibrary = super.findLibrary(name);
if (!TextUtils.isEmpty(findLibrary)) {
return findLibrary;
}
File findSoLibrary = BundleArchiveRevision.this
.findSoLibrary(System.mapLibraryName(name));
if (findSoLibrary != null && findSoLibrary.exists()) {
return findSoLibrary.getAbsolutePath();
}
try {
return (String) OpenAtlasHacks.ClassLoader_findLibrary.invoke(
Framework.getSystemClassLoader(), name);
} catch (Exception e) {
e.printStackTrace();
return null;
}
}
}

所以我们可以总结出来,对于普通的ROM,插件中的类是通过dexFile加载出来的;而对应YunOS系统,则是先生成BundleArchiveRevisionClassLoader(它是DexClassLoader的子类)对象,之后通过反射调用它的findClass()方法来加载类。