Google推荐的Android架构使用方式

Google推荐的Android架构使用方式

引入

Lifecycles,LiveData,ViewModel

1
2
3
compile 'android.arch.lifecycle:runtime:1.0.0-alpha3'
compile 'android.arch.lifecycle:extensions:1.0.0-alpha3'
annotationProcessor 'android.arch.lifecycle:compiler:1.0.0-alpha3'

整体的架构图如下

Room

1
2
compile 'android.arch.persistence.room:runtime:1.0.0-alpha3'
annotationProcessor 'android.arch.persistence.room:compiler:1.0.0-alpha3'

如果需要使用RoomRxJava,则需要引入

1
compile "android.arch.persistence.room:rxjava2:1.0.0-alpha3"

需要注意的是,这里面使用到了rxjava2,所以如果之前使用了rxjava1的话,会有冲突.

考虑后续rxjava的升级。

LifeCycle

这个其实是这些组件设计的核心。

1.观察主体

观察主体就是Activity和Fragment喽,可以直接继承LifecycleActivity或LifecycleFragment,也可以自己去实现LifecycleRegistry接口。

1
2
3
4
5
6
7
8
9
10
11
12
13
public class MainActivity extends AppCompatActivity implements LifecycleRegistryOwner {
private static final String TAG = "Lifecycle";
private LifecycleRegistry lifecycleRegistry = new LifecycleRegistry(this);
@Override
public LifecycleRegistry getLifecycle() {
return lifecycleRegistry;
}
}

实现了LifecyleRegistryOwner之后,就可以充当观察主体了。

2.观察者

只需要实现LifecylceObserver,然后自己对什么事件感兴趣,就自己添加相应的注解。

@LifecycleEvent

如下是一个示例:

1
2
3
4
5
6
7
8
9
10
11
12
13
14
15
16
17
18
19
20
21
22
23
24
25
26
27
28
29
30
31
32
33
34
35
36
37
38
39
40
41
42
43
44
45
46
47
48
49
50
51
52
53
54
55
56
57
58
59
60
61
62
63
64
65
66
67
68
69
70
71
72
73
74
75
76
77
78
79
80
81
82
83
84
85
86
87
88
89
90
91
92
static class CustomLocationListener implements LifecycleObserver {
private boolean enabled = false;
private Lifecycle lifecycle;
private Context context;
private Callback callback;
private AMapLocationClient locationClient;
public CustomLocationListener(Context context, Lifecycle lifecycle, Callback callback) {
this.lifecycle = lifecycle;
this.context = context;
this.callback = callback;
}
public void enable() {
enabled = true;
if (lifecycle.getCurrentState().isAtLeast(Lifecycle.State.STARTED)) {
if (!locationClient.isStarted()) {
Log.d(TAG, "startLocation in enable() method");
locationClient.startLocation();
}
}
}
@OnLifecycleEvent(Lifecycle.Event.ON_CREATE)
public void onCreate() {
Log.d(TAG, "onCreate");
}
@OnLifecycleEvent(Lifecycle.Event.ON_START)
public void onStart() {
Log.d(TAG, "onStart");
if (locationClient == null) {
locationClient = new AMapLocationClient(context);
AMapLocationClientOption option = new AMapLocationClientOption();
option.setNeedAddress(true);
option.setOnceLocation(false);
option.setWifiActiveScan(true);
option.setLocationMode(AMapLocationClientOption.AMapLocationMode.Hight_Accuracy);
option.setInterval(3000);
locationClient.setLocationOption(option);
locationClient.setLocationListener(new AMapLocationListener() {
@Override
public void onLocationChanged(AMapLocation aMapLocation) {
if (aMapLocation.getErrorCode() != 0) {
Log.d(TAG, "get location failed:" + aMapLocation.getErrorCode() + ",info:" + aMapLocation.getErrorInfo());
} else {
callback.locationChanged(aMapLocation);
}
}
});
}
if (enabled && !locationClient.isStarted()) {
Log.d(TAG, "startLocation in onStart() method");
locationClient.startLocation();
}
}
@OnLifecycleEvent(Lifecycle.Event.ON_RESUME)
public void onResume() {
Log.d(TAG, "onResume");
}
@OnLifecycleEvent(Lifecycle.Event.ON_PAUSE)
public void onPause() {
Log.d(TAG, "onPause");
}
@OnLifecycleEvent(Lifecycle.Event.ON_STOP)
public void onStop() {
Log.d(TAG, "onStop");
//disconnect if connected
locationClient.stopLocation();
}
@OnLifecycleEvent(Lifecycle.Event.ON_DESTROY)
public void onDestroy() {
Log.d(TAG, "onDestroy");
}
//任意回调都会调用它,比如调用完onCreate()后会回调这里的onCreate(),然后会回调onAny();
@OnLifecycleEvent(Lifecycle.Event.ON_ANY)
public void onAny() {
Log.d(TAG, "onAny");
}
}

3.注册

在Activity或者Fragment中添加如下代码即可:

1
getLifecycle().addObserver(customLocationListener);

LiveData

LiveData是一个可数据持有者,它相比普通的observable的优势是知道Android组件的生命周期,它只有在Android组件处于活动状态时才会向其发送监听回调。

以定位为例,LocationLiveData可这样写

1
2
3
4
5
6
7
8
9
10
11
12
13
14
15
16
17
18
19
20
21
22
23
24
25
26
27
28
29
30
31
32
33
34
35
36
37
38
39
40
41
42
43
44
45
46
47
48
49
50
51
public class LocationLiveData extends LiveData<AMapLocation> {
private static final String TAG = "LiveData";
private AMapLocationClient locationClient;
private Context context;
private AMapLocationListener locationListener = new AMapLocationListener() {
@Override
public void onLocationChanged(AMapLocation location) {
Log.d(TAG, "onLocationChanged,location:" + location.getLongitude() + "," + location.getLatitude() + "," + location.getBearing());
setValue(location);
}
};
public LocationLiveData(Context context) {
this.context = context;
initLocationClient();
}
private void initLocationClient() {
locationClient = new AMapLocationClient(context);
AMapLocationClientOption option = new AMapLocationClientOption();
option.setNeedAddress(true);
option.setOnceLocation(false);
option.setWifiActiveScan(true);
option.setLocationMode(AMapLocationClientOption.AMapLocationMode.Hight_Accuracy);
option.setInterval(2000);
locationClient.setLocationOption(option);
locationClient.setLocationListener(locationListener);
}
//测试发现onActive是在onStart()之后
@Override
protected void onActive() {
Log.d(TAG, "onActive");
if (ContextCompat.checkSelfPermission(context, Manifest.permission.ACCESS_FINE_LOCATION) !=
PackageManager.PERMISSION_GRANTED) {
return;
}
locationClient.startLocation();
}
//测试发现onInactive()是在onPause()之后
@Override
protected void onInactive() {
Log.d(TAG, "onInactive");
locationClient.stopLocation();
}
}

使用方式如下

1
2
3
4
5
6
7
8
9
10
11
12
13
14
15
16
17
18
19
20
21
22
23
24
25
26
27
28
29
public class LiveDataActivity extends AppCompatActivity implements LifecycleRegistryOwner{
private LifecycleRegistry lifecycleRegistry=new LifecycleRegistry(this);
private LocationLiveData locationLiveData;
private static final String TAG="LiveData";
@Override
protected void onCreate(Bundle savedInstanceState) {
super.onCreate(savedInstanceState);
setContentView(R.layout.activity_live_data);
locationLiveData=new LocationLiveData(this);
locationLiveData.observe(LiveDataActivity.this, new Observer<AMapLocation>() {
@Override
public void onChanged(@Nullable AMapLocation location) {
Log.d("LiveData","onChanged:"+location.getLongitude()+","+location.getLatitude()+","+location.getBearing());
}
});
}
@Override
public LifecycleRegistry getLifecycle(){
return lifecycleRegistry;
}
}

这样即可在Activity中监听数据的变化,而定位的开始和停止则在LocationLiveData中控制.

不过上面这个例子其实举得不是很好,更常用的是我们在LiveData的外面获取到数据,然后为其setValue即可。在下面ViewModel中就是这样的例子。
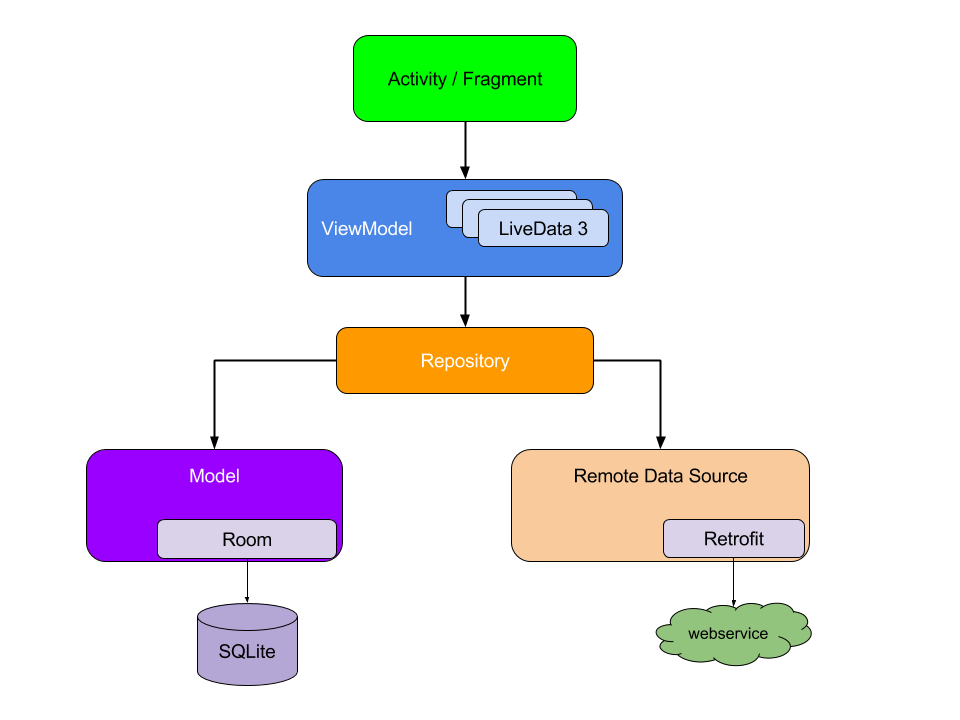
ViewModel

ViewModel需要跟LiveData结合起来,这样View就不需要跟Model直接关联,就可以监听到值的变化

ViewModel的好处是:

  • 不会在由于configuration改变引起的onDestroy而销毁数据

示意图如下:

一般来说ViewModel是与LiveData结合起来使用,如下

1
2
3
4
5
6
7
8
9
10
11
12
13
14
15
16
17
18
19
20
21
22
23
24
25
26
27
28
29
30
31
32
33
34
public class UserViewModel extends ViewModel {
private MutableLiveData<List<User>> usersLiveData;
private Handler handler=new Handler(Looper.getMainLooper());
public LiveData<List<User>> getUsers() {
if (usersLiveData == null) {
usersLiveData = new MutableLiveData<>();
}
return usersLiveData;
}
public void loadUserData(){
loadUsers();
}
private void loadUsers() {
//mock async operations
//这里是简化了,实际上获取数据应该放在Model里面
handler.postDelayed(new Runnable() {
@Override
public void run() {
List<User>userList=new ArrayList<>();
for(int i=0;i<5;i++){
userList.add(new User(i,"Lilei"+i));
}
usersLiveData.setValue(userList);
}
},2000);
}
}

在Activity中的使用如下:

1
2
3
4
5
6
7
8
9
10
11
12
13
14
15
16
17
18
19
20
21
22
23
24
25
26
27
28
29
30
31
32
33
34
35
36
37
38
39
40
41
42
43
44
45
46
47
48
49
public class SimpleVMActivity extends AppCompatActivity implements LifecycleRegistryOwner {
private static final String TAG = "ViewModel";
private LifecycleRegistry lifecycleRegistry = new LifecycleRegistry(this);
@Override
protected void onCreate(Bundle savedInstanceState) {
super.onCreate(savedInstanceState);
setContentView(R.layout.activity_simplevm);
final UserViewModel model= ViewModelProviders.of(this).get(UserViewModel.class);
model.getUsers().observe(this, new Observer<List<User>>() {
@Override
public void onChanged(@Nullable List<User> users) {
Log.d(TAG, "onChanged:uses.size()=" + users.size());
//update UI
}
});
findViewById(R.id.startBtn).setOnClickListener(new View.OnClickListener() {
@Override
public void onClick(View view) {
//点击之后如果马上退出的话,则不会接受到数据
model.loadUserData();
}
});
}
@Override
protected void onStop(){
super.onStop();
Log.d(TAG,"onStop");
}
//注意:ViewModel对于由configuration change引起的onDestroy(),并不会将状态销毁,所以旋转屏幕之后依然能够保存状态。
//只有调用activity.finish()引起的onDestroy(),才会引起ViewModel的销毁
@Override
protected void onDestroy(){
super.onDestroy();
Log.d(TAG,"onDestroy");
}
@Override
public LifecycleRegistry getLifecycle() {
return lifecycleRegistry;
}
}

在这里,ViewModel与LiveData结合之后,通过LiveData实现了对于Activity生命周期的监听,所以不会在activity finish之后还收到回调;

同时,由于ViewModel又实现了数据在Activity生命周期内可以一直存活。

Repository

其实就等同于Model,只不过刚刚为了简化,将数据的获取过程由Handler来模拟。

到这里,如果不考虑数据持久化,就可以写出一个比较完整的由LiveData,ViewModel和Repository架构成的例子了。

首先是http相关的接口定义及实现

1
2
3
4
5
6
7
8
9
10
11
12
13
14
15
16
17
18
19
20
21
22
23
24
25
26
27
28
public interface WebService {
@GET("/users/{user}")
Call<User>getUser(@Path("user")String userId);
}
public class WebServiceFactory {
private static final String BASE_URL = "http://www.baidu.com";
protected static WebService webService;
public static WebService get() {
if (webService == null) {
synchronized (WebService.class) {
if (null == webService) {
Retrofit retrofit = new Retrofit.Builder().baseUrl(BASE_URL)
.addConverterFactory(GsonConverterFactory.create())
//.addCallAdapterFactory(RxJavaCallAdapterFactory.createWithScheduler(Schedulers.io()))
.build();
webService = retrofit.create(WebService.class);
}
}
}
return webService;
}
}

然后是UserRepository,网络请求是通过它来调用的

1
2
3
4
5
6
7
8
9
10
11
12
13
14
15
16
17
18
19
20
21
22
23
24
25
26
public class UserRepository {
private WebService webService;
public UserRepository(WebService webService) {
this.webService = webService;
}
public LiveData<User> getUser(String userId) {
final MutableLiveData<User> data = new MutableLiveData<>();
webService.getUser(userId).enqueue(new Callback<User>() {
@Override
public void onResponse(Call<User> call, Response<User> response) {
data.setValue(response.body());
}
@Override
public void onFailure(Call<User> call, Throwable t) {
}
});
return data;
}
}

最后是ViewModel

1
2
3
4
5
6
7
8
9
10
11
12
13
14
15
16
17
18
19
20
21
22
public class UserViewModel extends ViewModel {
private LiveData<User> user;
private UserRepository userRepo;
//这里可以与Dagger结合,由Dagger提供UserRepository
public UserViewModel() {
this.userRepo = new UserRepository(WebServiceFactory.get());
}
public void init(String userId) {
if (this.user != null) {
return;
}
user = userRepo.getUser(userId);
}
public LiveData<User> getUser() {
return this.user;
}
}

在Activity中的使用与前面类似,不再赘述。
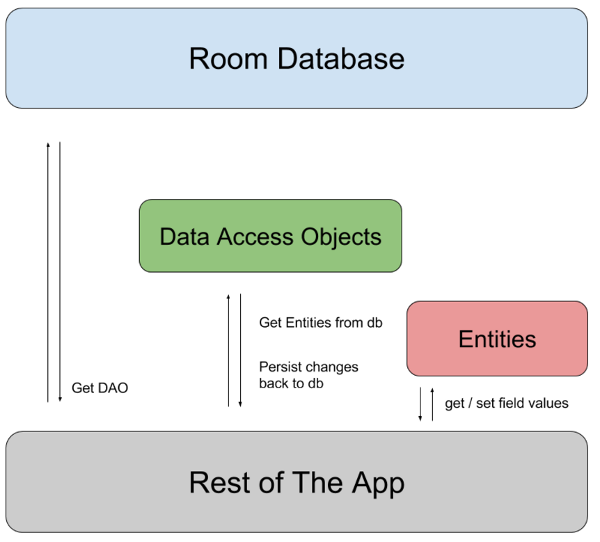
Room

Room的作用是通过注解来简化java bean保存到数据库或者从数据库中获取的操作。它主要包含Database,Entity,DAO这3大部分。示意图如下:

下面举一个简单的例子:

首先是java bean的定义:

1
2
3
4
5
6
7
8
9
10
11
12
13
14
15
16
17
18
19
20
21
22
23
24
25
26
27
28
29
30
31
32
33
34
35
36
37
38
39
40
41
42
43
44
45
46
47
@Entity(tableName = "user_info_table")
public class User {
@PrimaryKey
private int uid;
@ColumnInfo(name = "first_name")
private String firstName;
@ColumnInfo(name = "last_name")
private String lastName;
@Ignore
private Bitmap avatar;
public int getUid() {
return uid;
}
public void setUid(int uid) {
this.uid = uid;
}
public String getFirstName() {
return firstName;
}
public void setFirstName(String firstName) {
this.firstName = firstName;
}
public String getLastName() {
return lastName;
}
public void setLastName(String lastName) {
this.lastName = lastName;
}
public Bitmap getAvatar() {
return avatar;
}
public void setAvatar(Bitmap avatar) {
this.avatar = avatar;
}
}

然后是Dao的定义:

1
2
3
4
5
6
7
8
9
10
11
12
13
14
15
16
17
18
19
20
21
22
23
24
25
26
@Dao
public interface UserDao {
String USER_TABLE_NAME="user_info_table";
@Query("SELECT * FROM "+USER_TABLE_NAME)
List<User> getAll();
@Query("SELECT * FROM "+USER_TABLE_NAME+" WHERE uid IN (:userIds)")
List<User> loadAllByIds(int[] userIds);
@Query("SELECT * FROM "+ USER_TABLE_NAME+" WHERE first_name LIKE :first AND "
+ "last_name LIKE :last LIMIT 1")
User findByName(String first, String last);
//记得加上throws Exception,因为可能会有运行时错误,比如插入重复id时会抛出android.database.sqlite.SQLiteConstraintException: UNIQUE constraint failed: User.uid
@Insert
void insertAll(User... users) throws Exception;
@Update
void update(User... users) throws Exception;
@Delete
void delete(User user) throws Exception;
}

最后是Database的定义

1
2
3
4
5
6
7
8
@Database(entities = {User.class, Book.class}, version = 3)
public abstract class AppDatabase extends RoomDatabase {
public abstract UserDao userDao();
public abstract BookDao bookDao();
}

可以看到,AppDatabase可以对应多个Entity.

最后,对数据库操作进行封装

1
2
3
4
5
6
7
8
9
10
11
12
13
14
15
16
17
18
19
20
21
22
23
24
25
26
27
28
29
30
31
32
33
34
35
36
37
38
public class DbManager {
private static DbManager sInstance;
private static final String USER_DB_NAME = "user_db";
public static DbManager getInstance(Context context) {
if (null == sInstance) {
synchronized (DbManager.class) {
sInstance = new DbManager(context);
}
}
return sInstance;
}
private AppDatabase appDatabase;
private UserDao userDao;
private BookDao bookDao;
private DbManager(Context context) {
appDatabase = Room.databaseBuilder(context.getApplicationContext(), AppDatabase.class, USER_DB_NAME).build();
}
public UserDao getUserDao() {
if (null == userDao) {
userDao = appDatabase.userDao();
}
return userDao;
}
public BookDao getBookDao() {
if (null == bookDao) {
bookDao = appDatabase.bookDao();
}
return bookDao;
}
}

到这里,有了UserDao之后,我们就可以写一个带有数据持久化功能的完整示例, 跟前面相比,只需要修改一下UserRepository即可

1
2
3
4
5
6
7
8
9
10
11
12
13
14
15
16
17
18
19
20
21
22
23
24
25
26
27
28
29
30
31
32
33
34
public class UserRepository {
private WebService webService;
private UserDao userDao;
public UserRepository(WebService webService, UserDao userDao) {
this.webService = webService;
this.userDao = userDao;
}
public LiveData<User> getUser(String userId) {
final MutableLiveData<User> data = new MutableLiveData<>();
webService.getUser(userId).enqueue(new Callback<User>() {
@Override
public void onResponse(Call<User> call, Response<User> response) {
User user = response.body();
data.setValue(user);
try {
userDao.insertAll(user);
} catch (Exception ex) {
ex.printStackTrace();
}
}
@Override
public void onFailure(Call<User> call, Throwable t) {
//fetch data from userDao,如果用Handler的话就会很难看,所以需要与RxJava2配合使用
}
});
return data;
}
}

高级用法

与Dagger2, RxJava2的结合等

测试

原理