RePlugin解析之插件的安装与加载

1.插件的加载:从PmBase.loadAppPlugin()说起

RePlugin解析-startActivity流程分析 文章的最后提到PmBase.loadAppPlugin()方法, 如下:

1
2
3
final Plugin loadAppPlugin(String plugin) {
return loadPlugin(mPlugins.get(plugin), Plugin.LOAD_APP, true);
}

这里的3个参数都很重要,首先看mPlugins是如何来的。

mPlugins其实包含的就是插件信息,key为插件的包名或别名,而value则为插件对象。它其实是在常驻进程初始化时赋值的。当然,中间如果安装了新的插件,mPlugins中的信息也会有更新。
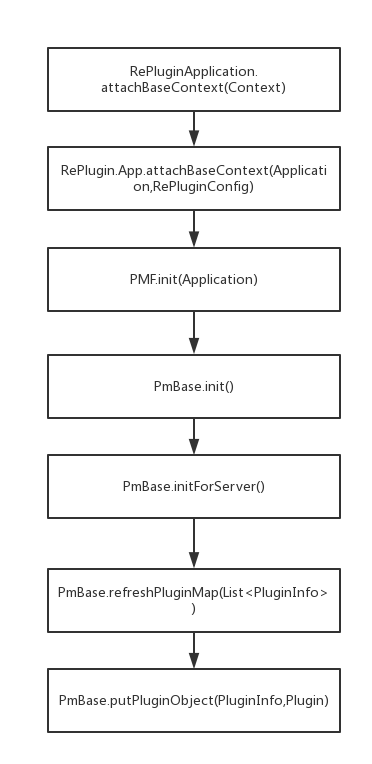
mPlugins的初始化流程如下:

1.1 插件信息的加载

首先看一下插件信息是如何来的,关注initForServer()中调用的Builder.builder()方法.

1
2
3
4
5
6
7
8
9
10
11
12
13
14
15
16
17
18
19
20
21
static final void builder(Context context, PxAll all) {
// 搜索所有本地插件和V5插件
Finder.search(context, all);
// 删除不适配的PLUGINs
for (PluginInfo p : all.getOthers()) {
// TODO 如果已存在built-in和V5则不删除
...
boolean rc = p.deleteObsolote(context);
...
}
// 删除所有和PLUGINs不一致的DEX文件
deleteUnknownDexs(context, all);
// 删除所有和PLUGINs不一致的SO库目录
// Added by Jiongxuan Zhang
deleteUnknownLibs(context, all);
// 构建数据
}

其中的重点在于Finder.search()这个方法调用,因为它会搜索所有本地插件和V5插件,如下:

1
2
3
4
5
6
7
8
9
10
11
12
13
14
15
16
17
18
19
20
21
22
23
24
25
26
27
* 扫描插件
*/
static final void search(Context context, PxAll all) {
// 扫描内置插件
FinderBuiltin.loadPlugins(context, all);
// 扫描V5插件
File pluginDir = context.getDir(Constant.LOCAL_PLUGIN_SUB_DIR, 0);
V5Finder.search(context, pluginDir, all);
// 扫描现有插件,包括刚才从V5插件文件更新过来的文件
HashSet<File> deleted = new HashSet<File>();
{
if (LOG) {
LogDebug.d(PLUGIN_TAG, "search plugins: dir=" + pluginDir.getAbsolutePath());
}
searchLocalPlugins(pluginDir, all, deleted);
}
// 删除非插件文件和坏的文件
for (File f : deleted) {
...
boolean rc = f.delete();
...
}
deleted.clear();
}

真正执行查询的是FinderBuiltin.loadPlugins()这个方法:

1
2
3
4
5
6
7
8
9
10
11
12
13
14
15
16
tatic final void loadPlugins(Context context, PxAll all) {
InputStream in;
// 读取内部配置
in = null;
try {
in = context.getAssets().open("plugins-builtin.json");
// TODO 简化参数 all
readConfig(in, all);
} catch (FileNotFoundException e0) {
...
} catch (Throwable e) {
...
}
CloseableUtils.closeQuietly(in);
}

显然,这里就是查询assets目录下的plugins-builtin.json这个文件,获取所有内建的插件信息,该文件示例如下:

1
[{"high":null,"frm":null,"ver":100,"low":null,"pkg":"com.qihoo360.replugin.sample.demo1","path":"plugins/demo1.jar","name":"demo1"},{"high":null,"frm":null,"ver":100,"low":null,"pkg":"com.qihoo360.replugin.sample.demo2","path":"plugins/demo2.jar","name":"demo2"}]

而读取里面的json信息的代码如下:

1
2
3
4
5
6
7
8
9
10
11
12
13
14
15
16
17
18
19
20
21
22
23
24
25
26
27
28
29
30
31
32
33
34
35
36
37
38
39
40
41
42
43
44
45
46
47
private static final void readConfig(InputStream in, PxAll all) throws IOException, JSONException {
String str = IOUtils.toString(in, Charsets.UTF_8);
JSONArray ja = new JSONArray(str);
for (int i = 0; i < ja.length(); i++) {
JSONObject jo = ja.getJSONObject(i);
if (jo == null) {
continue;
}
String name = jo.getString("name");
if (TextUtils.isEmpty(name)) {
...
continue;
}
PluginInfo info = PluginInfo.buildFromBuiltInJson(jo);
if (!info.match()) {
...
continue;
}
...
all.addBuiltin(info);
}
}
public static final PluginInfo buildFromBuiltInJson(JSONObject jo) {
String pkgName = jo.optString("pkg");
String name = jo.optString("name");
String assetName = jo.optString("path");
if (TextUtils.isEmpty(name) || TextUtils.isEmpty(pkgName) || TextUtils.isEmpty(assetName)) {
if (LogDebug.LOG) {
LogDebug.d(TAG, "buildFromBuiltInJson: Invalid json. j=" + jo);
}
return null;
}
int low = jo.optInt("low", Constant.ADAPTER_COMPATIBLE_VERSION); // Low应指向最低兼容版本
int high = jo.optInt("high", Constant.ADAPTER_COMPATIBLE_VERSION); // High同上
int ver = jo.optInt("ver");
PluginInfo info = new PluginInfo(pkgName, name, low, high, ver, assetName, TYPE_BUILTIN);
// 从 json 中读取 frameVersion(可选)
int frameVer = jo.optInt("frm");
if (frameVer < 1) {
frameVer = RePlugin.getConfig().getDefaultFrameworkVersion();
}
info.setFrameworkVersion(frameVer);
return info;
}

其实就是读取json信息然后赋值给PluginInfo,其实PluginInfo本来应该设计成一个标准的Java bean,而现在竟然仍然用JSONObject来保存信息,然后后面需要时又要读出来,这其实是一个不太好的设计

1.2 initForServer()

如果允许开启常驻进程来管理插件进程,则在在首次启动:GuardService这个常驻进程时,会调用initForServer()进行初始化:

1
2
3
4
5
6
7
8
9
10
11
12
13
14
15
16
17
18
19
20
21
22
23
24
25
26
27
28
29
30
31
32
33
/**
* Persistent(常驻)进程的初始化
*
*/
private final void initForServer() {
if (LOG) {
LogDebug.d(PLUGIN_TAG, "search plugins from file system");
}
mHostSvc = new PmHostSvc(mContext, this);
PluginProcessMain.installHost(mHostSvc);
PluginProcessMain.schedulePluginProcessLoop(PluginProcessMain.CHECK_STAGE1_DELAY);
// 兼容即将废弃的p-n方案 by Jiongxuan Zhang
mAll = new Builder.PxAll();
Builder.builder(mContext, mAll);
refreshPluginMap(mAll.getPlugins());
// [Newest!] 使用全新的RePlugin APK方案
// Added by Jiongxuan Zhang
try {
List<PluginInfo> l = PluginManagerProxy.load();
if (l != null) {
// 将"纯APK"插件信息并入总的插件信息表中,方便查询
// 这里有可能会覆盖之前在p-n中加入的信息。本来我们就想这么干,以"纯APK"插件为准
refreshPluginMap(l);
}
} catch (RemoteException e) {
if (LOGR) {
LogRelease.e(PLUGIN_TAG, "lst.p: " + e.getMessage(), e);
}
}
}

在其中的refreshPluginMap()中会进行mPlugins的赋值:

1
2
3
4
5
6
7
8
9
10
11
12
13
14
15
16
17
18
19
20
21
22
23
/**
* 更新所有的插件信息
*
* @param plugins
*/
private final void refreshPluginMap(List<PluginInfo> plugins) {
if (plugins == null) {
return;
}
for (PluginInfo info : plugins) {
Plugin plugin = Plugin.build(info);
putPluginObject(info, plugin);
}
}
private void putPluginObject(PluginInfo info, Plugin plugin) {
// 同时加入PackageName和Alias(如有)
mPlugins.put(info.getPackageName(), plugin);
if (!TextUtils.isEmpty(info.getAlias())) {
// 即便Alias和包名相同也可以再Put一次,反正只是覆盖了相同Value而已
mPlugins.put(info.getAlias(), plugin);
}
}

可见,首先根据之前的插件信息生成Plugin对象,然后分别以插件的包名和别名为key,以Plugin对象作为value插入到mPlugins中,经过初始化后,Demo中的结果如下图:

所以,再回到PluginCommImpl.getActivityInfo()这个方法,显然可以根据”demo1”这个别名获取到对应的Plugin对象。

1.3 插件解压到目标目录中

到这里为止,我们只是分析了读取插件信息并且创建Plugin对象的过程,但是还没有分析完插件的加载过程,实际上插件的加载涉及到dex文件,so库等的处理。

而内建插件的加载流程如下:
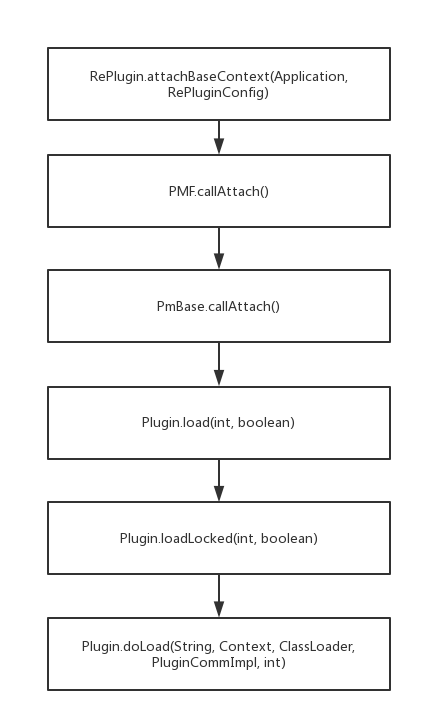
  • Plugin.load(int, boolean)方法如下:

    1
    2
    3
    4
    5
    6
    7
    8
    9
    10
    11
    12
    13
    14
    15
    16
    final boolean load(int load, boolean useCache) {
    PluginInfo info = mInfo;
    boolean rc = loadLocked(load, useCache);
    // 尝试在此处调用Application.onCreate方法
    // Added by Jiongxuan Zhang
    if (load == LOAD_APP && rc) {
    callApp();
    }
    // 如果info改了,通知一下常驻
    // 只针对P-n的Type转化来处理,一定要通知,这样Framework_Version也会得到更新
    if (rc && mInfo != info) {
    UpdateInfoTask task = new UpdateInfoTask((PluginInfo) mInfo.clone());
    Tasks.post2Thread(task);
    }
    return rc;
    }

    显然,这个方法是先调用loadLocked()方法完成加载,然后调用callApp()以调用到插件的Application.onCreate()方法。

  • loadLocked()方法如下:

    1
    2
    3
    4
    5
    6
    7
    8
    9
    10
    11
    12
    13
    14
    15
    16
    17
    18
    19
    20
    21
    22
    23
    24
    25
    26
    27
    28
    29
    30
    31
    32
    33
    34
    35
    36
    37
    38
    39
    40
    41
    42
    43
    44
    45
    46
    47
    48
    49
    50
    51
    52
    53
    54
    55
    56
    57
    58
    59
    60
    61
    62
    63
    64
    65
    66
    67
    68
    69
    70
    71
    72
    73
    74
    75
    76
    77
    78
    79
    80
    81
    82
    83
    84
    85
    86
    87
    88
    89
    90
    91
    92
    93
    94
    95
    96
    97
    98
    99
    100
    101
    102
    103
    104
    105
    106
    107
    108
    109
    110
    111
    112
    113
    114
    115
    116
    117
    private boolean loadLocked(int load, boolean useCache) {
    // 若插件被“禁用”,则即便上次加载过(且进程一直活着),这次也不能再次使用了
    // Added by Jiongxuan Zhang
    int status = PluginStatusController.getStatus(mInfo.getName(), mInfo.getVersion());
    if (status < PluginStatusController.STATUS_OK) {
    ...
    return false;
    }
    if (mInitialized) {
    if (mLoader == null) {
    ...
    return false;
    }
    if (load == LOAD_INFO) {
    boolean rl = mLoader.isPackageInfoLoaded();
    ...
    return rl;
    }
    if (load == LOAD_RESOURCES) {
    boolean rl = mLoader.isResourcesLoaded();
    ...
    return rl;
    }
    if (load == LOAD_DEX) {
    boolean rl = mLoader.isDexLoaded();
    ...
    return rl;
    }
    boolean il = mLoader.isAppLoaded();
    ...
    return il;
    }
    mInitialized = true;
    ...
    // 这里先处理一下,如果cache命中,省了后面插件提取(如释放Jar包等)操作
    if (useCache) {
    boolean result = loadByCache(load);
    // 如果缓存命中,则直接返回
    if (result) {
    return true;
    }
    }
    Context context = mContext;
    ClassLoader parent = mParent;
    PluginCommImpl manager = mPluginManager;
    //
    String logTag = "try1";
    String lockFileName = String.format(Constant.LOAD_PLUGIN_LOCK, mInfo.getApkFile().getName());
    ProcessLocker lock = new ProcessLocker(context, lockFileName);
    ...
    if (!lock.tryLockTimeWait(5000, 10)) {
    // 此处仅仅打印错误
    ...
    }
    //
    long t1 = System.currentTimeMillis();
    boolean rc = doLoad(logTag, context, parent, manager, load);
    ...
    lock.unlock();
    ...
    if (rc) {
    ...
    try {
    // 至此,该插件已开始运行
    PluginManagerProxy.addToRunningPluginsNoThrows(mInfo.getName());
    } catch (Throwable e) {
    ...
    }
    return true;
    }
    //
    logTag = "try2";
    lock = new ProcessLocker(context, lockFileName);
    if (!lock.tryLockTimeWait(5000, 10)) {
    // 此处仅仅打印错误
    ...
    }
    // 清空数据对象
    mLoader = null;
    // 删除优化dex文件
    File odex = mInfo.getDexFile();
    if (odex.exists()) {
    ...
    odex.delete();
    }
    if (Build.VERSION.SDK_INT < Build.VERSION_CODES.LOLLIPOP) {
    // support for multidex below LOLLIPOP:delete Extra odex,if need
    try {
    FileUtils.forceDelete(mInfo.getExtraOdexDir());
    } catch (IOException e) {
    e.printStackTrace();
    }
    }
    t1 = System.currentTimeMillis();
    rc = doLoad(logTag, context, parent, manager, load);
    ...
    //
    lock.unlock();
    if (!rc) {
    ...
    return false;
    }
    ...
    try {
    // 至此,该插件已开始运行
    PluginManagerProxy.addToRunningPluginsNoThrows(mInfo.getName());
    } catch (Throwable e) {
    ...
    }
    return true;
    }

这个方法其实更多的是对异常情况的判断与处理,真正进行加载的是在Plugin.doLoad()方法中:

1
2
3
4
5
6
7
8
9
10
11
12
13
14
15
16
17
18
19
20
21
22
23
24
25
26
27
28
29
30
31
32
33
34
35
36
37
38
39
40
41
42
43
44
45
46
47
48
49
50
51
52
53
54
55
56
57
58
59
60
61
62
63
64
65
66
67
68
69
70
71
72
73
74
75
76
77
78
79
80
81
82
83
84
85
86
87
88
89
90
91
92
93
94
95
96
97
98
99
100
101
102
103
private final boolean doLoad(String tag, Context context, ClassLoader parent, PluginCommImpl manager, int load) {
if (mLoader == null) {
// 试图释放文件
PluginInfo info = null;
if (mInfo.getType() == PluginInfo.TYPE_BUILTIN) {
//
File dir = context.getDir(Constant.LOCAL_PLUGIN_SUB_DIR, 0);
File dexdir = mInfo.getDexParentDir();
String dstName = mInfo.getApkFile().getName();
boolean rc = AssetsUtils.quickExtractTo(context, mInfo, dir.getAbsolutePath(), dstName, dexdir.getAbsolutePath());
if (!rc) {
// extract built-in plugin failed: plugin=
...
return false;
}
File file = new File(dir, dstName);
info = (PluginInfo) mInfo.clone();
info.setPath(file.getPath());
// FIXME 不应该是P-N,即便目录相同,未来会优化这里
info.setType(PluginInfo.TYPE_PN_INSTALLED);
} else if (mInfo.getType() == PluginInfo.TYPE_PN_JAR) {
//
V5FileInfo v5i = V5FileInfo.build(new File(mInfo.getPath()), mInfo.getV5Type());
if (v5i == null) {
// build v5 plugin info failed: plugin=
...
return false;
}
File dir = context.getDir(Constant.LOCAL_PLUGIN_SUB_DIR, 0);
info = v5i.updateV5FileTo(context, dir, true, true);
if (info == null) {
// update v5 file to failed: plugin=
...
return false;
}
// 检查是否改变了?
if (info.getLowInterfaceApi() != mInfo.getLowInterfaceApi() || info.getHighInterfaceApi() != mInfo.getHighInterfaceApi()) {
...
// 看看目标文件是否存在
String dstName = mInfo.getApkFile().getName();
File file = new File(dir, dstName);
if (!file.exists()) {
...
return false;
}
// 重新构造
info = PluginInfo.build(file);
if (info == null) {
return false;
}
}
} else {
//
}
//
if (info != null) {
// 替换
mInfo = info;
}
//
mLoader = new Loader(context, mInfo.getName(), mInfo.getPath(), this);
if (!mLoader.loadDex(parent, load)) {
return false;
}
// 设置插件为“使用过的”
// 注意,需要重新获取当前的PluginInfo对象,而非使用“可能是新插件”的mInfo
try {
PluginManagerProxy.updateUsedIfNeeded(mInfo.getName(), true);
} catch (RemoteException e) {
// 同步出现问题,但仍继续进行
if (LOGR) {
e.printStackTrace();
}
}
// 若需要加载Dex,则还同时需要初始化插件里的Entry对象
if (load == LOAD_APP) {
// NOTE Entry对象是可以在任何线程中被调用到
if (!loadEntryLocked(manager)) {
return false;
}
// NOTE 在此处调用则必须Post到UI,但此时有可能Activity已被加载
// 会出现Activity.onCreate比Application更早的情况,故应放在load外面立即调用
// callApp();
}
}
if (load == LOAD_INFO) {
return mLoader.isPackageInfoLoaded();
} else if (load == LOAD_RESOURCES) {
return mLoader.isResourcesLoaded();
} else if (load == LOAD_DEX) {
return mLoader.isDexLoaded();
} else {
return mLoader.isAppLoaded();
}
}

可见,加载插件时分两种类型,一种是TYPE_BUILTIN,另外一种是TYPE_PN_JAR(deprecated),由于后一种已经deprecated了,这里就不分析了。

对于TYPE_BUILTIN类型的插件,先将插件文件从asset中解压到/data/data/pkg/plugins_v3/目录下。然后将新的目录赋值给clone出的PluginInfo.

1.4 四大组件信息解析

在将插件文件解压到指定目录之后,创建了Loader对象,并且调用Loader.loadDex()方法,如下:

1
2
3
4
5
6
7
8
9
10
11
12
13
14
15
16
17
18
19
20
21
22
23
24
25
26
27
28
29
30
31
32
33
34
35
36
37
38
39
40
41
42
43
44
45
46
47
48
49
50
51
52
53
54
55
56
57
58
59
60
61
62
63
64
65
66
67
68
69
70
71
72
73
74
75
76
77
78
79
80
81
82
83
84
85
86
87
88
89
90
91
92
93
94
95
96
97
98
99
100
101
102
103
104
105
106
107
108
109
110
111
112
113
114
115
116
117
118
119
120
121
122
123
124
125
126
127
128
129
130
131
132
133
134
135
136
137
138
139
140
141
142
143
144
145
146
147
148
149
150
151
152
153
154
155
156
157
158
159
160
161
final boolean loadDex(ClassLoader parent, int load) {
try {
PackageManager pm = mContext.getPackageManager();
mPackageInfo = Plugin.queryCachedPackageInfo(mPath);
if (mPackageInfo == null) {
// PackageInfo
mPackageInfo = pm.getPackageArchiveInfo(mPath,
PackageManager.GET_ACTIVITIES | PackageManager.GET_SERVICES | PackageManager.GET_PROVIDERS | PackageManager.GET_RECEIVERS | PackageManager.GET_META_DATA);
if (mPackageInfo == null || mPackageInfo.applicationInfo == null) {
...
mPackageInfo = null;
return false;
}
...
mPackageInfo.applicationInfo.sourceDir = mPath;
mPackageInfo.applicationInfo.publicSourceDir = mPath;
if (TextUtils.isEmpty(mPackageInfo.applicationInfo.processName)) {
mPackageInfo.applicationInfo.processName = mPackageInfo.applicationInfo.packageName;
}
// 添加针对SO库的加载
// 此属性最终用于ApplicationLoaders.getClassLoader,在创建PathClassLoader时成为其参数
// 这样findLibrary可不用覆写,即可直接实现SO的加载
// Added by Jiongxuan Zhang
PluginInfo pi = mPluginObj.mInfo;
File ld = pi.getNativeLibsDir();
mPackageInfo.applicationInfo.nativeLibraryDir = ld.getAbsolutePath();
// // 若PluginInfo.getFrameworkVersion为FRAMEWORK_VERSION_UNKNOWN(p-n才会有),则这里需要读取并修改
// if (pi.getFrameworkVersion() == PluginInfo.FRAMEWORK_VERSION_UNKNOWN) {
// pi.setFrameworkVersionByMeta(mPackageInfo.applicationInfo.metaData);
// }
// 缓存表: pkgName -> pluginName
synchronized (Plugin.PKG_NAME_2_PLUGIN_NAME) {
Plugin.PKG_NAME_2_PLUGIN_NAME.put(mPackageInfo.packageName, mPluginName);
}
// 缓存表: pluginName -> fileName
synchronized (Plugin.PLUGIN_NAME_2_FILENAME) {
Plugin.PLUGIN_NAME_2_FILENAME.put(mPluginName, mPath);
}
// 缓存表: fileName -> PackageInfo
synchronized (Plugin.FILENAME_2_PACKAGE_INFO) {
Plugin.FILENAME_2_PACKAGE_INFO.put(mPath, new WeakReference<PackageInfo>(mPackageInfo));
}
}
// TODO preload预加载虽然通知到常驻了(但pluginInfo是通过MP.getPlugin(name, true)完全clone出来的),本进程的PluginInfo并没有得到更新
// TODO 因此preload会造成某些插件真正生效时由于cache,造成插件版本号2.0或者以上无法生效。
// TODO 这里是临时做法,避免发版前出现重大问题,后面可以修过修改preload的流程来优化
// 若PluginInfo.getFrameworkVersion为FRAMEWORK_VERSION_UNKNOWN(p-n才会有),则这里需要读取并修改
if (mPluginObj.mInfo.getFrameworkVersion() == PluginInfo.FRAMEWORK_VERSION_UNKNOWN) {
mPluginObj.mInfo.setFrameworkVersionByMeta(mPackageInfo.applicationInfo.metaData);
// 只有“P-n”插件才会到这里,故无需调用“纯APK”的保存功能
// PluginInfoList.save();
}
// 创建或获取ComponentList表
// Added by Jiongxuan Zhang
mComponents = Plugin.queryCachedComponentList(mPath);
if (mComponents == null) {
// ComponentList
mComponents = new ComponentList(mPackageInfo, mPath, mPluginObj.mInfo);
// 动态注册插件中声明的 receiver
regReceivers();
// 缓存表:ComponentList
synchronized (Plugin.FILENAME_2_COMPONENT_LIST) {
Plugin.FILENAME_2_COMPONENT_LIST.put(mPath, new WeakReference<>(mComponents));
}
/* 只调整一次 */
// 调整插件中组件的进程名称
adjustPluginProcess(mPackageInfo.applicationInfo);
// 调整插件中 Activity 的 TaskAffinity
adjustPluginTaskAffinity(mPluginName, mPackageInfo.applicationInfo);
}
if (load == Plugin.LOAD_INFO) {
return isPackageInfoLoaded();
}
mPkgResources = Plugin.queryCachedResources(mPath);
// LOAD_RESOURCES和LOAD_ALL都会获取资源,但LOAD_INFO不可以(只允许获取PackageInfo)
if (mPkgResources == null) {
// Resources
try {
if (BuildConfig.DEBUG) {
// 如果是Debug模式的话,防止与Instant Run冲突,资源重新New一个
Resources r = pm.getResourcesForApplication(mPackageInfo.applicationInfo);
mPkgResources = new Resources(r.getAssets(), r.getDisplayMetrics(), r.getConfiguration());
} else {
mPkgResources = pm.getResourcesForApplication(mPackageInfo.applicationInfo);
}
} catch (NameNotFoundException e) {
...
return false;
}
if (mPkgResources == null) {
...
return false;
}
...
// 缓存表: Resources
synchronized (Plugin.FILENAME_2_RESOURCES) {
Plugin.FILENAME_2_RESOURCES.put(mPath, new WeakReference<>(mPkgResources));
}
}
if (load == Plugin.LOAD_RESOURCES) {
return isResourcesLoaded();
}
mClassLoader = Plugin.queryCachedClassLoader(mPath);
if (mClassLoader == null) {
// ClassLoader
String out = mPluginObj.mInfo.getDexParentDir().getPath();
if (BuildConfig.DEBUG) {
// 因为Instant Run会替换parent为IncrementalClassLoader,所以在DEBUG环境里
// 需要替换为BootClassLoader才行
// Added by yangchao-xy & Jiongxuan Zhang
parent = ClassLoader.getSystemClassLoader();
} else {
// 线上环境保持不变
parent = getClass().getClassLoader().getParent(); // TODO: 这里直接用父类加载器
}
String soDir = mPackageInfo.applicationInfo.nativeLibraryDir;
mClassLoader = RePlugin.getConfig().getCallbacks().createPluginClassLoader(mPluginObj.mInfo, mPath, out, soDir, parent);
...
if (mClassLoader == null) {
...
return false;
}
// 缓存表:ClassLoader
synchronized (Plugin.FILENAME_2_DEX) {
Plugin.FILENAME_2_DEX.put(mPath, new WeakReference<>(mClassLoader));
}
}
if (load == Plugin.LOAD_DEX) {
return isDexLoaded();
}
// Context
mPkgContext = new PluginContext(mContext, android.R.style.Theme, mClassLoader, mPkgResources, mPluginName, this);
...
} catch (Throwable e) {
...
return false;
}
return true;
}

这个方法看似很长,其实没多少东西,主要做了以下事情:

  • 从缓存中获取PackageInfo,如果没有获取到,说明是第一次,需要创建,创建方式是将插件解压后的目录传递给PackageManager,代码如下:

    1
    2
    mPackageInfo = pm.getPackageArchiveInfo(mPath,
    PackageManager.GET_ACTIVITIES | PackageManager.GET_SERVICES | PackageManager.GET_PROVIDERS | PackageManager.GET_RECEIVERS | PackageManager.GET_META_DATA);

    如果顺利创建PackageInfo对象,则还要为其设置soureDir, publicSourceDir和nativeLibraryDir. 之后将packageInfo对象放入Plugin.FILENAME 2 PACKAGE_INFO这个缓存中。

  • 获取插件中的所有组件信息并保存在ComponentList对象mComponents中,其中ComponentList这个对象中定义的域如下:

    1
    2
    3
    4
    5
    6
    7
    8
    9
    10
    11
    12
    13
    14
    15
    16
    17
    18
    19
    20
    21
    22
    23
    24
    25
    26
    27
    public class ComponentList {
    /**
    * Class类名 - Activity的Map表
    */
    final HashMap<String, ActivityInfo> mActivities = new HashMap<>();
    /**
    * Class类名 - Provider的Map表
    */
    final HashMap<String, ProviderInfo> mProvidersByName = new HashMap<>();
    /**
    * Authority - Provider的Map表
    */
    final HashMap<String, ProviderInfo> mProvidersByAuthority = new HashMap<>();
    /**
    * Class类名 - Service的Map表
    */
    final HashMap<String, ServiceInfo> mServices = new HashMap<>();
    /**
    * Application对象
    */
    ApplicationInfo mApplication = null;
    ...
    }

    显然,就是四大组件加上ApplicationInfo, 而4大组件的获取就在它的构造方法中:

    1
    2
    3
    4
    5
    6
    7
    8
    9
    10
    11
    12
    13
    14
    15
    16
    17
    18
    19
    20
    21
    22
    23
    24
    25
    26
    27
    28
    29
    30
    31
    32
    33
    34
    35
    36
    37
    38
    39
    40
    41
    42
    43
    44
    45
    46
    47
    48
    49
    50
    51
    52
    53
    54
    55
    56
    57
    58
    59
    60
    61
    62
    63
    64
    65
    66
    67
    68
    public ComponentList(PackageInfo pi, String path, PluginInfo pli) {
    if (pi.activities != null) {
    for (ActivityInfo ai : pi.activities) {
    ...
    ai.applicationInfo.sourceDir = path;
    // todo extract to function
    if (ai.processName == null) {
    ai.processName = ai.applicationInfo.processName;
    }
    if (ai.processName == null) {
    ai.processName = ai.packageName;
    }
    mActivities.put(ai.name, ai);
    }
    }
    if (pi.providers != null) {
    for (ProviderInfo ppi : pi.providers) {
    ...
    if (ppi.processName == null) {
    ppi.processName = ppi.applicationInfo.processName;
    }
    if (ppi.processName == null) {
    ppi.processName = ppi.packageName;
    }
    mProvidersByName.put(ppi.name, ppi);
    mProvidersByAuthority.put(ppi.authority, ppi);
    }
    }
    if (pi.services != null) {
    for (ServiceInfo si : pi.services) {
    if (LOG) {
    LogDebug.d(PLUGIN_TAG, "service=" + si.name);
    }
    if (si.processName == null) {
    si.processName = si.applicationInfo.processName;
    }
    if (si.processName == null) {
    si.processName = si.packageName;
    }
    mServices.put(si.name, si);
    }
    }
    if (pi.receivers != null) {
    for (ActivityInfo ri : pi.receivers) {
    ...
    if (ri.processName == null) {
    ri.processName = ri.applicationInfo.processName;
    }
    if (ri.processName == null) {
    ri.processName = ri.packageName;
    }
    mReceivers.put(ri.name, ri);
    }
    }
    // 解析 Apk 中的 AndroidManifest.xml
    String manifest = getManifestFromApk(path);
    ...
    // 生成组件与 IntentFilter 的对应关系
    ManifestParser.INS.parse(pli, manifest);
    mApplication = pi.applicationInfo;
    if (mApplication.dataDir == null) {
    mApplication.dataDir = Environment.getDataDirectory() + File.separator + "data" + File.separator + mApplication.packageName;
    }
    ...
    }

    那么pi.activities等组件信息又是怎么来的呢?其实就来自于PackageInfo的创建过程中,前面说过它是由PackageManager.getPackageArchiveInfo()方法创建的,从这个方法开始,包的解析过程的调用为PackageManager.getPackageArchiveInfo()–>PackageParser.generatePackageInfo()—>PackageParser.generatePackageInfo()(重载方法), 在PackageParser.generatePackageInfo()中有四大组件的解析,代码片段如下:

    1
    2
    3
    4
    5
    6
    7
    8
    9
    10
    11
    12
    13
    14
    15
    16
    17
    18
    19
    20
    21
    22
    23
    24
    25
    26
    27
    28
    29
    30
    31
    32
    33
    34
    35
    36
    37
    38
    39
    40
    41
    42
    43
    44
    45
    46
    47
    48
    49
    50
    51
    52
    53
    54
    55
    56
    if ((flags & PackageManager.GET_ACTIVITIES) != 0) {
    final int N = p.activities.size();
    if (N > 0) {
    int num = 0;
    final ActivityInfo[] res = new ActivityInfo[N];
    for (int i = 0; i < N; i++) {
    final Activity a = p.activities.get(i);
    if (state.isMatch(a.info, flags)) {
    res[num++] = generateActivityInfo(a, flags, state, userId);
    }
    }
    pi.activities = ArrayUtils.trimToSize(res, num);
    }
    }
    if ((flags & PackageManager.GET_RECEIVERS) != 0) {
    final int N = p.receivers.size();
    if (N > 0) {
    int num = 0;
    final ActivityInfo[] res = new ActivityInfo[N];
    for (int i = 0; i < N; i++) {
    final Activity a = p.receivers.get(i);
    if (state.isMatch(a.info, flags)) {
    res[num++] = generateActivityInfo(a, flags, state, userId);
    }
    }
    pi.receivers = ArrayUtils.trimToSize(res, num);
    }
    }
    if ((flags & PackageManager.GET_SERVICES) != 0) {
    final int N = p.services.size();
    if (N > 0) {
    int num = 0;
    final ServiceInfo[] res = new ServiceInfo[N];
    for (int i = 0; i < N; i++) {
    final Service s = p.services.get(i);
    if (state.isMatch(s.info, flags)) {
    res[num++] = generateServiceInfo(s, flags, state, userId);
    }
    }
    pi.services = ArrayUtils.trimToSize(res, num);
    }
    }
    if ((flags & PackageManager.GET_PROVIDERS) != 0) {
    final int N = p.providers.size();
    if (N > 0) {
    int num = 0;
    final ProviderInfo[] res = new ProviderInfo[N];
    for (int i = 0; i < N; i++) {
    final Provider pr = p.providers.get(i);
    if (state.isMatch(pr.info, flags)) {
    res[num++] = generateProviderInfo(pr, flags, state, userId);
    }
    }
    pi.providers = ArrayUtils.trimToSize(res, num);
    }
    }

    可以看到,pi.activities就是在这里被赋值的。

  • 生成组件与IntentFilter的对应关系。在完成四大组件的信息获取之后,最重要的一个调解就是下面这句了:

    1
    ManifestParser.INS.parse(pli, manifest);

    其中INS是ManifestParser的单例,ManifestParser.parse()方法如下:

    1
    2
    3
    4
    5
    6
    7
    8
    9
    10
    11
    12
    13
    14
    15
    16
    17
    18
    19
    20
    public void parse(PluginInfo pli, String manifestStr) {
    XmlHandler handler = parseManifest(manifestStr);
    Map<String, List<IntentFilter>> activityFilterMap = new HashMap<>();
    putToMap(mPluginActivityInfoMap, activityFilterMap, pli);
    parseComponent(pli.getName(), activityFilterMap, handler.getActivities(), mActivityActionPluginsMap);
    Map<String, List<IntentFilter>> serviceFilterMap = new HashMap<>();
    putToMap(mPluginServiceInfoMap, serviceFilterMap, pli);
    parseComponent(pli.getName(), serviceFilterMap, handler.getServices(), mServiceActionPluginsMap);
    Map<String, List<IntentFilter>> receiverFilterMap = new HashMap<>();
    putToMap(mPluginReceiverInfoMap, receiverFilterMap, pli);
    parseComponent(pli.getName(), receiverFilterMap, handler.getReceivers(), null);
    /* 打印日志 */
    if (LOG) {
    printFilters(activityFilterMap, serviceFilterMap, receiverFilterMap);
    }
    }

    这里就是解析四大组件的intent-filter以及action信息的,逻辑很简单,就不赘述了。这里唯一需要注意的就是,RePlugin没有像DroidPlugin那样借用Android系统的Parser,而是自己利用SAXParser来解析,这样的好处就是不存在兼容性问题

  • 最后将pi.applicationInfo赋值给mApplication, 并且为mApplication.dataDir赋值为/data/data/host_pkg_name/data/plugin_pkg_name目录。

1.5 调整进程

再回到Loader.loadDex()方法中,在创建ComponentList对象后,有如下代码:

1
2
3
4
5
6
7
8
9
10
11
12
13
14
// 动态注册插件中声明的 receiver
regReceivers();
// 缓存表:ComponentList
synchronized (Plugin.FILENAME_2_COMPONENT_LIST) {
Plugin.FILENAME_2_COMPONENT_LIST.put(mPath, new WeakReference<>(mComponents));
}
/* 只调整一次 */
// 调整插件中组件的进程名称
adjustPluginProcess(mPackageInfo.applicationInfo);
// 调整插件中 Activity 的 TaskAffinity
adjustPluginTaskAffinity(mPluginName, mPackageInfo.applicationInfo);

其中regReceivers()是将静态的BroadcastReceiver全部注册为动态的BroadcastReceiver, 然后将mComponents放入Plugin.FILENAME_ 2_COMPONENT_LIST缓存中。之后有两个非常重要的调用:

  • adjustPluginProcess(mPackageInfo.applicationInfo)用以调整插件中组件的进程名称。那它是如何做到的呢?看代码就知道了。

    1
    2
    3
    4
    5
    6
    7
    8
    9
    10
    11
    12
    private void adjustPluginProcess(ApplicationInfo appInfo) {
    HashMap<String, String> processMap = getConfigProcessMap(appInfo);
    if (processMap == null || processMap.isEmpty()) {
    processMap = genDynamicProcessMap();
    }
    ...
    doAdjust(processMap, mComponents.getActivityMap());
    doAdjust(processMap, mComponents.getServiceMap());
    doAdjust(processMap, mComponents.getReceiverMap());
    doAdjust(processMap, mComponents.getProviderMap());
    ...
    }

首先看下getConfigProcessMap()方法:

1
2
3
4
5
6
7
8
9
10
11
12
13
14
15
16
17
18
19
20
21
22
23
24
25
26
27
28
29
30
31
private HashMap<String, String> getConfigProcessMap(ApplicationInfo appInfo) {
HashMap<String, String> processMap = new HashMap<>();
Bundle bdl = appInfo.metaData;
if (bdl == null || TextUtils.isEmpty(bdl.getString("process_map"))) {
return processMap;
}
try {
String processMapStr = bdl.getString("process_map");
JSONArray ja = new JSONArray(processMapStr);
for (int i = 0; i < ja.length(); i++) {
JSONObject jo = (JSONObject) ja.get(i);
if (jo != null) {
String to = jo.getString("to").toLowerCase();
if (to.equals("$ui")) {
to = IPC.getPackageName();
} else {
// 非 UI 进程,且是用户自定义的进程
if (to.contains("$" + PluginProcessHost.PROCESS_PLUGIN_SUFFIX)) {
to = PluginProcessHost.PROCESS_ADJUST_MAP.get(to);
}
}
processMap.put(jo.getString("from"), to);
}
}
} catch (JSONException e) {
if (BuildConfig.DEBUG) {
e.printStackTrace();
}
}
return processMap;
}

其中的appInfo.meta-data其实就是插件中Manifest中定义的meta-data的key-value数据,比如这里demo1这个插件中定义了如下meta-data:

1
2
3
4
5
<meta-data
android:name="process_map"
android:value="[
{'from':'com.qihoo360.replugin.sample.demo1:bg','to':'$p0'}
]" />

可以很清楚地看到插件开发者希望将com.qihoo360.replugin.sample.demo1:bg这个进程映射到p0这个进程(其实是hostpkg:p0进程)。

所以这里getConfigProcessMap()的含义就是如果插件开发者指定了进程的映射关系,就要按照这个映射关系来分配插件进程(当然,如果发现插件进程已经被占用,还是会给它分配别的进程),如果插件开发者根本没指定,那就返回一个空的HashMap.

再回到adjustPluginProcess()方法中,剩下的事情就是对于四大组件逐一去调整那些有自定义进程的组件中的processName.

1.6 调整taskAffinity

在Loader.loadDex()方法中,调整完插件进程信息后,接下来就调用adjustPluginTaskAffinity()方法调整taskAffinity了:

1
2
3
4
5
6
7
8
9
10
11
12
13
14
15
16
17
18
19
20
21
22
23
24
private void adjustPluginTaskAffinity(String plugin, ApplicationInfo appInfo) {
if (appInfo == null) {
return;
}
Bundle bdl = appInfo.metaData;
if (bdl != null) {
boolean useDefault = bdl.getBoolean("use_default_task_affinity", true);
...
if (!useDefault) {
...
String defaultPluginTaskAffinity = appInfo.packageName;
for (HashMap.Entry<String, ActivityInfo> entry : mComponents.getActivityMap().entrySet()) {
ActivityInfo info = entry.getValue();
...
// 如果是默认 TaskAffinity
if (info != null && info.taskAffinity.equals(defaultPluginTaskAffinity)) {
info.taskAffinity = info.taskAffinity + "." + plugin;
...
}
}
}
}
}

这个方法其实很简单,即如果use_default_task_affinity为false,即不使用默认的taskAffinity值,那么就将Activity的taskAffinity修改为在之前的基础上加上”.”和plugin名称,代码为:

1
info.taskAffinity = info.taskAffinity + "." + plugin;

显然,这样做的目的是为了将各个插件的Activity的任务栈完全区分开来,以避免出现雷同导致影响用户体验。

1.7 资源解析

再回到Loader.loadDex()方法中,如果加载类型是Plugin.LOAD_INFO,那么到这里就可以直接返回了。否则下一步进行资源的解析:

1
2
3
4
5
6
7
8
9
10
11
12
try {
if (BuildConfig.DEBUG) {
// 如果是Debug模式的话,防止与Instant Run冲突,资源重新New一个
Resources r = pm.getResourcesForApplication(mPackageInfo.applicationInfo);
mPkgResources = new Resources(r.getAssets(), r.getDisplayMetrics(), r.getConfiguration());
} else {
mPkgResources = pm.getResourcesForApplication(mPackageInfo.applicationInfo);
}
} catch (NameNotFoundException e) {
...
return false;
}

这里分两种情况,如果是Debug模式,为了防止与Instant Run冲突,就new一个资源对象; 否则调用PackageManager的getResourcesForApplication()获取插件的资源对象,之后将资源放入缓存中。

1.8 创建PluginDexClassLoader

再继续看Loader.loadDex()方法,首次加载插件时,需要创建PluginDexClassLoader对象,创建之前需要以下参数:

  • optimizedDirectory,即loadDex()方法中的out,其路径类似”/data/user/0/me.ele.repluginhostsample/app_plugins_v3/oat/arm64”这样
  • 父ClassLoader,由于ClassLoader都是双亲委托的方式工作,release模式时采用的是getClass().getClassLoader().getParent(),我们知道getClass().getClassLoader()获取的是宿主的PathClassLoader,所以这里最后获取的是PathClassLoader的parent
  • so文件夹,可通过PackageInfo.applicationInfo.nativeLibraryDir获得

之后就开始了PluginDexClassLoader的创建:

1
2
3
4
5
6
7
8
9
public PluginDexClassLoader(PluginInfo pi, String dexPath, String optimizedDirectory, String librarySearchPath, ClassLoader parent) {
super(dexPath, optimizedDirectory, librarySearchPath, parent);
installMultiDexesBeforeLollipop(pi, dexPath, parent);
mHostClassLoader = RePluginInternal.getAppClassLoader();
initMethods(mHostClassLoader);
}

super()的调用就不说了,因为PluginDexClassLoader继承自DexClassLoader嘛,之后是对于Android 5.0之前的ROM需要安装多个dex,代码如下:

1
2
3
4
5
6
7
8
9
10
11
12
13
14
15
16
17
18
19
20
21
22
23
24
25
26
27
28
29
30
31
32
33
34
35
36
37
38
39
40
41
42
43
44
45
46
47
48
49
50
51
52
private void installMultiDexesBeforeLollipop(PluginInfo pi, String dexPath, ClassLoader parent) {
if (Build.VERSION.SDK_INT >= Build.VERSION_CODES.LOLLIPOP) {
return;
}
try {
// get paths of extra dex
List<File> dexFiles = getExtraDexFiles(pi, dexPath);
if (dexFiles != null && dexFiles.size() > 0) {
List<Object[]> allElements = new LinkedList<>();
// get dexElements of main dex
Class<?> clz = Class.forName("dalvik.system.BaseDexClassLoader");
Object pathList = ReflectUtils.readField(clz, this, "pathList");
Object[] mainElements = (Object[]) ReflectUtils.readField(pathList.getClass(), pathList, "dexElements");
allElements.add(mainElements);
// get dexElements of extra dex (need to load dex first)
String optimizedDirectory = pi.getExtraOdexDir().getAbsolutePath();
for (File file : dexFiles) {
if (LogDebug.LOG && RePlugin.getConfig().isPrintDetailLog()) {
LogDebug.d(TAG, "dex file:" + file.getName());
}
DexClassLoader dexClassLoader = new DexClassLoader(file.getAbsolutePath(), optimizedDirectory, optimizedDirectory, parent);
Object obj = ReflectUtils.readField(clz, dexClassLoader, "pathList");
Object[] dexElements = (Object[]) ReflectUtils.readField(obj.getClass(), obj, "dexElements");
allElements.add(dexElements);
}
// combine Elements
Object combineElements = combineArray(allElements);
// rewrite Elements combined to classLoader
ReflectUtils.writeField(pathList.getClass(), pathList, "dexElements", combineElements);
// delete extra dex, after optimized
FileUtils.forceDelete(pi.getExtraDexDir());
...
}
} catch (Exception e) {
e.printStackTrace();
}
}

可以看到,这个安装方式跟Google提供的MultiDex安装方式基本相同,不再赘述。

之后是通过反射获取到宿主的loadClass()方法,后面在类的加载时会用到。

1.9 总结

到这里,就全部完成了一个插件的加载。总结一下,插件加载过程中主要做了以下事情:

  • 将插件文件解压到目标目录中
  • 解析插件的所有组件信息
  • 调整插件的进程信息(其实就是进行映射)
  • 调整插件中Activity的taskAffinity
  • 解析插件中的资源
  • 创建PluginDexClassLoader
  • 可以看出,每个插件有自己的资源对象(Resources对象),类加载器(PluginDexClassLoader)

2.上下文替换

2.1 插件中ApplicationContext替换

在Loader.loadDex()方法的最后,有如下语句:

1
mPkgContext = new PluginContext(mContext, android.R.style.Theme, mClassLoader, mPkgResources, mPluginName, this);

在这里就创建了一个PluginContext对象,那这个PluginContext对象在哪里被调用呢?

其实就在插件被加载之后!!!

看Plugin.load()方法:

1
2
3
4
5
6
7
8
9
10
11
12
13
14
15
16
final boolean load(int load, boolean useCache) {
PluginInfo info = mInfo;
boolean rc = loadLocked(load, useCache);
// 尝试在此处调用Application.onCreate方法
// Added by Jiongxuan Zhang
if (load == LOAD_APP && rc) {
callApp();
}
// 如果info改了,通知一下常驻
// 只针对P-n的Type转化来处理,一定要通知,这样Framework_Version也会得到更新
if (rc && mInfo != info) {
UpdateInfoTask task = new UpdateInfoTask((PluginInfo) mInfo.clone());
Tasks.post2Thread(task);
}
return rc;
}

其中loadLocked()方法就是我们前面讨论过的插件的加载过程,插件的所有数据都加载到内存之后,下一步要做的事情是什么?

当然就是启动插件了,启动的入口当然就是插件的Application.

其中的callApp()方法如下:

1
2
3
4
5
6
7
8
9
10
11
12
13
private void callApp() {
if (Looper.myLooper() == Looper.getMainLooper()) {
callAppLocked();
} else {
// 确保一定在UI的最早消息处调用
mMainH.postAtFrontOfQueue(new Runnable() {
@Override
public void run() {
callAppLocked();
}
});
}
}

显然,这个方法的作用就是为了在宿主的UI线程中调用callAppLocked()方法:

1
2
3
4
5
6
7
8
9
10
11
12
13
14
15
16
17
18
19
20
21
22
23
private void callAppLocked() {
// 获取并调用Application的几个核心方法
if (!mDummyPlugin) {
// NOTE 不排除A的Application中调到了B,B又调回到A,或在同一插件内的onCreate开启Service/Activity,而内部逻辑又调用fetchContext并再次走到这里
// NOTE 因此需要对mApplicationClient做判断,确保永远只执行一次,无论是否成功
if (mApplicationClient != null) {
// 已经初始化过,无需再次处理
return;
}
mApplicationClient = PluginApplicationClient.getOrCreate(
mInfo.getName(), mLoader.mClassLoader, mLoader.mComponents, mLoader.mPluginObj.mInfo);
if (mApplicationClient != null) {
mApplicationClient.callAttachBaseContext(mLoader.mPkgContext);
mApplicationClient.callOnCreate();
}
} else {
if (LOGR) {
LogRelease.e(PLUGIN_TAG, "p.cal dm " + mInfo.getName());
}
}
}

可以看到,这个方法主要做的事情就是创建一个PluginApplicationClient对象,这个对象中封装了对于插件Application的操作,之后调用PluginApplicationClient.callAttachBaseContext()和PluginApplicationClient.callOnCreate()其实是通过反射调用插件Application的attachBaseContext()和onCreate()方法

而在PluginApplication调用的callAttachBaseContext()中传入的Context就是在Loader.loadDex()中创建的PluginContext对象,可见PluginContext充当的作用是插件中的ApplicationContext.

2.2 插件中ActivityContext替换

PluginContext除了替换了插件中的ApplicationContext之外,其实还替换了插件中各个Activity的Context, 看replugin-plugin-library这个库中的PluginActivity.attachBaseContext()方法:

1
2
3
4
5
@Override
protected void attachBaseContext(Context newBase) {
newBase = RePluginInternal.createActivityContext(this, newBase);
super.attachBaseContext(newBase);
}

这里的RePluginInternal.createActivity()最终会通过反射调用到Factory2的createActivityContext()方法:

1
2
3
public static final Context createActivityContext(Activity activity, Context newBase) {
return sPLProxy.createActivityContext(activity, newBase);
}

之后调用到PluginLibraryInternalProxy中的createActivityContext()方法:

1
2
3
4
5
6
7
8
9
10
11
12
public Context createActivityContext(Activity activity, Context newBase) {
// 此时插件必须被加载,因此通过class loader一定能找到对应的PLUGIN对象
Plugin plugin = mPluginMgr.lookupPlugin(activity.getClass().getClassLoader());
if (plugin == null) {
if (LOG) {
LogDebug.d(PLUGIN_TAG, "PACM: createActivityContext: can't found plugin object for activity=" + activity.getClass().getName());
}
return null;
}
return plugin.mLoader.createBaseContext(newBase);
}

而这里的Loader.createBaseContext()方法中就创建了PluginContext对象:

1
2
3
final Context createBaseContext(Context newBase) {
return new PluginContext(newBase, android.R.style.Theme, mClassLoader, mPkgResources, mPluginName, this);
}

2.3 为什么要进行上下文替换

最主要的原因就是对于插件中依赖Context的调用,都需要重写,让它以插件的身份进行合适的操作,所以可以看到PluginContext这个类中重写了ContextWrapper和ContextThemeWrapper的很多方法, 包括我们常用的startActivity(), startService(), stopService(), bindService()等等:

  • bindService(Intent,ServiceConnection, int):boolean
  • deleteFile(String): boolean
  • getApplicationContext(): Context
  • getApplicationInfo(): ApplicationInfo
  • getAssets(): AssetManager,这个是重写了ContextThemeWrapper中的方法
  • getCacheDir(): File
  • getClassLoader(): ClassLoader
  • getDatabasePath(String): File
  • getDatabaseDir():File
  • getDir(String, int): File
  • getFilesDir(): File
  • getFileStreamPath(String): File
  • getPackageCodePath(): String
  • getPackageName():String
  • getResources(): Resources
  • getSharedPreferences(String, int): SharedPreference
  • getSystemService(String): Object,这个是重写了ContextThemeWrapper的方法
  • handleCreateView(String, Context, AttributeSet): View
  • makeFilename(File, String): File
  • openFileInput(String): FileInputStream
  • openFileOutput(String, int): FileOutputStream
  • startActivity(Intent): void
  • startActivity(Intent, Bundle): void
  • startService(Intent): ComponentName
  • stopService(Intent): boolean
  • unbindService(ServiceConnection): void